COMPLETING OF THE WORK
BACK AND SHELLS
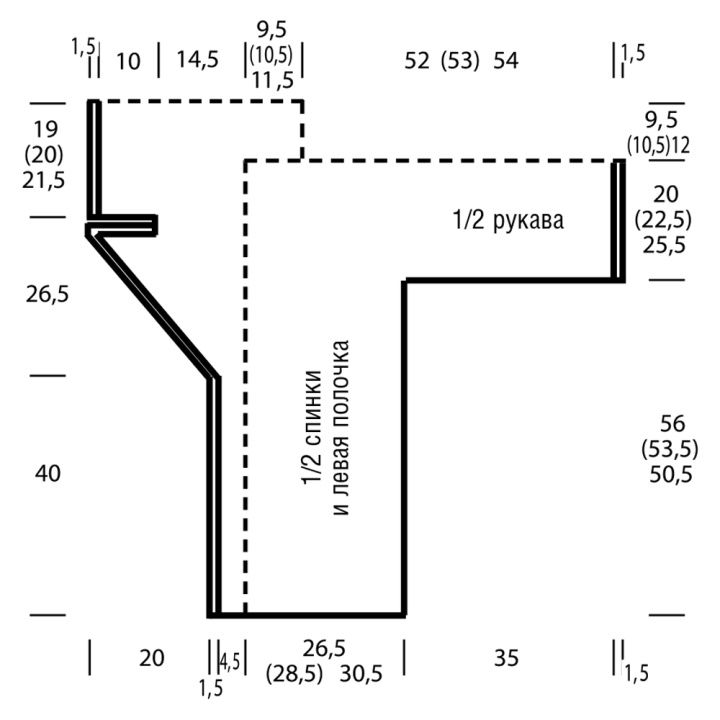
On the needles No. 8, dial 121 (129) 137 loops with a cruciform dial and knit the main pattern between the patent edges.
Attention!
Between the patent edges, the outer parts of 31 (33) 35 sections form shelves, the middle ones 53 (57) 61 sections - the backrest.
After 21.5 cm = 32 rows from the initial row, perform in the right shelf 1 a pair of button holes. To do this, knit 2 loops in the front row after the patent edge, then knit 2 loops together on the front and make 1 nakid, knit 10 loops, 2 knit the loops together on the front and make 1 nakid. Nakida in purl row to knit acc. patterned.
Perform a second pair of buttonhole holes in 13.5 cm = 20 rows in the same way.
For a lapel after 40 cm = 60 rows from the initial row, add on both sides after and in front of the patent edge, respectively, 1 face cross of a transverse thread and include in the pattern. Repeat this increase 19 more times in each 2nd row.
Through 56 cm = 84 rows (53.5 cm = 80 rows) 50.5 cm = 76 rows from the initial row, i.e. after 12 (10) of the 8th extension for the lapel, on the needles a total of 145 (149) 153 loops. Then finish the parts separately.
TOP OF THE RIGHT SHELF WITH SLEEVE
On the first 46 hinges continue to work according. the pattern, the remaining loops to leave and on the right edge continue to carry out increases for the lapel.
At the same time, in the 1st row from the division of work, type 38 new loops for the knitted sleeve along the left edge, including the first 35 points to include in the main pattern, the remaining 3 points to knit with the patent edge. After the last increase for the lapel, the total number of loops will reach 92 (94) 96 p.
To cut the lapel through 66.5 cm = 100 rows from the initial row, close 13 loops using a hollow-cord (i-cord) technique as follows: * knit 2 loops of the pattern 1 with the front loops, knit the 3rd loop with the next loop with the front loop tilted (Remove 1 loop, as front, 1 face, then stretch it through the removed loop), return the 3 loops of the patent edge to the left needle, repeat * 9 times from *, then close the 3 loops of the patent edge, as facial loops.
At the end of the next purl row, collect 13 new loops and continue working with the patent edge according to patterned.
After 76 cm = 114 rows from the initial row, continue work only on the loops of the patent edge and the first 34 (35) 36 loops for the back of the collar acc. pattern, the last 52 (53) 54 p. + 3 p. of the patent edge to leave for the line of the shoulder / sleeve.
After 9.5 cm = 14 rows (10.5 cm = 16 rows) 12 cm = 18 rows from the start of knitting the collar, leave the loop.
UPPER PART OF LEFT SHELF WITH SLEEVE
Knit the same way as the upper part of the right shelf, but in mirror image and without holes for buttons, to cut the lapel in the 100th row from the initial row (= purl row) to close the 13th paragraph as follows: * 2 knit the loops of the paired edge with the wrong side , Knit the 3rd loop with the next loop together with the purl, return the 3 loops of the patent edge to the left knitting needle, from * repeat 9 more times, then close the 3 loops of the patent edge, as facial loops. These 13 loops again dial in the next front row.
TOP OF THE BACK WITH SLEEVES
Dial 38 loops on the spokes on the front row of the front of the right sleeve, then knit 53 (57) 61 p
. pattern with a patent edge on both sides, while starting with 1 purl row.
After 76 cm = 114 rows, leave loops from the initial row, while the average 19 (21) 23 sections form the neck, the outer parts of 52 (53) 54 paragraph + 3 paragraphs of the patent edge form a shoulder / sleeve line.
ASSEMBLY
For the shoulder seams and the seams of the sleeves, the back and the shelves should be folded inward, and the left shoulder / sleeve loops are parallel to each other on separate needles. Start from the right edge: knit 55 (56) 57 x 2 p. (1 p. With each knitting needle) together front and close; 57 x 2 p. Together front and close.
The left collar loops should be knitted with a knitted stitch and sewed into the collar. Sew buttons on the left shelf.