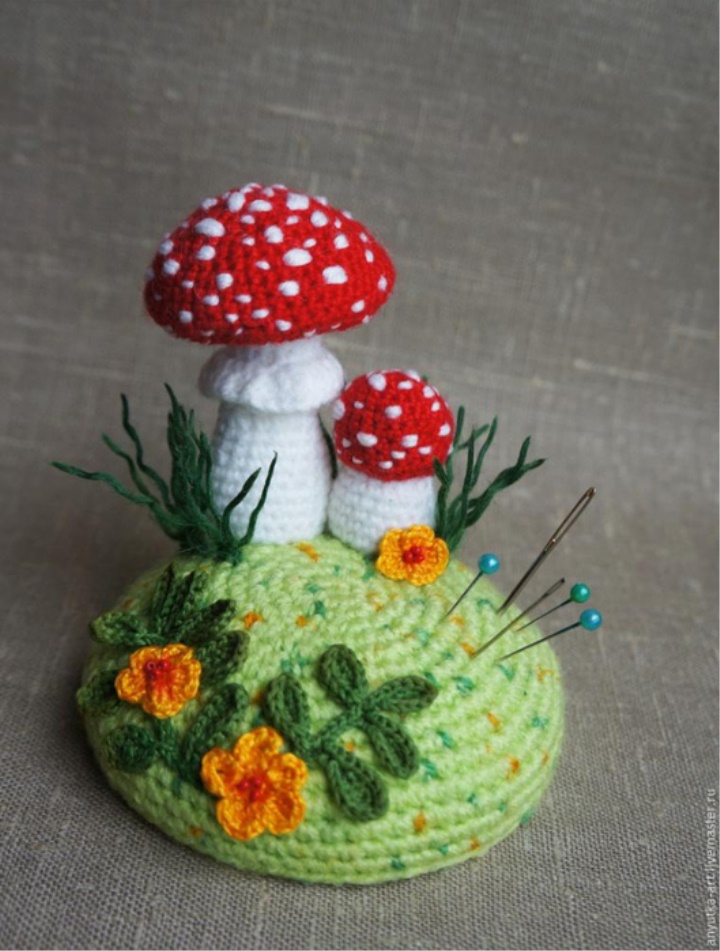
In the first part of the master class, we knitted aspen mushrooms - mushrooms, which are not ashamed to put in the basket. Now I propose to link the mushrooms, which people usually bypass. Yes, toadstools (what a shameful word!) Are not edible, and even sometimes poisonous. But what they are bright, elegant, and most importantly fabulous! And of course, among them the first place in beauty is occupied by the Amanita. With them we begin. And if there is a mood, then in the company of amanita we will impose graceful little pimples and cute snails. Knitting these needles is not much more difficult than a needle case with aspen mushrooms, but it will take more time.
For the manufacture of needle bar you need to be able to: knit a single crochet column, a connecting column (half column), a double crochet column, a column with one, two, three naffs, increase, decrease and spiral knit. It is also desirable to be able to knit amigurumi ring.
If something of the above is unfamiliar to you, then I recommend watching the training workshops, which are very numerous on the Internet.
fine yarn for leaves and flowers (cotton is best - "Iris", "chamomile", "coco", "rose", etc.);
flap tissue. It is better to take a fabric of medium density, green or neutral colors (I used linen);
All-purpose glue (I used "Moment Crystal").
brushes for glue, paint, varnish.
sbn - column without nakida.
We knit the basis of the needle bed and the details of the mushrooms in a spiral (without lifting loops).
How to knit the base of the needle case, we disassembled in the first part of the master class. For these needle cases, the base fits in the same way. Only we sew leaves and flowers after the base-hillock is completely ready.
If it is still difficult for you to knit small parts from fine yarn, then you can decorate the needle bed as you did on the needle case with boletus - flowers and twigs to embroider.
Amanitas I knitted from Alize baby wool yarn (175 m / 50 g, 40% wool, 40% acrylic, 40% bamboo).
5-8th ranks: 24 sat.
14th-16th rows: 16 sat.
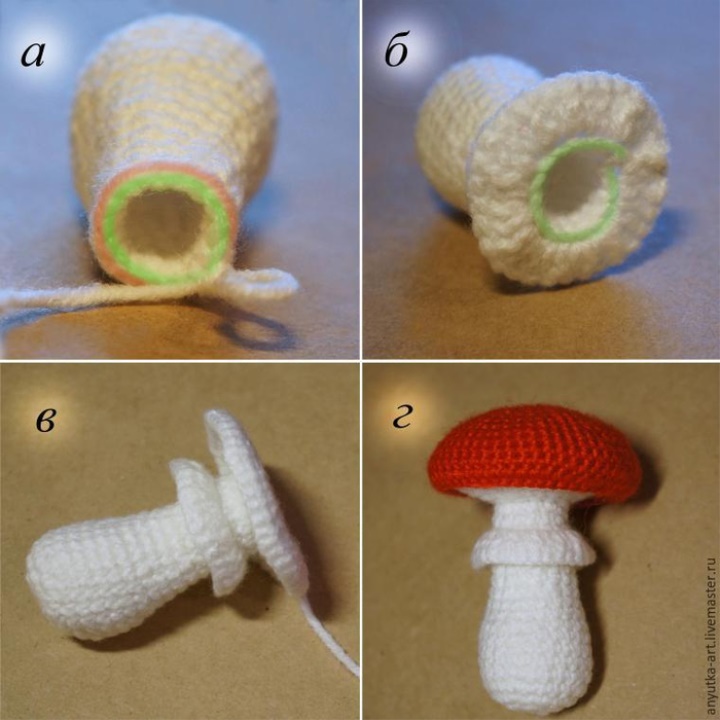
17th row: On the near (front) half-loops, we knit a collar (photo a, front half-loops are marked in pink). We knit in each half-loop with 2 double crochets. Closing the knit connecting column. We cut the thread and "tail" hiding in the thickness of the canvas. Collar ready (photo b).
We attach the yarn and knit 16 knit on the distant (purl) half-loops (in photo a, b, purl half-loops are marked in green).
Next, knit for both half-loops.
18-19th rows: 1 decrease in each row = 14 sbn.
If you want the lower part of the cap to be more clearly separated from the leg, then knit the first row with the additions, on the near half-loops (in our case it is the 20th row). Then knit as usual, for both half-loops.
The foot is ready (photo in).
We collect a fly agaric in the same way that a large orange-cap boletus was collected (photo d).
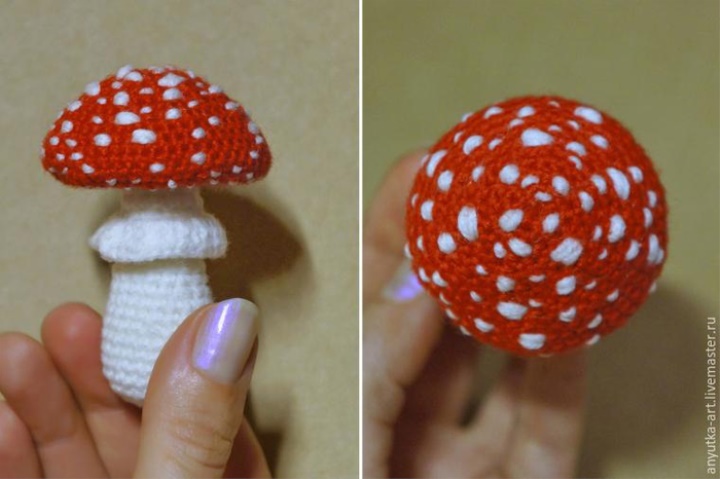
Embroider on the speckled hat.
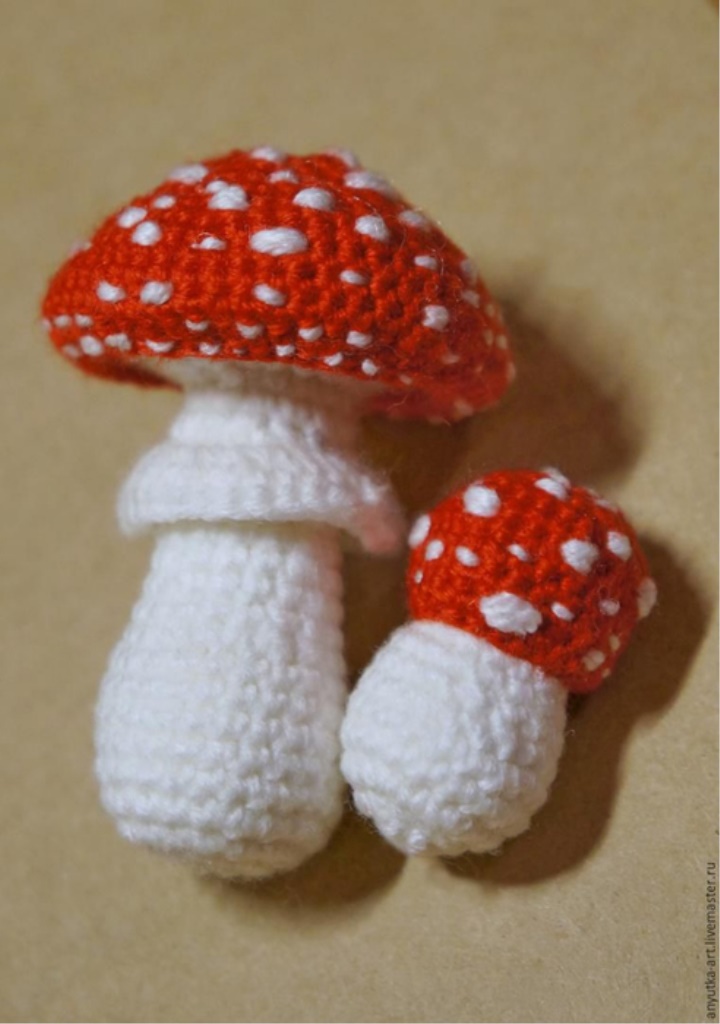
Little fly agaric
1) Hat
1st row: 6 sbn in the ring amigurumi;
2-4th rows: 6 increments in each row = 24 UHF;
5-8th ranks: 24 sat.
9th row: 4 increments = 20 sbn.
2) Leg
1st row: 6 sbn in the ring amigurumi;
2-3rd rows: 6 increments in each row = 18 Sbn;
4th row: 2 increments = 20 sat;
5th row: 20 Sat;
6-7th rows: 2 increments in each row = 16 sbn;
8-9th rows: on 16 sbn.
Fly agaric collect as well as collected small orange-cap boletus.
Embroider speckles.
Mushrooms are ready.
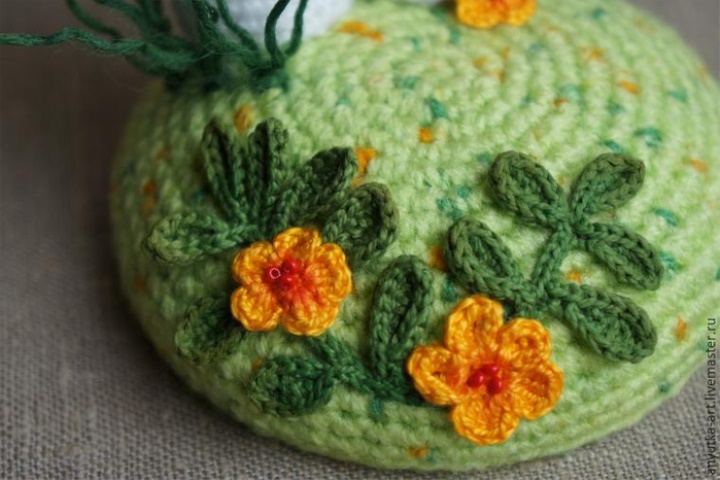
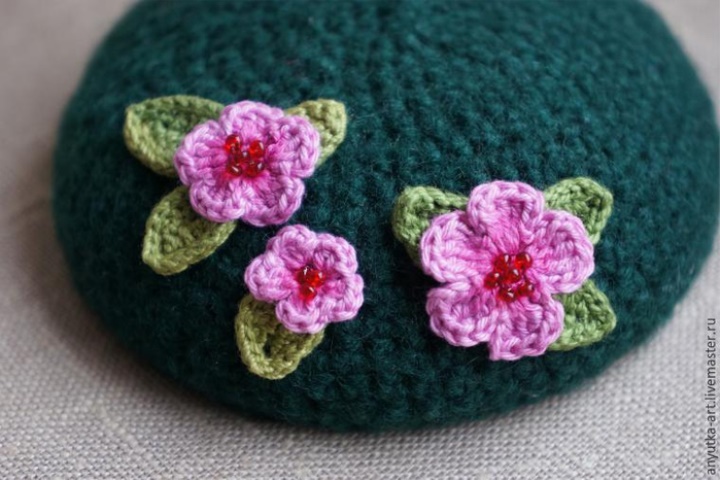
Flowers, twigs, leaves
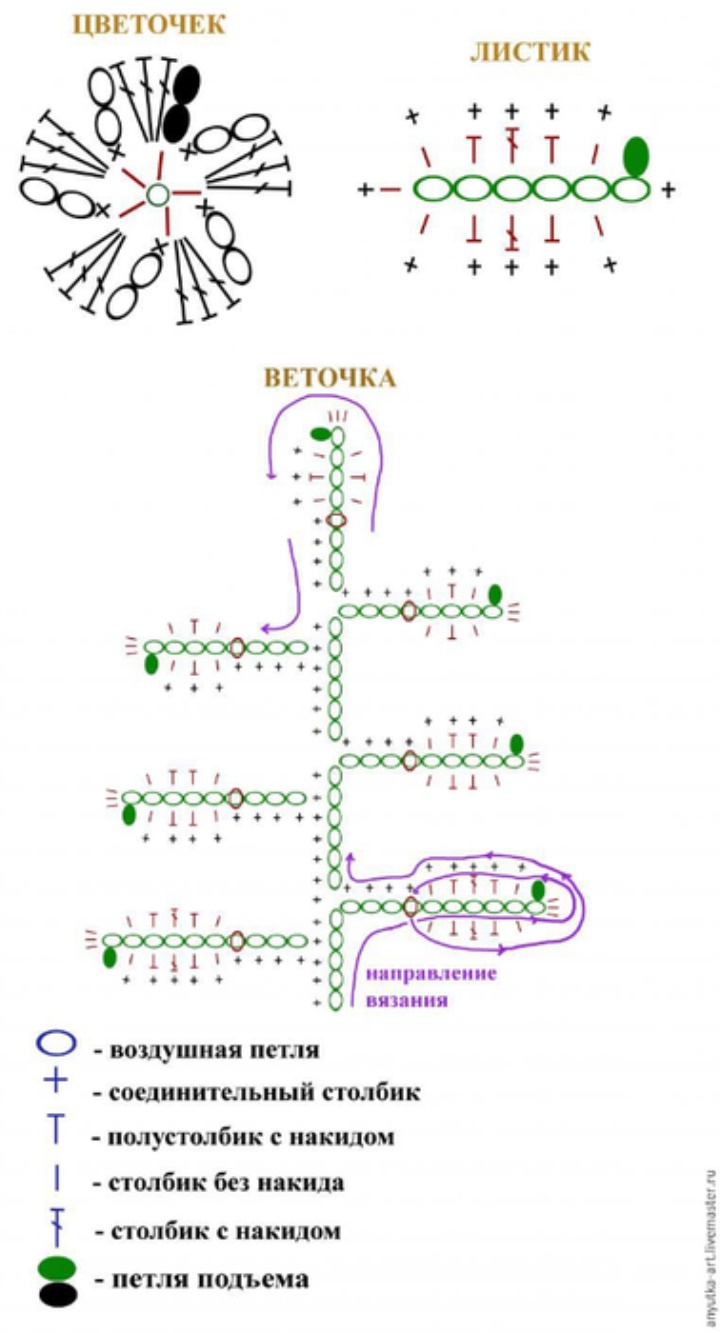
The simplest flower can be connected according to the scheme shown in the figure below.
If you want a bigger flower, instead of two lifting loops, tie three loops, and for petals, knit the posts not with one, but with two crochets.
An even bigger flower will come out if you tie four loops of lift, and for petals you will knit columns with three naquids.
The leaves also fit very easily. If you want to make a bigger leaf, then increase the number of loops of the initial chain and, accordingly, the number of double crochets in the middle of the leaf.
The diagram shows a fragment of a twig. You can tie a twig of the length that you need, just by adding the right amount of leaves. You can also reduce or increase the distance between the leaves by connecting more air loops between them.
We collect needle bed
Sew the twigs and flowers. And how to sew mushrooms and make blade of grass, described in the first part of the master class.
Needle is ready.
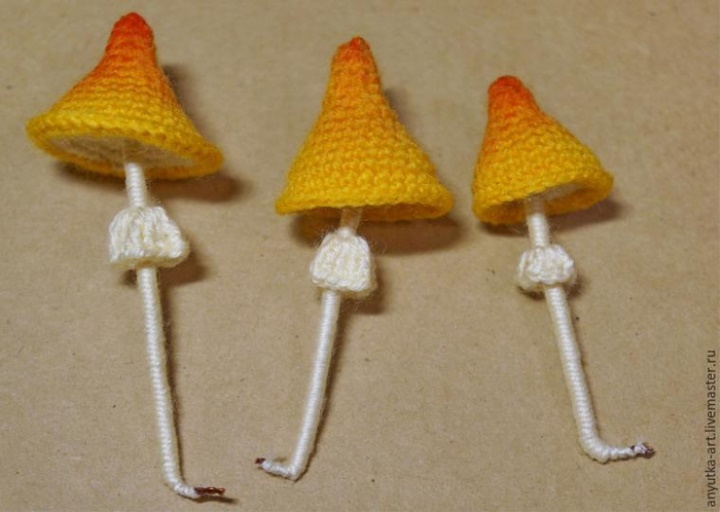
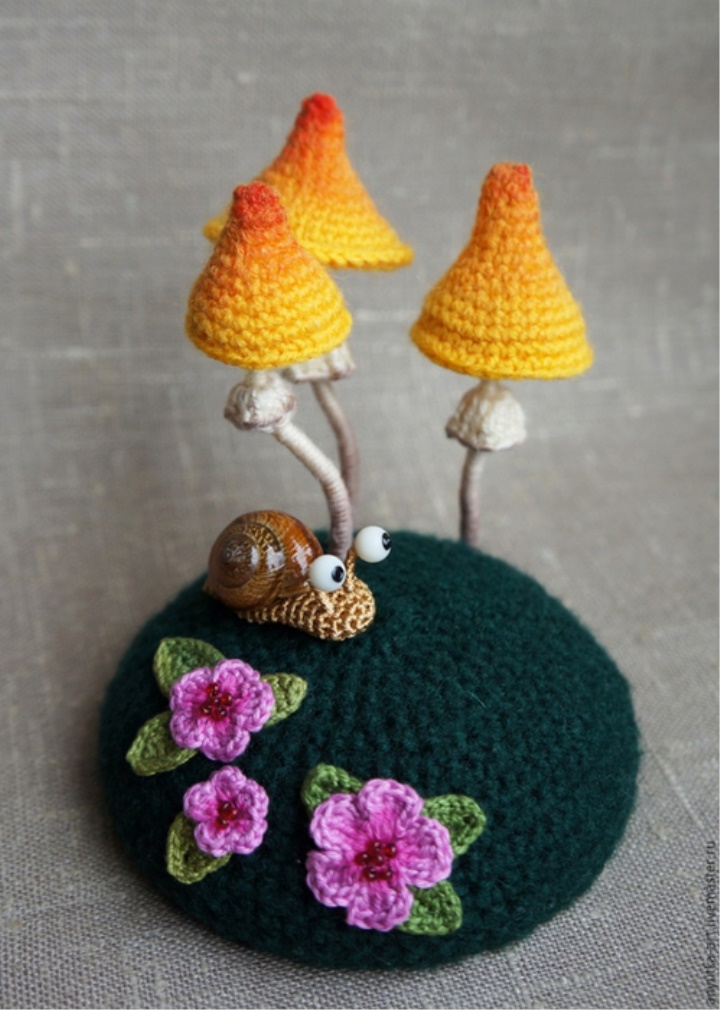
Needle with toadstools
Although they call all inedible mushrooms toadstools, but no, of course, they are not filthy, but very nice!
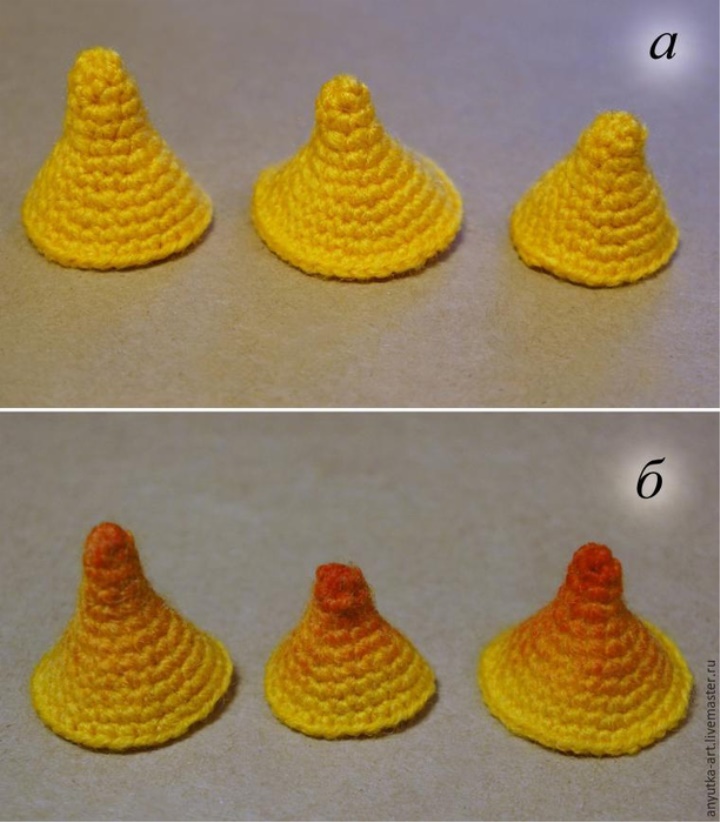
We have three mushrooms with caps, slightly differing in shape and size. Below is a description of all three hats.
You can tie all the hats different, and you can make the same.
Hat 1
1st row: 5 sbn in the ring amigurumi;
2-5th rows: 1 increase in each row = 9 sbn;
6-12th rows: 3 increments in each row = 30 sbn.
Hat 2
1st row: 5 sbn in the ring amigurumi;
2-3rd rows: 1 increase in each row = 7 sbn;
4-6th rows: 3 increments in each row = 16 sbn;
7-11th rows: 4 increments in each row = 36 sbn.
Hat 3
1st row: 5 sbn in the ring amigurumi;
2nd row: 1 increase = 6 sbn;
3-9th rows: 3 increments in each row = 16 sbn;
10th row: 24 Arb.
The thread at the end of knitting cut off.
Hats are ready (photo a).
I decided to toned them with acrylic paint.
To do this, I moistened the caps and dipped the red paint diluted in ink.
Turned caps and left to dry. The paint itself was distributed on a wet canvas, as needed (photo b).
Lower part of the cap
For bonnet 1
1st row: 6 sbn in the ring amigurumi;
2nd to 5th rows: 6 increments in each row = 30 sbn.
For a hat 2
1st row: 6 sbn in the ring amigurumi;
2-6th rows: 6 increments in each row = 36 sbn.
For bonnet 3
1st row: 6 sbn in the ring amigurumi;
2-4th rows: 6 increments in each row = 24 sbn.
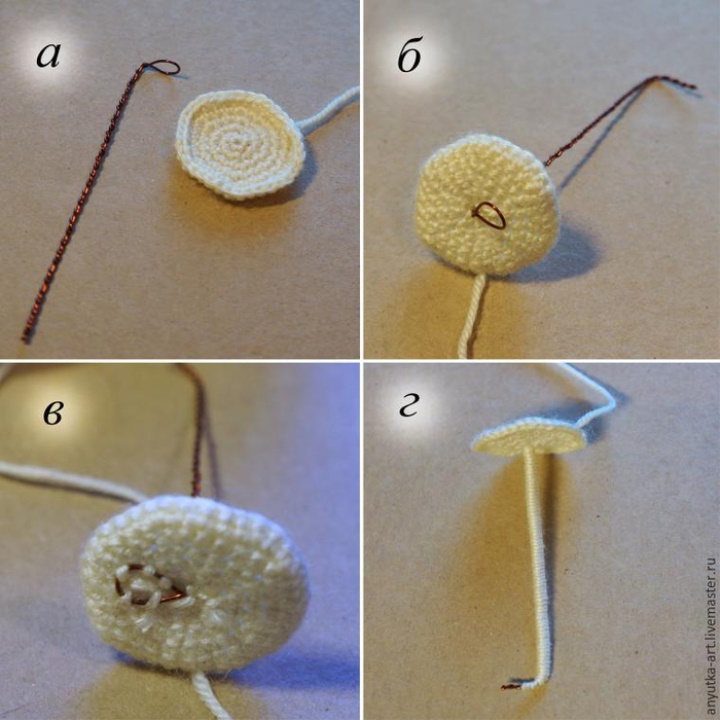
Leg
For the legs we twist the wire leaving a loop (photo a).
We put on the lower part of the cap on the leg (photo b).
The tip of the wire bend the letter G.
We thread the tip of the yarn with a needle into the middle of the circle (do not cut it off from the coil) and sew it with a wire loop with the tip (photo c).
We grease the wire with glue and wind the yarn. We try to wind the coil to the coil, without overlaps. I made three layers of winding. Before each new layer we grease the foot with glue (photo g).
Connect the cap and leg.
When we knit the aspen mushrooms (and the toadstools), we turned the mushroom with its foot and introduced the hook under the loop of the lower part of the cap. With this method, the edges of the cap are slightly tucked inward.
We do not need poganochek to wrap the cap. Therefore, turn the mushroom top of the cap towards you and insert the hook under the loop of the top of the cap (photo a).
Pull out the loop (photo b).
We make a lifting loop and connect the parts of the caps by knitting a series of non-crocheted columns (photo c).
You can additionally link the second row.
Do not forget to leave a hole for stuffing. We put the filler only in the top of the cap, otherwise the lower part of the cap will protrude ugly.
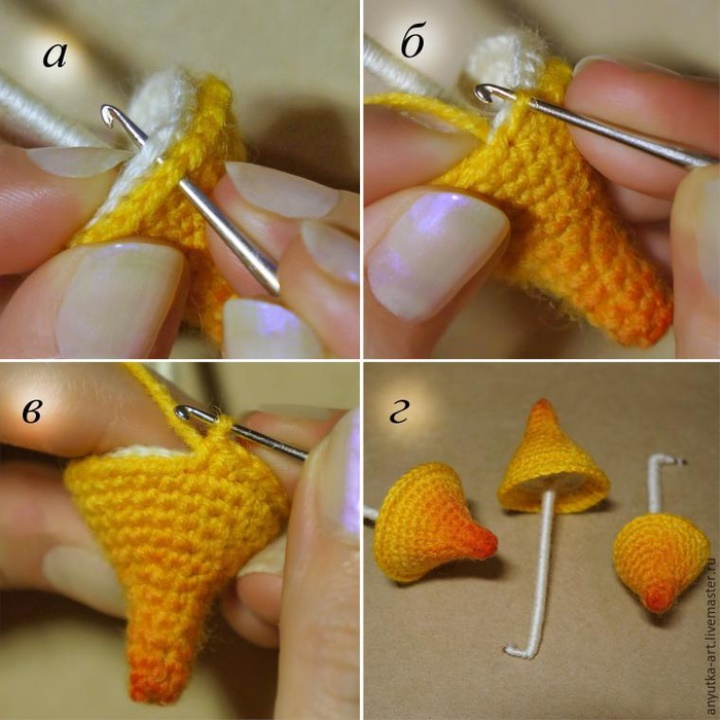
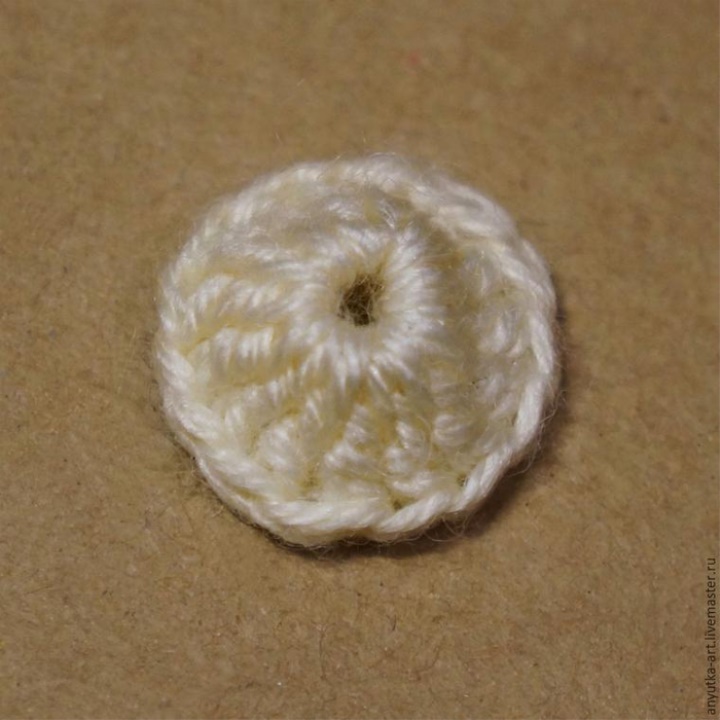
Knit the collar.
In the ring amigurumi we knit 15 double crochets. Closing the circle, knitting the connecting column.
Put on collars on legs and sew.
Poganochki ready.
Sew on the basis of flowers and leaves.
We choose the place on the needle room where the mushrooms will grow.
Using needles or a toothpick, we make holes in the cloth of the needle case.
Lubricate the curved ends of the legs with glue and glue to the needle bed.
Dried.
Monofilament sew legs to the needle bed, alternately picking up the threads on the base of the legs and on the needle bed.
I decided the lower part of the legs and the collars of mushrooms slightly toned with brown paint. It seems to me that it came out so lively.
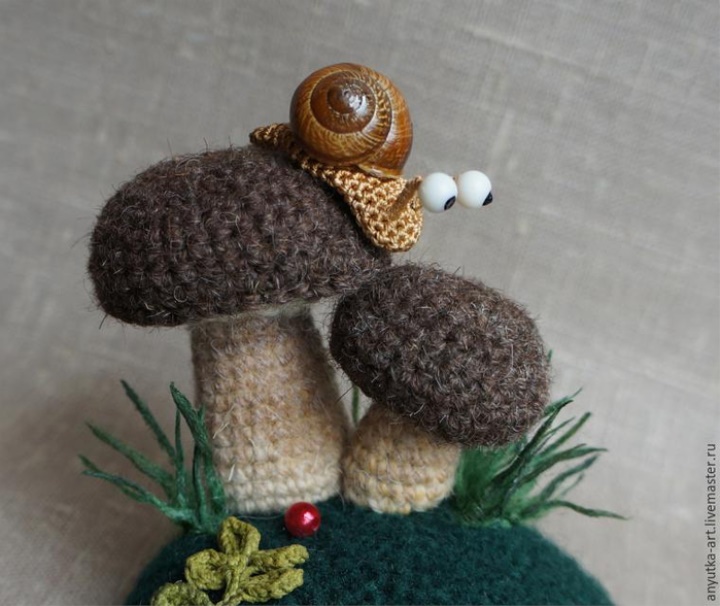
Run the snail. Needle with toadstools ready.
Snail with a real shell
I think the photos are clear how to make such a little snail. But, just in case, I will explain some points.
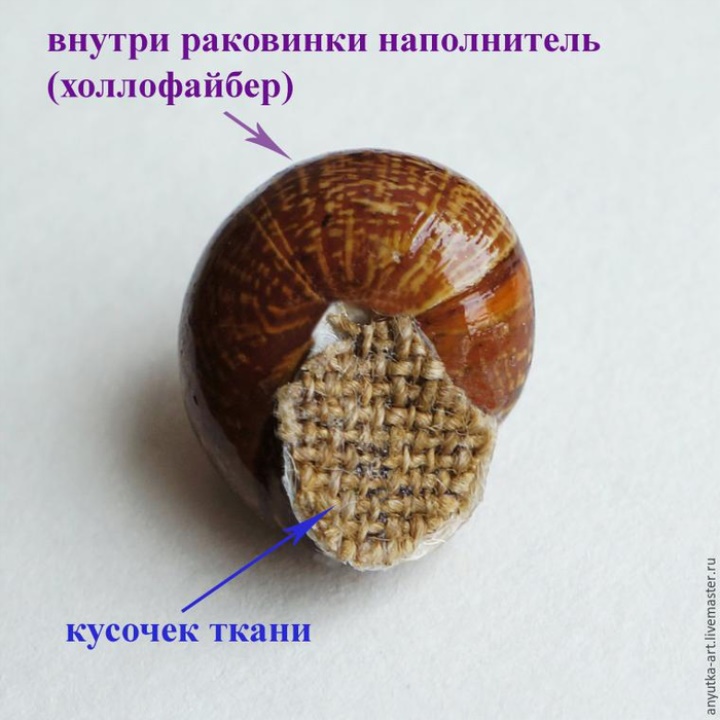
Sink preparation
We will need empty land shells or aquatic snails. I gathered shells in the forest, washed them well and dried them. Then covered with three layers of lacquer with intermediate drying of each layer. Varnish is needed not only for beauty, but also for enhancing durability, since the shells of land snails are quite fragile.
I filled the shell with holofiber. The white filler shines through the translucent walls and the pattern on the sink is beautifully highlighted. Well, again, additional reinforcement. In the widest part of the shell (mouth), I used the glue on the inner surface of the wall so that the filler would hold well and seal the mouth with a piece of cloth.
Snail body
I knitted the body from Tulip YarnArt yarn (250 m / 50 g. 100% microfiber).
Since your shell may have a different size and yarn of a different thickness, you may have to change the number of additions and rows:
If you need to make the body wider, then simply increase the number of rows with additions in front of the body (shown in the photo by the red bracket).
If you need to lengthen the cochlea, then increase the number of rows in the middle part of the body (marked with a blue bracket).
“Tail” knit according to the above description (green bracket), its dimensions will change themselves, according to your changes in the scheme.

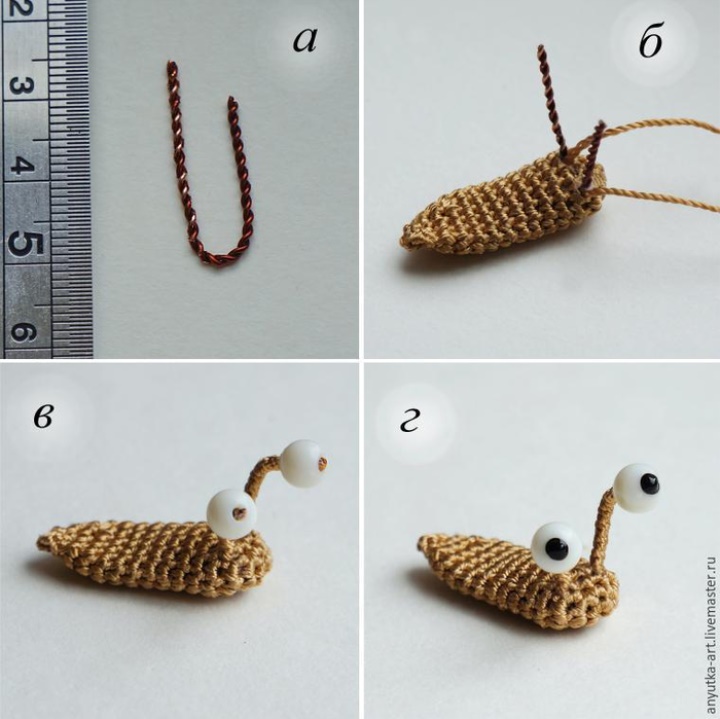
Snail eyes
For the eyes fit any white or colored, light beads. You can also paint the wooden beads with acrylic paint, or make polymer clay eyes.
Before inserting the wire into the head of the cochlea, make holes with a needle or toothpick, otherwise the filler will cling to the ends of the wire (photo a, b).
Wear the bead so that the hole is completely closed (photo c). Do not forget to glue the tip of the wire.
I made eyes from acrylic beads, and my pupils painted with black acrylic contour (photo d).
Glue the shell on the back of a snail.
Here's a little thing turned out.
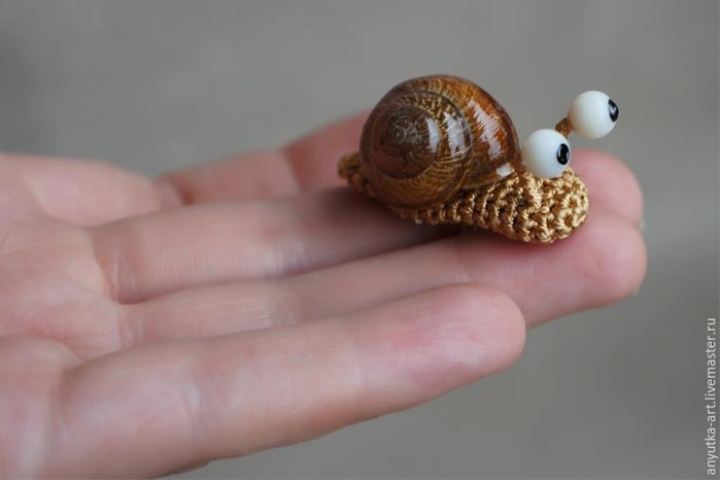
Crawled to examine the mushrooms ... Curious!
If you do not have these shells, then the snail can be made completely knitted.
Knitted snail
I knitted a snail shell from “Rose” Vita yarn (100% cotton, 150 m / 50 g).
The body is made of “Iris” yarn (100% cotton).
Shell
Attention! Knit for distant half loops!
1st row: 5 sbn in the ring amigurumi;
2-4th rows: 1 increase in each row = 8 sbn;
5th row: 8 Sat;
6th row: 1 increase = 9 sbn;
7th row: 9 Sat;
8th row: 1 increase = 10 sbn;
9th row: 10 Sat;
10th row: 1 increase = 11 kn;
11th row: 11 Sat;
12th-26th rows: 1 increase in each row = 25 Sbn;
27th row: 3 increments = 28 sbn.
We have a cone with a “ribbed” pattern due to an unpaired half-string (photo a). We finish knitting with a connecting column.
We unfold knitting and knit connecting columns on un-tied front half-loops (photo b).
When all half-loops are knitted, we cut the thread leaving a long “tail” (photo c).
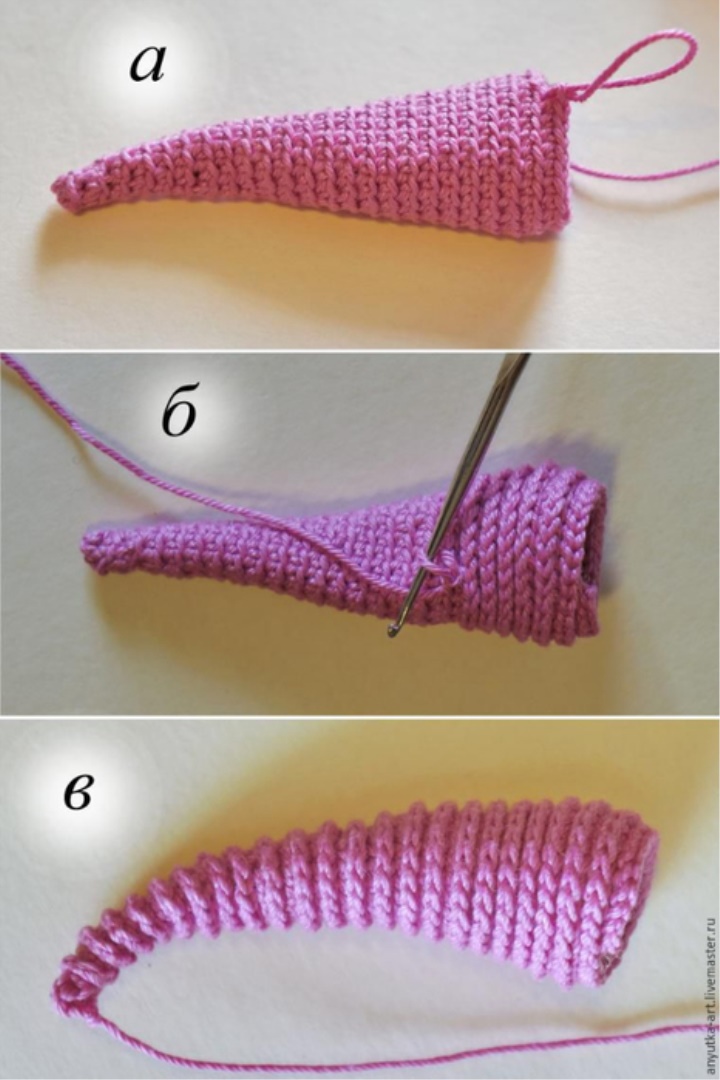
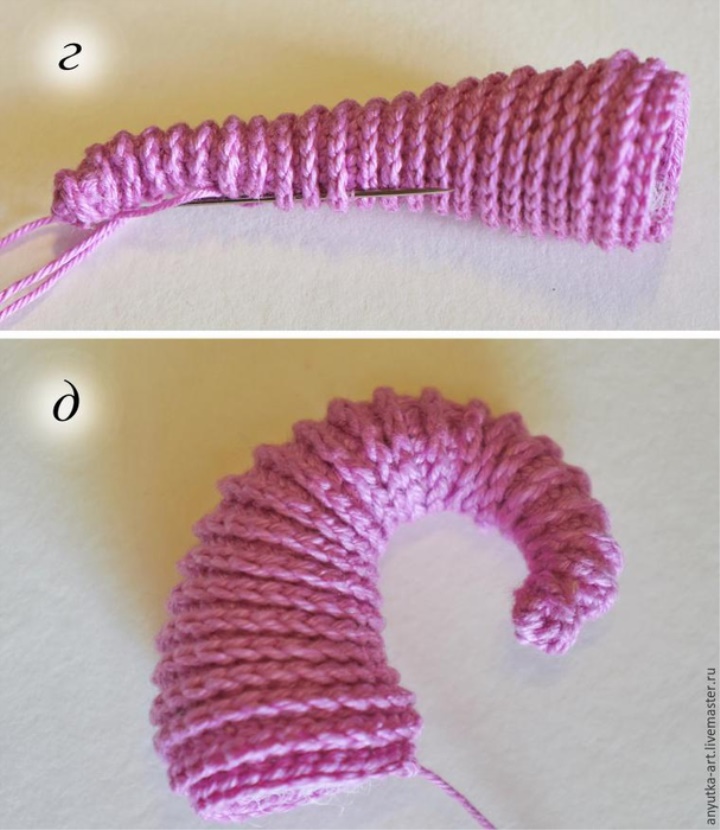
“Tail” we fill into the needle and skip along the entire length of the shell, from the top of the head to the base (photo d).
We fill the shell, but not completely, but only two-thirds.
We tighten the thread so that the cone is bent and fasten the thread (photo e).
We fill the shell to the end.
Next, twist the shell as we need and fix the coils with the same “tail”. I have not photographed this stage, but I hope everything is clear from the photo of the finished snail.
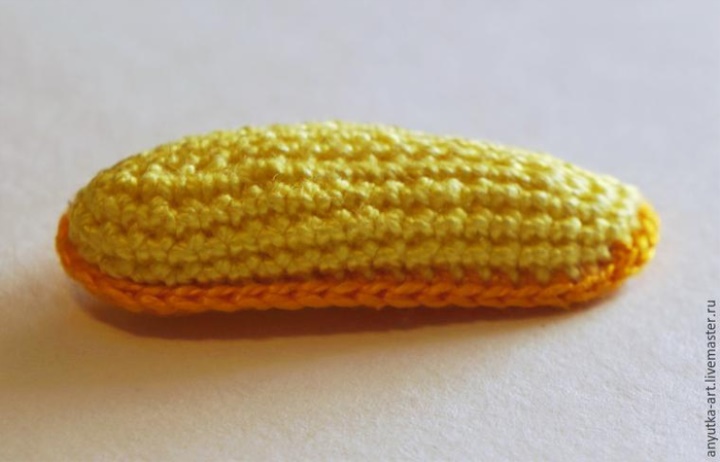
Snail body
1. We knit two parts of the body of the cochlea according to the schemes.
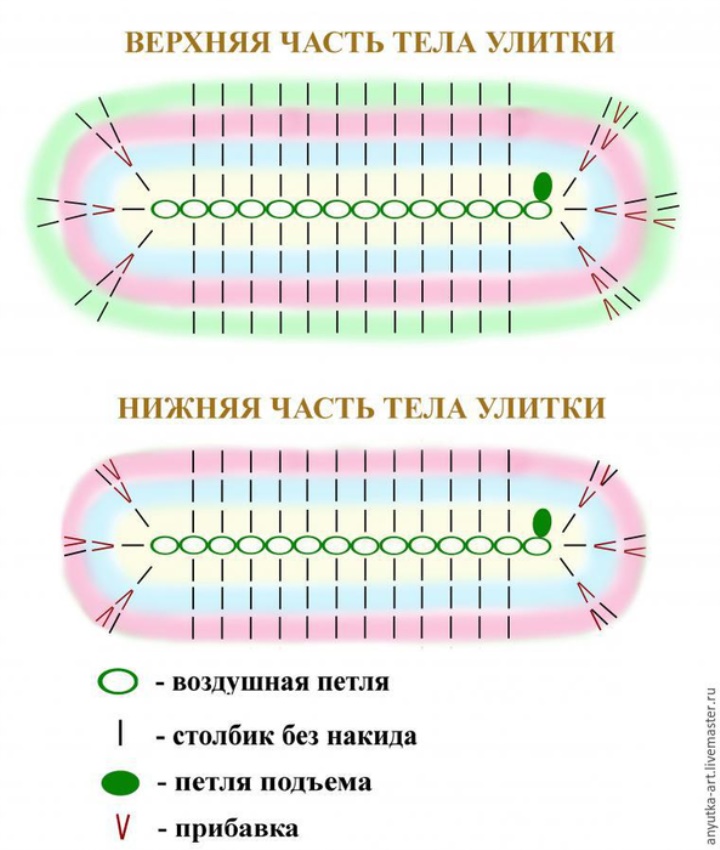
2. We fold the parts with the wrong sides to each other and join them by knitting a series of columns without a single crochet. Do not forget to leave a hole for stuffing. We stuff the body and finish the strapping.
Eyes
For the eyes, I took the pearl beads.
1. We make stalks for eyes from thin wire (photo a). I took the beading wire.
2. Knit a hemisphere for the back of the eyes. I give a description for my beads. Your bead sizes may differ - you will have to adjust the number of additions and rows. Try on the snail eye.
1st row: 6 sbn in the ring amigurumi;
2nd row: 2 increments = 8 sbn;
3-4 rows: 8 sbn in a row.
We finish knitting with a connecting column and leave a long “tail”.
With the help of a needle, we drag the "tail" from the inside out to the front side.
In the same place we pierce the knitting with a wire stalk and put a hemisphere on the eye (photo b).
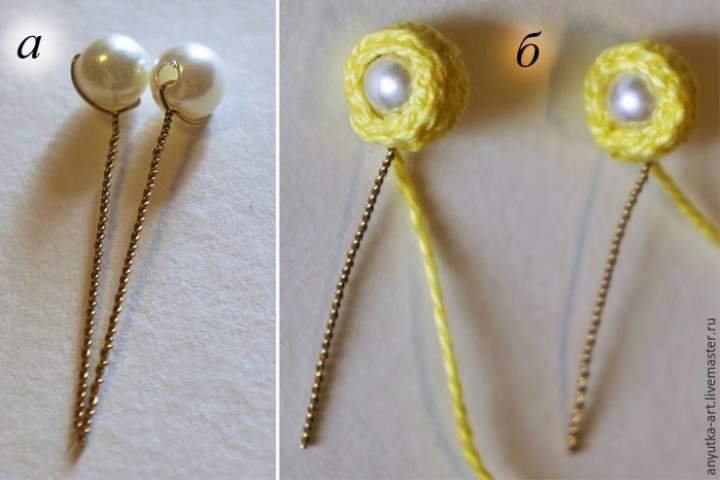
3. Draw black acrylic paint pupils.
4. Bend the tips of the stalks with the letter G (as we did with the mushrooms) and glue in the front end of the cochlea.
5. Grease stalks with glue and wrap yarns with “tails”. I made three layers of winding. The tips of the yarn, with the help of a needle, output to the lower side of the body and fasten.
Sew the shell to the body of the snail.
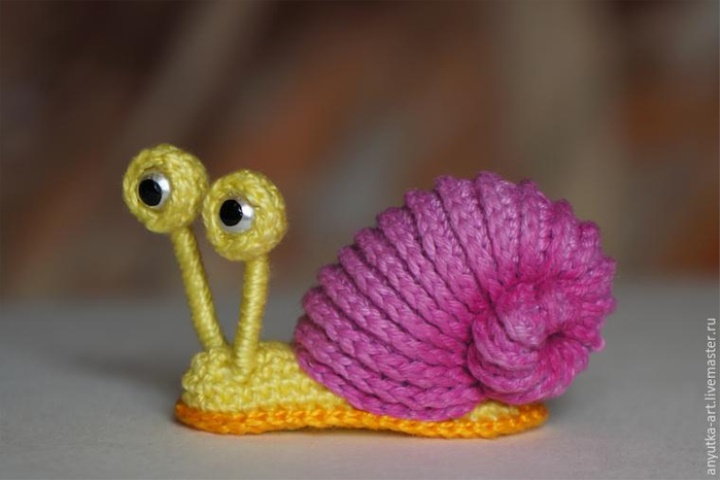
The snail turns out rather tiny. If you find it difficult to knit from thin yarn, you can take a thread thicker. But then the snail will turn out larger. This snail has not yet found its bump and its mushroom, therefore it is crawling while on the palm.
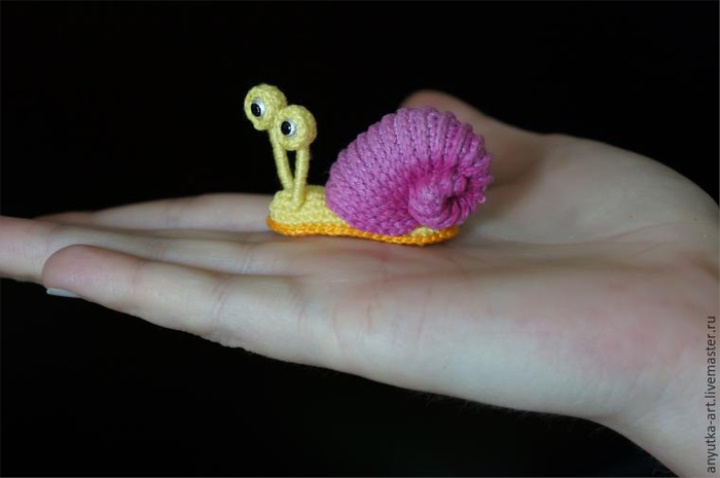
But the group mushroom portrait. The snail does not even know which bump to choose for living.
All summer mood! Successes!