Click For Crochet Abbreviations List
Once again, I was fascinated by knitting pillows, so to speak, my hands came to the realization of some ideas. When the work will be ready, and there will be a lot of them, I promise to show it. But all the same, it’s not really possible to connect all the beautiful things that come across in the Internet and magazines. Therefore, the knitted pillow case presented today is a picture from the network with a diagram, to which I made a description and shot a video.
The cover for the square pillow is made of gray yarn crocheted and it seems to me that this very looks very effective in a sofa cushion. You can tie several of these pillows for the interior.
Suitable for knitting pillows yarn - knitted, acrylic, cotton, wool blend. Better to take not too thick, but not very thin thread. Hook, I always advise you to choose the thickness of the strings.
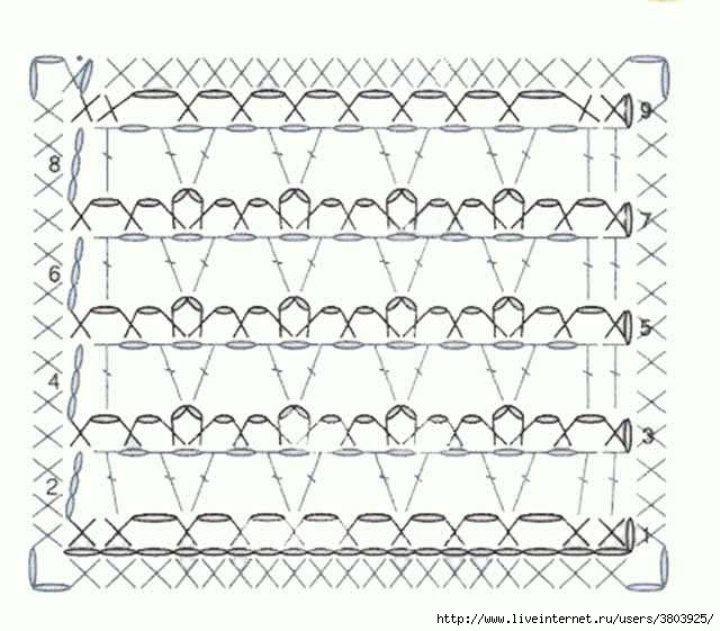
Knitted cushion cover: scheme
The pattern for the cover is so open and very simple, in fact it is made of two alternating rows with single crochets and single crochets.
The pattern for the cover is in front of you, and for those who find it difficult to read, I will make a description.
Each of the two halves of the cover will need to be tied around the perimeter with columns without a nakida, while in the corners we knit two more air loops.
The two parts are connected by the same columns in the face, folding the canvas inside out to each other. If desired, you can connect from the wrong side.
On the edge, you can sew a zipper and insert a sofa cushion into the knitted cover.

How to knit a pattern for a pillow cover
We first associate the sample, and then make the calculation of the required number of loops for the cover on the pillow.
The cover we will have a square shape and knitting swivel rows.
For the sample, I scored 21 air loops.
Row 1: at the beginning of the 1VP row for lifting, 2СБН, and then the posts without crochet into each second loop, between them there is 1 air loop; at the end of the row - 2СБН.
Row 2: 3VP, 1С1Н, * 1ВП, under the column of the previous row - 1С1Н, 1ВП, 1С1Н *; 1VP, finish the row with two double crochets.
Row 3: 1VP, 1SBN, * 1VP; 1SBN under the arch (air loop) of the previous row; 1VP; between the rows with double crotch of the 2nd row - 1СБН, 2ВП, 1СБН *; 1VP, 1SBN.
Next, repeat rows 2 and 3, alternating them.
For novice needlewomen, my short video is also useful.