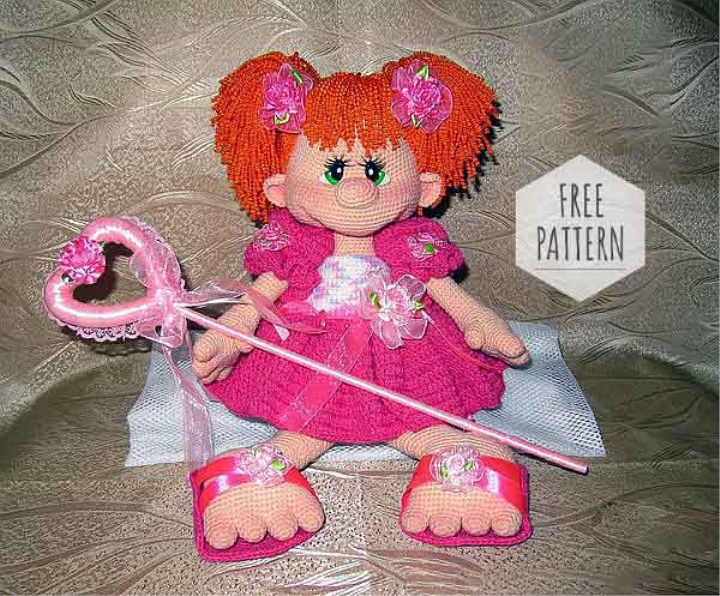
I invite all those who wish to associate such a doll with me.
The doll is tied from yarn YarnArt jeans (55% cotton, 45% acrylic) 160 m/50 g-Body, Trinity Factory Blues (20% silk, 80% acrylic) 190 m/50 g-dress and flip flops, Adelia Erika (100% Polyester) 90 m/50 g-hair. Crochet 2.5.
For the body is better to take 100% acrylic, because it is soft, and novice knitters will be easier to form a duck, from jeans is rough.
1. Flesh-colored yarn (required) for the body and multicolored for clothes and hair.
2. Suitable hook.
3. Filler (I used a holfayber)
4. Various ornaments: ribbons, flowers.
I used the colors of the yarn: nude, pink, white, melange, red-haired.
V. P. – Air Loop
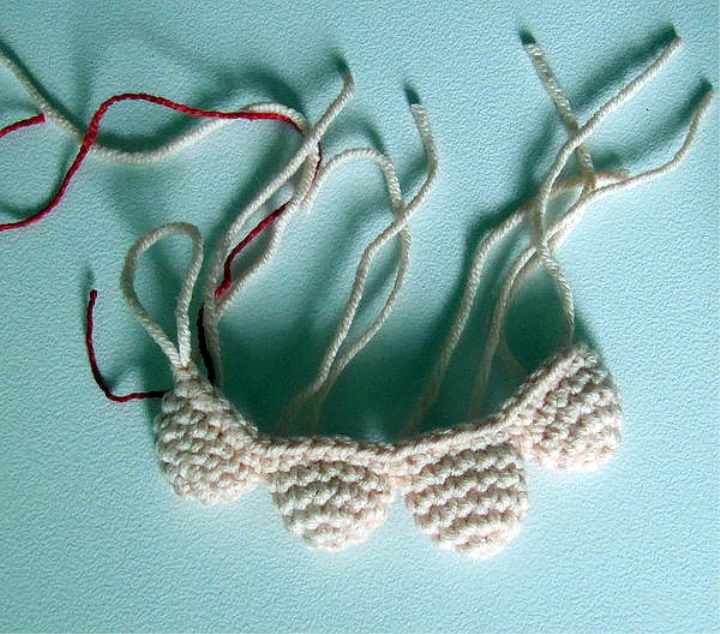
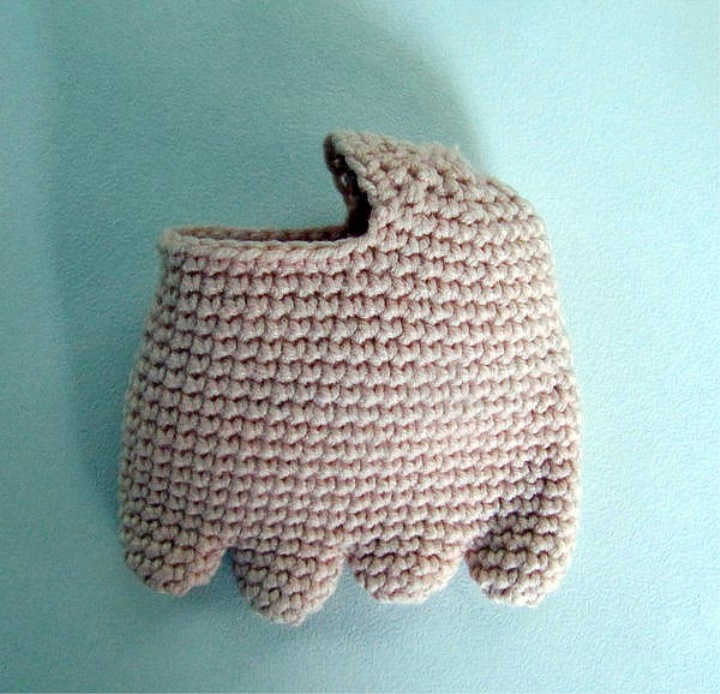
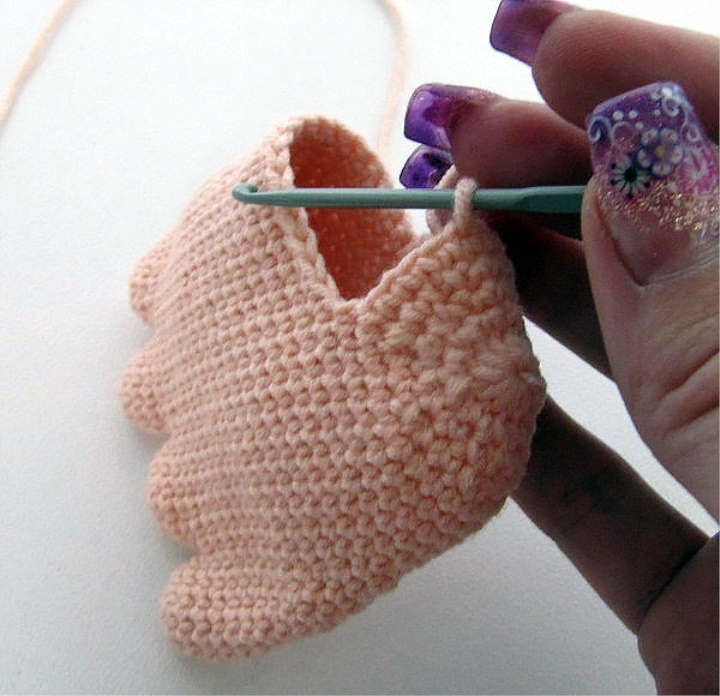
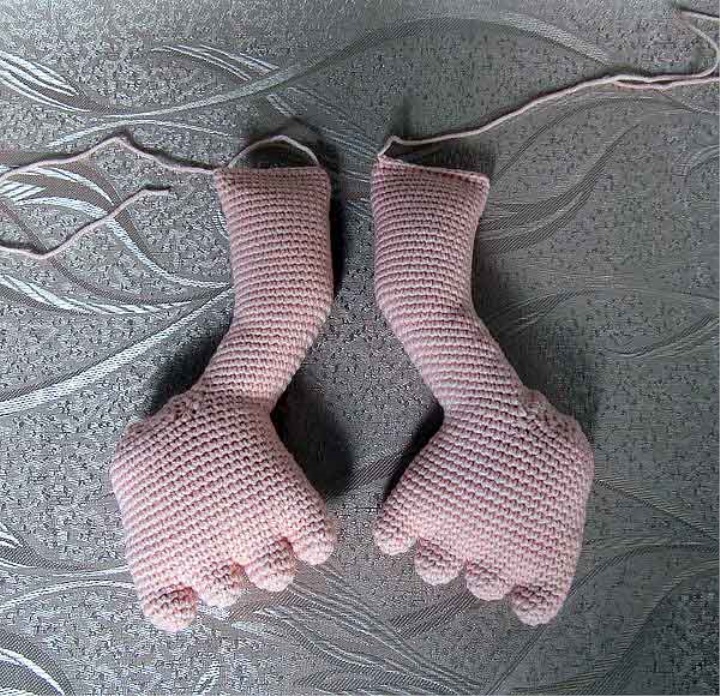
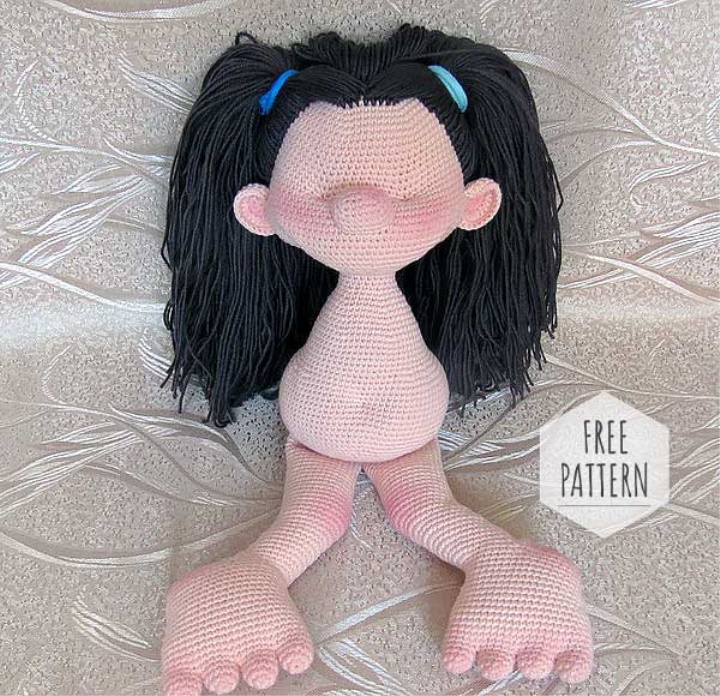
Stage № 1. Feet
Knit flesh yarn. Stuffing in the process of knitting.
For one leg you need 4 fingers:
Middle finger:
1 row: 6 in the Amaguumi ring
2 row: 6 increments (12)
3 – 5 row: 12 SBN
Big, nameless and mezinets:
1 row: 6 in the Amaguumi ring
2 row: 6 increments (12)
3 – 4 row: 12
On a little finger thread do not cut, begin to collect fingers:
1 row: 6 on the little finger, 6 on the unnamed, 6 on the average, 12 on the big, 6 on the average, 6 on the unnamed and 6 on the Little Finger (48)
2 – 8 row: 48
9 row: (Ubava, 22) – 2 times (46)
10 row: 46
11 row: (Ubava, 21) – 2 times (44)
12 Row: 44
13 row: (Ubava, 20) – 2 times (42)
14 – 16 Row: 42
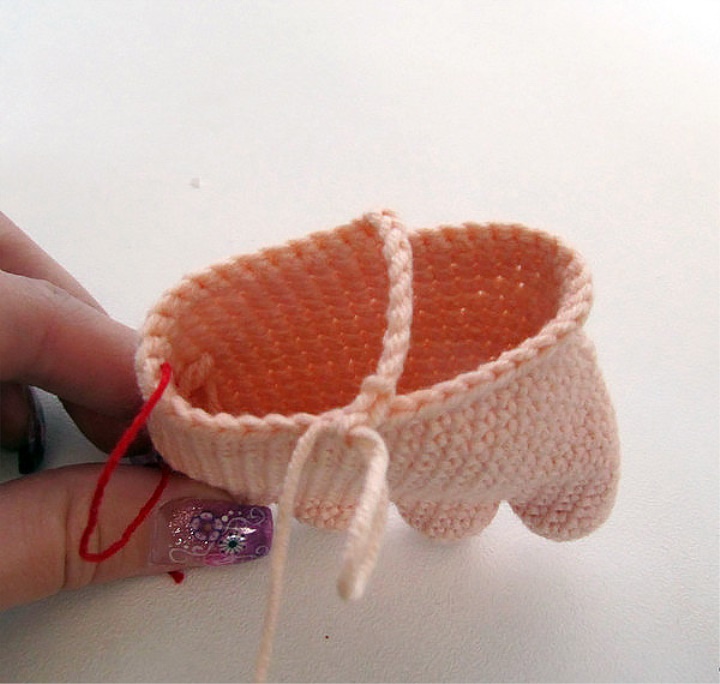
17 Row: 12 SBN, 10 v. P. Skip 20 Loops, 10 SBN (32)
18 Row: 32
19 Row: (2 SBN) – 8 times (24)
20 row: (2 SBN) – 6 times (18)
21 Row: (1 SBN) – 6 times (12)
22 Row: Pull
Attach the thread to the middle of the heel (see photo 5) and knit in a circle
1 row: 30 SBN
2 row: 5 SBN, Ubroka, 6 SBN, 4 increments, 6 SBN, Ubava, 5 SBN (30)
3 row: 4 SBN, Ubroka, 20 SBN, Ubavka, 4 SBN (30)
4 row: 30 SBN
5 row: 2 Ubcaps, 10 SBN, 4 increments, 8 SBS, 2 Bcaps (30)
6 – 7 row: 30 SBN
8 row: 3 Ubcaps, 8 SBN, 4 increments, 10 SBN, Ubavka (30)
9 – 10 row: 30 SBN
11 row: 3 Ubcaps, 8 SBN, 4 increments, 10 SBN, Ubavka (30)
12 – 13 row: 30 SBN
14th row: 3 Ubcaps, 8 SBN, 4 increments, 10 SBN, Ubavka (30)
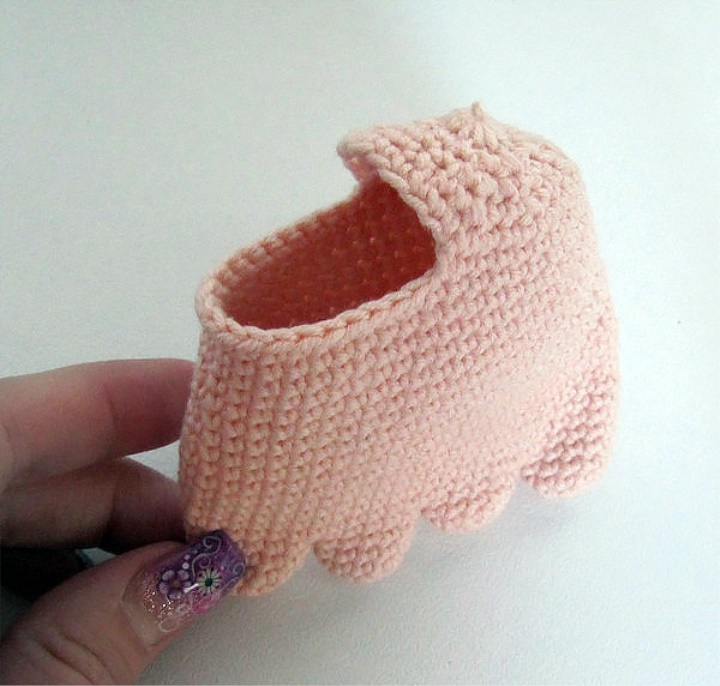
15 – 33 Series: 30 SBN
Fold in half, we get another 4, turn and we twist for 2 loops.
The second leg is knit similarly.
Stage № 2. Head
1 row: 6 in the Amaguumi ring
2 row: 6 increments (12)
3 row: (Sat, raise) – 6 times (18)
4 row: (2 SBN, increment) – 6 times (24)
5 row: (3 off, raise) – 6 times (30)
6 row: (4 SBN, Raise) – 6 times (36)
7 row: (5 SBN, increment) – 6 times (42)
8 row: (6 SBN, increment) – 6 times (48)
9 row: (7 SBN, Increase) – 6 times (54)
10 row: (8 SBN, increment) – 6 times (60)
11 Row: (9 SBN, increment) – 6 times (66)
12 – 17 Row: 66
18 Row: (10 SBN, increment) – 6 times (72)
19 – 21 Series: 72
22 row: (11 SBN, increment) – 6 times (78)
23 – 26 Row: 78
27 Row: 10 Sbn, (2 SBN, Increase) – 14 times, 26 Rnd (92)
28 – 34 Series: 92
35 Series: (2 SBN, Ubava) – To the end of the series (69)
36 Series: (9 SBN, Ubroka)-6 times, 3 SBN
37 Series: (8 SBN, Ubroka)-6 times, 3 SBN
38 Series: (7 SBN, Ubava)-6 times, Ubroka, 1 SBN
39 Series: (6 SBN, Ubroka)-6 times, 2 SBN
40 Row: (5 SBN, Ubroka) – 6 times, 2 SBN
41 Series: (4 SBN, Ubava)-6 times, Ubava
42 Series: (3 SBN, Ubroka)-6 times, 1 sat
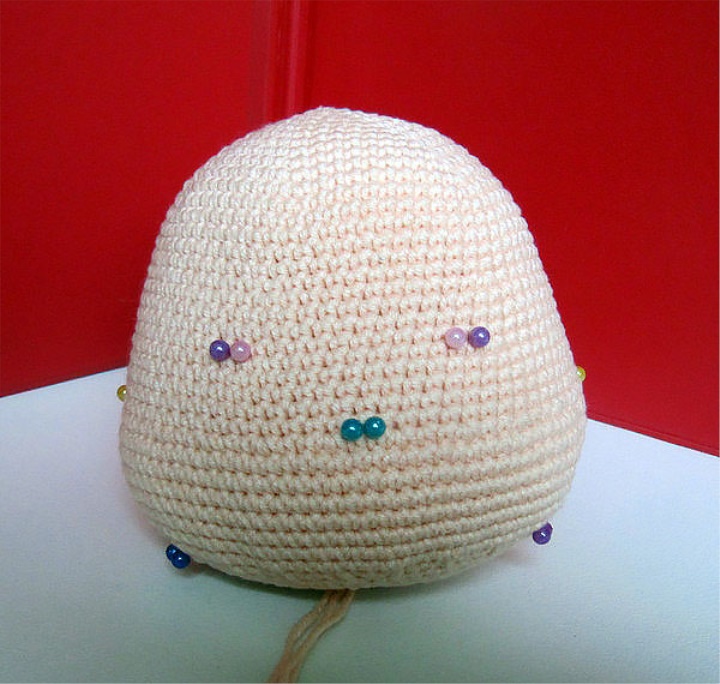
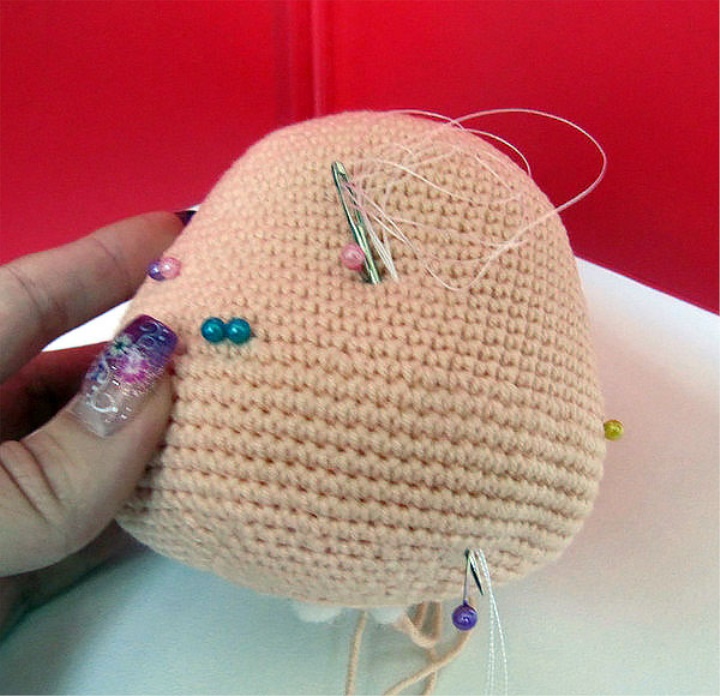
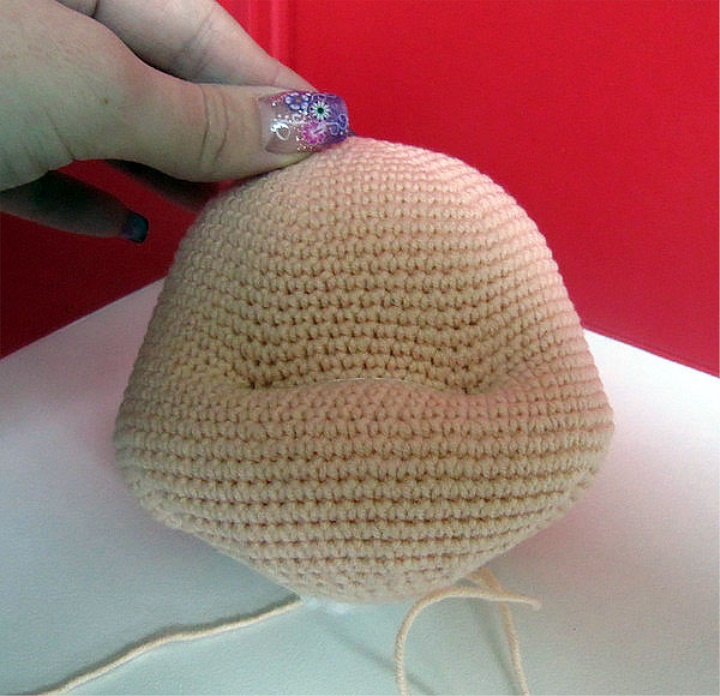
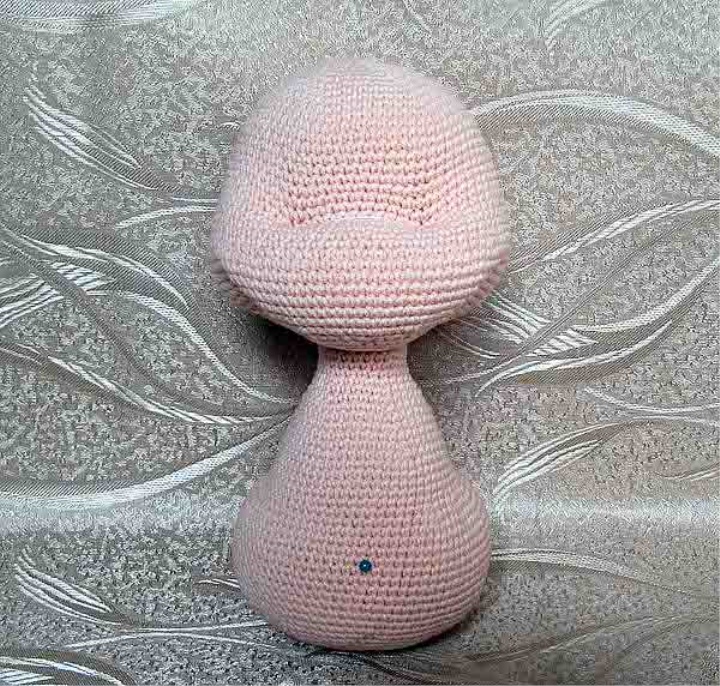
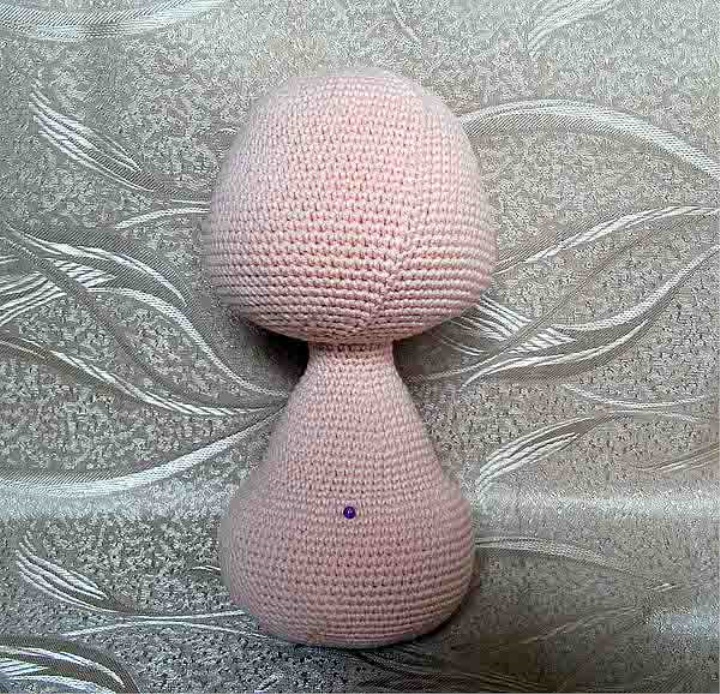
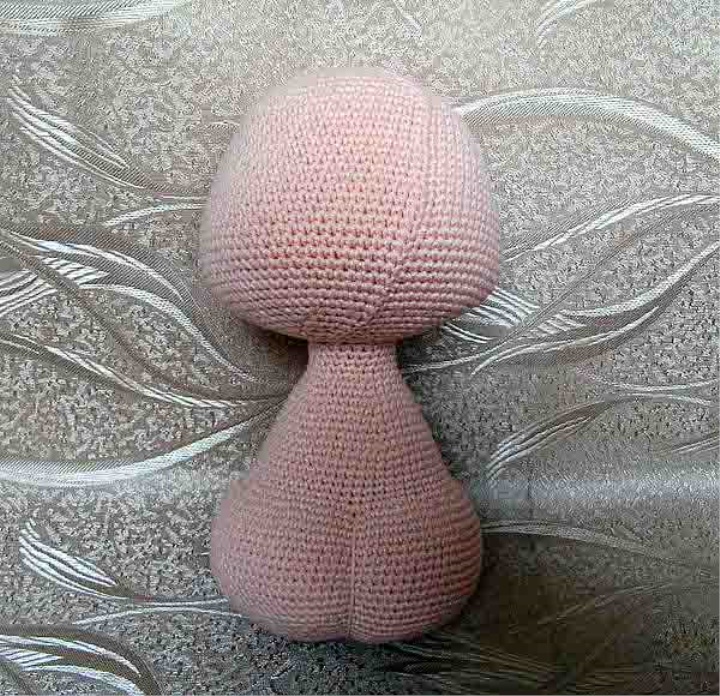
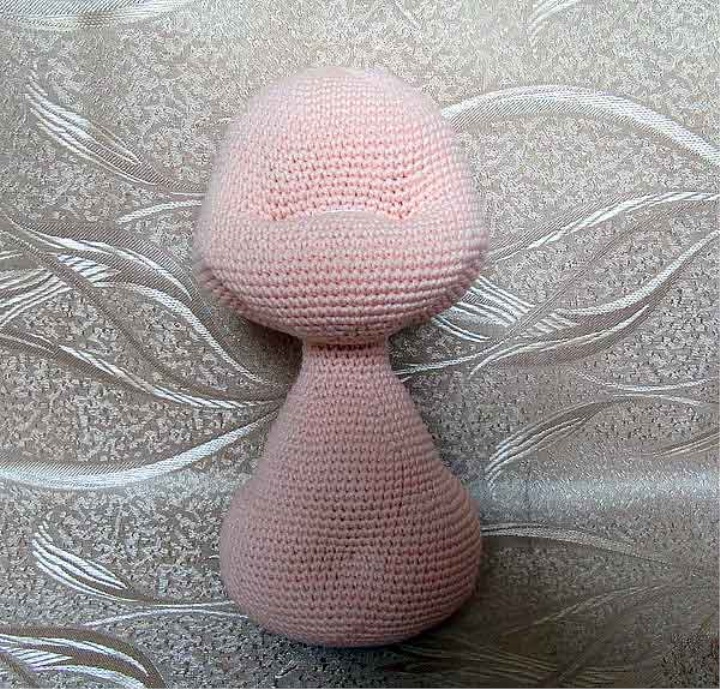
Make a duck with flossing or a solid thread in the body tone. Mark on the face with pins of the place of ducklings (Photo 1). Enter the needle in the cheek (approximately in 35 a row from the crown) and output in the eye (approximately between 21 and 22 next to the top) (Photo 2), insert the needle into the neighbouring hole and output in cheek (Photo 3), bind and tie the knot, just form the second cheek (Photo 4). Insert the needle in the non-closed hole of the neck and put in the right eye, enter the left and output in the hole in the neck, bind and tie the knot. If you need to stuffing more, forming a plump cheeks and knitting further.
44 Series: (1 SBN, Ubroka)-6 times, 1 sat
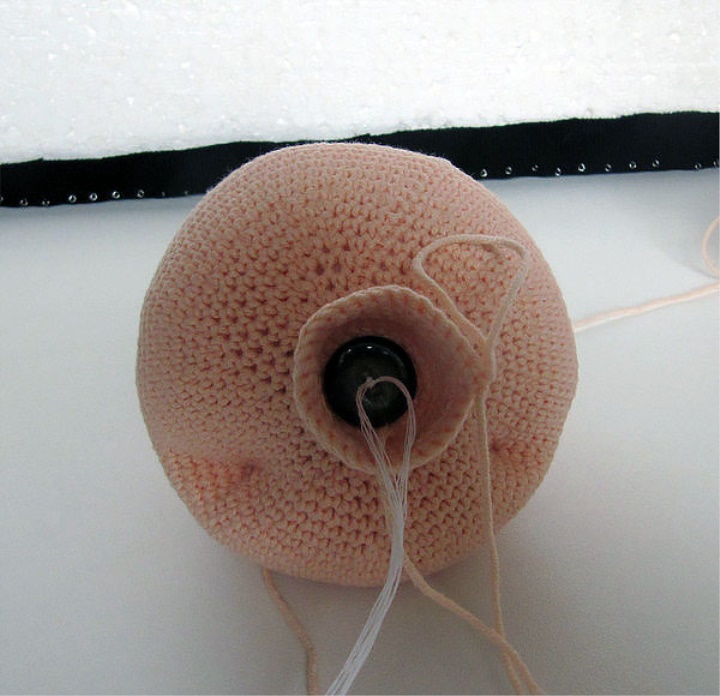
I always make a button mount, but then I still sewing, so in this place insert a button.
45 Series: Bind

Stage № 3. Body
Knit a flesh-colored yarn.
1 row: 6 in the Amaguumi ring
2 row: 6 increments (12)
3 row: (Sat, raise) – 6 times (18)
4 row: (2 SBN, increment) – 6 times (24)
5th-8th row: 24 SBN
In about this place we make a button fastening (see photo)
9 row: (3 off, raise) – 6 times (30)
10 row: 30 SBN
11 Row: (4 SBN, increment) – 6 times (36)
12 row: (5 SBN, increment) – 6 times (42)
13 Row: 42
14 row: (6 SBN, increment) – 6 times (48)
15 Row: 48
16 Row: (7 SBN, increment) – 6 times (54)
17 Row: (8 SBN, increment) – 6 times (60)
18 – 23 Row: 60 SBN
24 row: (2 SBN, Increase) – 15 times, 15 Rnd (75)
25 Row: (3 SBN, increase) – 15 times, 15 SBN (90)
26 – 36 Series: 90 SBN
37 Series: (13 SBN, Ubava)-6 times (84)
38 Series: (12 SBN, Ubava)-6 times (78)
39 Series: (11 SBN, Ubroka)-6 times (72)
40 Series: (10 SBN, Ubava) – 6 times (66)
41 Series: (9 SBN, Ubava)-6 times (60)
42 Series: (8 SBN, Ubava)-6 times (54)
43 Series: (7 SBN, Ubava)-6 times (48)
44 Series: (6 SBN, Ubava)-6 times (42)
45 Series: (5 SBN, Ubava)-6 times (36)
46 Series: (4 SBN, Ubroka)-6 times (30)
47 Series: (3 SBN, Ubroka)-6 times (24)
48 Series: (2 SBN, Ubava) – 6 times (18)
49 Series: (1 SBN, Ubava) – 6 times (12)
50 Row: Pull
We're doing a butt duck. We tighten that thread which knitting, flesh color. We plan the pins beginning to cut the butt (about the middle of the increments in the 24th row) and the navel area. Insert the needle into a tight hole, output in the navel, enter the row above/below and output to the recess of the butt, enter in 49 series and put in a tight hole (50 series), bind and tie the knot. Pull can not very much, the main thing that formed a butt and belly, with a very strong compressing thread can break and have to repeat the whole procedure first.
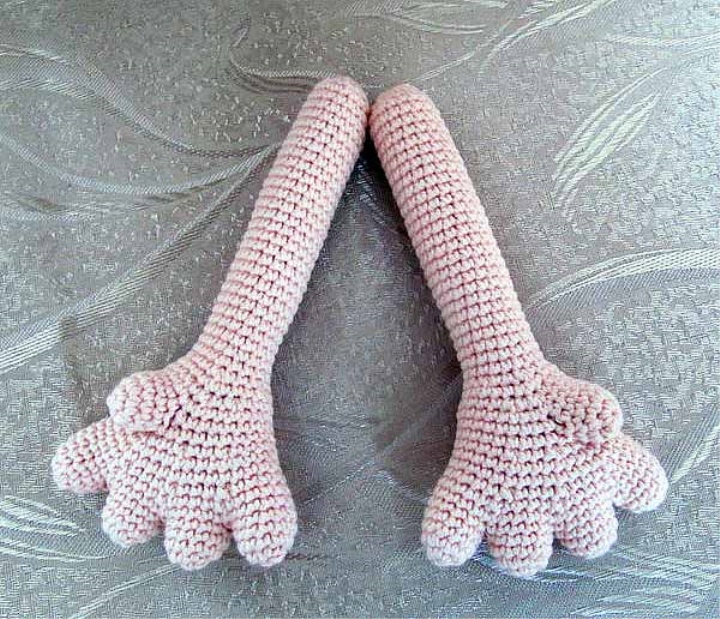
Stage № 4. Hands
Knit a flesh-colored yarn.
For one hand it is necessary 5 fingers, knitting 5 fingers, on the last thread do not cut, and begin to collect.
Finger:
1 row: 6 in the Amaguumi ring
2 row: 6 increments (12)
3 – 4 row: 12
Assembly:
1 row: 6 on the first finger, 6 on the second, 6 on the third, 12 on the fourth, six on the third, six on the second, 6 on the first (48).
2 row: 48
3 row: 5 SBN, Uabka, 4 SBN, Ubavka, 4 SBN, Ubroka, 10 SBN, Ubavka, 4 SBN, Ubavka, 4 SBN, Ubavka, 5 SBN (42)
4th row: 4 SBN, Uabka, 3 SBN, Uabaka, 3 SBN, Ubava, 9 SBN, Uabka, 3 SBN, Ubroka, 3 SBN, Ubavka, 5 SBN (36)
5 – 6 row: 36
7 row: 4 SBN, Ubroka, 2 SBN, Ubava, 2 SBN, Ubroka, 8 SBN, Ubava, 2 SBN, Ubroka, 2 SBN, Ubavka, 4 SBN (30)
8 row: 9 SBN (15 for the left hand), 6 to cling to the finger and hand at the same time, 15 for the left hand (30)
9 Row: 9 SBN (15 for left hand), 6 on Finger, 15 off (9 for left hand) (30)
10 row: 30 SBN
11 row: 4 SBN, Ubroka, 1 SBN, Ubroka, 1 SBN, Ubavka, 7 SBN, Ubavka, 1 SBN, Ubroka, 1 SBN, Ubava, 3 SBN (24)
12 row: 24 SBN
13 Row: (2 SBN, Ubava) – 6 times (18)
14 – 40 Series: 18 SBN
41 Series: (1 SBN, Ubava) – 6 times (12)
42 Series: Pull
The second hand is knit similarly. Hands are not nailed, we will collect when the dress tie.
Stage № 5. Nose. Ears. Hair.
Nose
Knit a flesh-colored yarn.
1 row: 5 v. P. In the second loop from the Hook 3 SBN, 3 SBN in one loop, then knit on the other side of the chain 3 SBN, 3 in the bottom of the loop (12)
2 row: 3 SBN, 3 increments, 3 SBN, 3 increments (18)
3 row: 3 times, (1 SBN, Increment) – 3 x, 3 times, (1 SBN, Increase) – 3 (24)
4th-5th row: 24 SBN
Leave the thread to be nailed.
Ears
Knit a flesh-colored yarn.
1 row: 6 in the ring Amaguuumi, ring is not lock, V. P. Lifting, turn
2 row: 6 increments (12), V. P. Lifting, turn
3 row: (SBN, Raise) – 6 times (18), V. P. Lifting, turn
4 row: 18 Sbn, v. P. Lifting, turn
5 row: 18 SBN
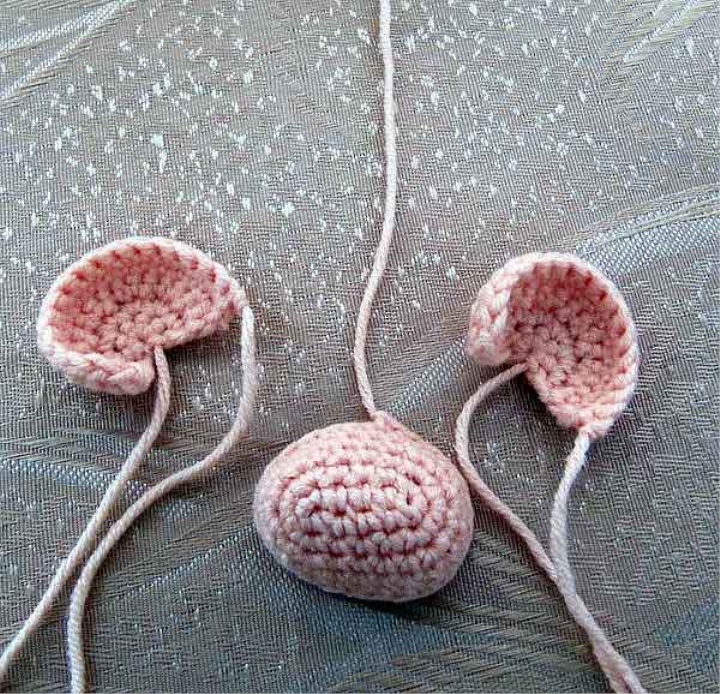
Before you fasten your hair, fasten your nose and ears.
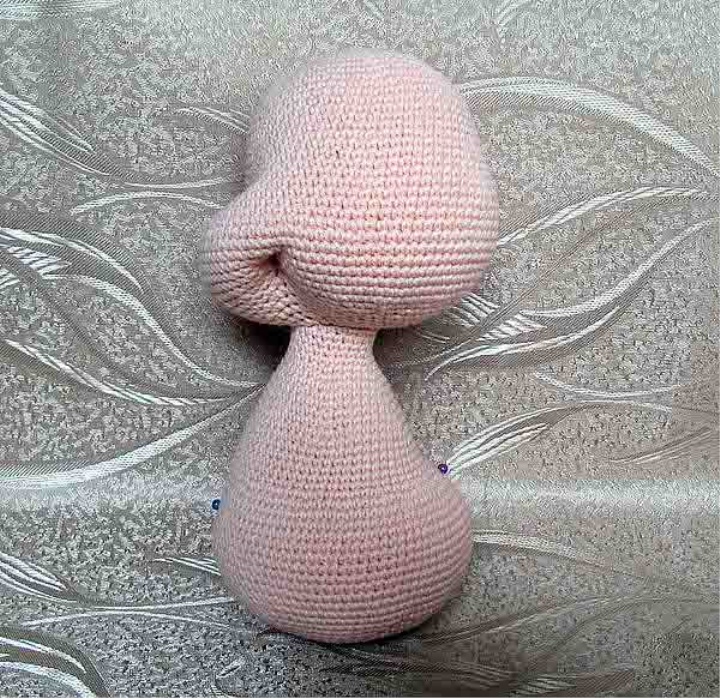
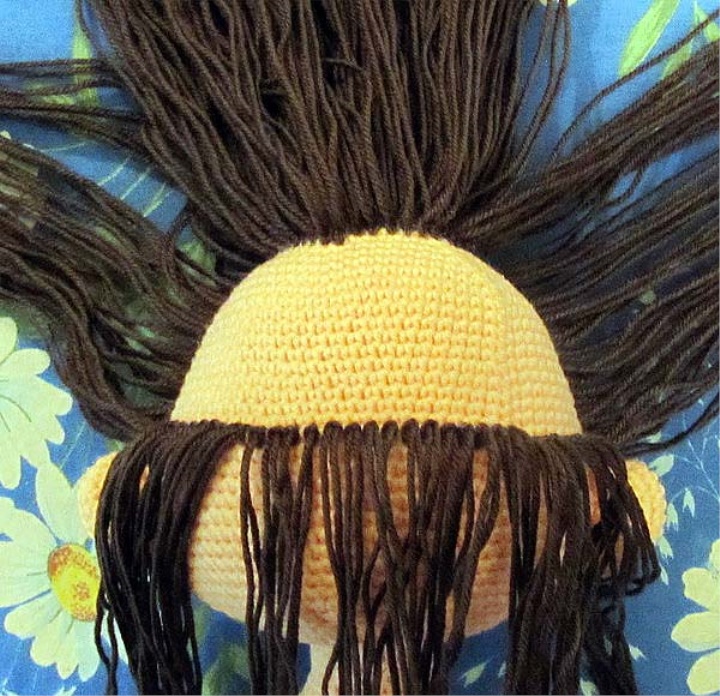
The hair is attached to the head as a fringe. We start from the top in a circle of rows 4 – 6 (see that the LOBK was beautiful), then designate the area of fastening the hair and at the end fill the back (see photo).
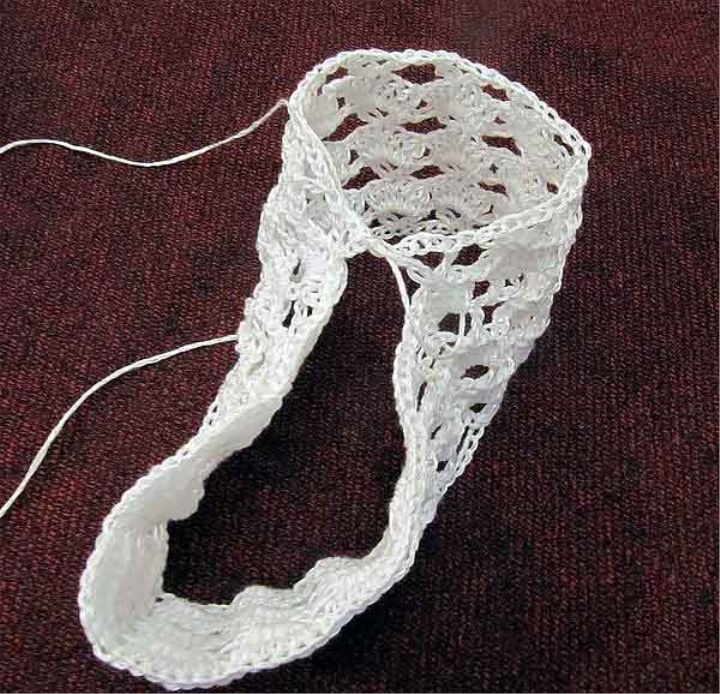
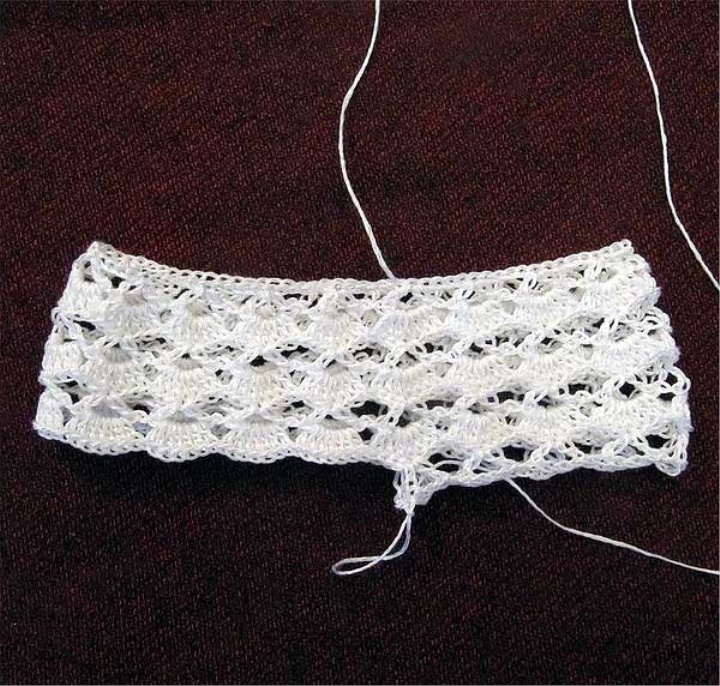
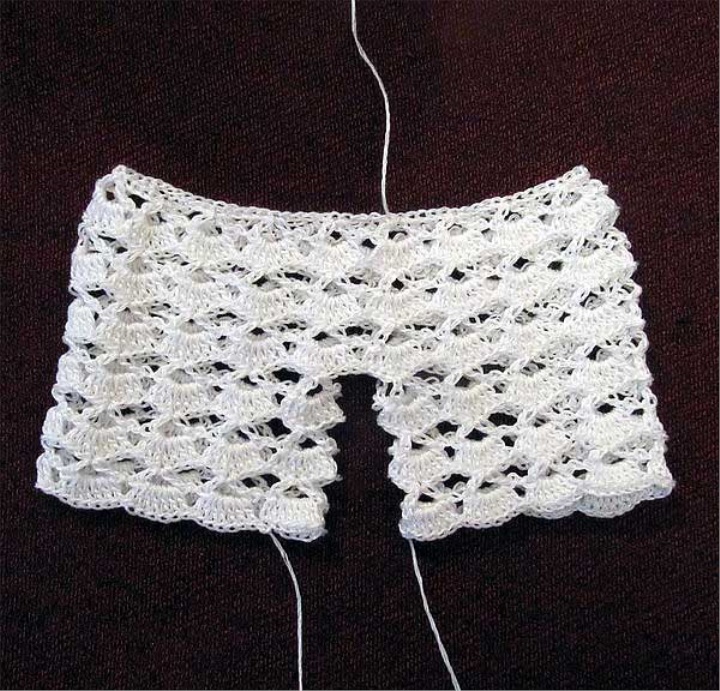
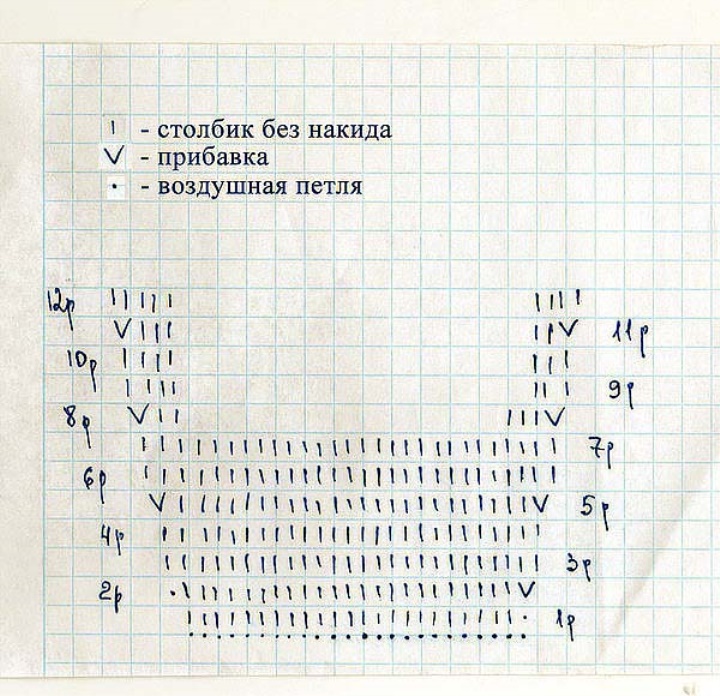
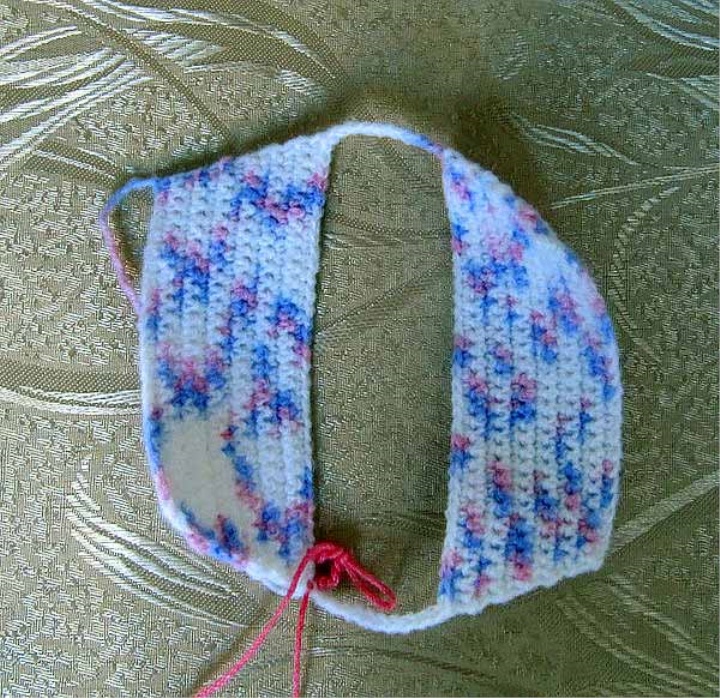
Stage № 6 Pantaloons
Knitting yarn of white color Troitskaya factory summer 400m/100g (50% cotton, 50% viscose)
We dial 90 p, lock in a circle and knit according to the scheme:
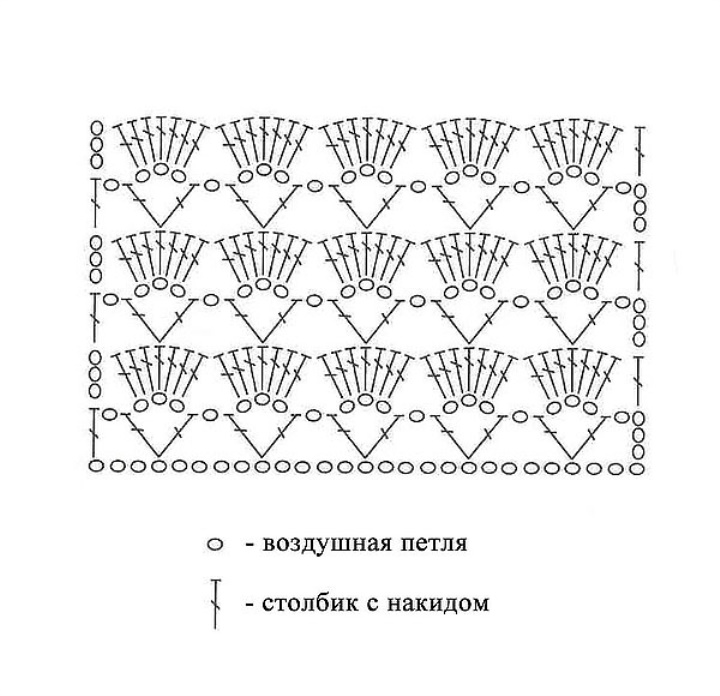
Having failed 6 rows (3 Raport), divide 9 reports on each leg and get 6 rows (3 raport). On a belt and on a bottom (having retreated 1 report) a Pantalon tie a spandex in a tone of a yarn.
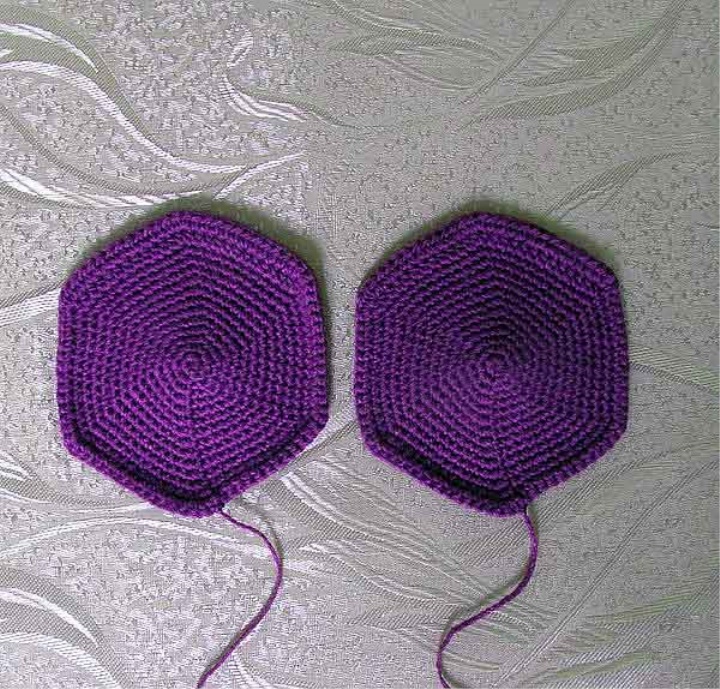
Sneaker
Knit yarn Pink, 2 pcs
1 row: 6 in the Amaguumi ring
2 row: 6 increments (12)
3 row: (Sat, raise) – 6 times (18)
4 row: (2 SBN, increment) – 6 times (24)
5 row: (3 off, raise) – 6 times (30)
6 row: (4 SBN, Raise) – 6 times (36)
7 row: (5 SBN, increment) – 6 times (42)
8 row: (6 SBN, increment) – 6 times (48)
9 row: (7 SBN, Increase) – 6 times (54)
10 row: (8 SBN, increment) – 6 times (60)
11 Row: (9 SBN, increment) – 6 times (66)
12 row: (10 SBN, increment) – 6 times (72)
13 row: 11 SBN, a raise, 11 SBN, in one loop SBN and PST, 11 PST, increase of PST, 11 PST, in one loop of PST and SBN, 11 sbn, increase, 11 sbn, increment
14 row: Turn and knit on the wrong side of the increase, 12 SBN, a raise, 12 SBN, in one loop SBN and PST, 12 PST, the increase of the PST, 12 PST, in one loop of the PST and SBN, 12 SBN, raise, 12 SBN
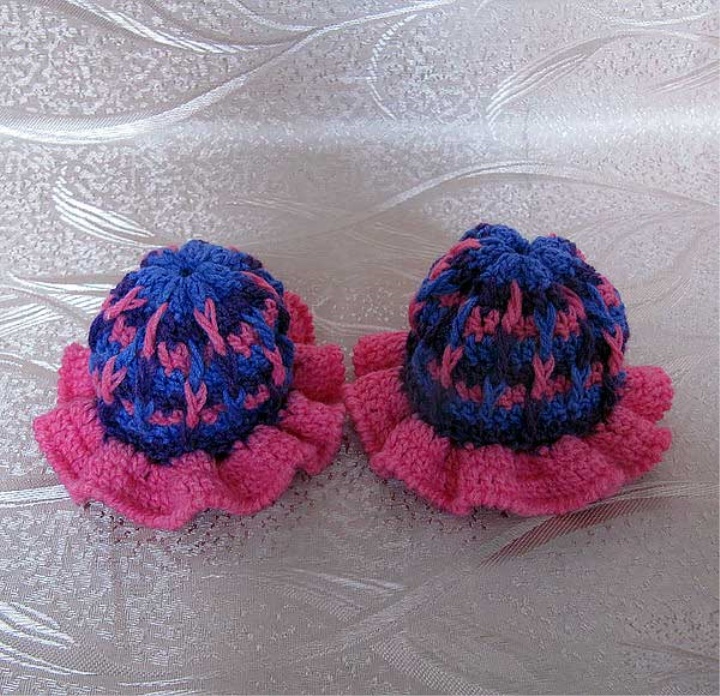
Straps are made of ribbons and decorate.
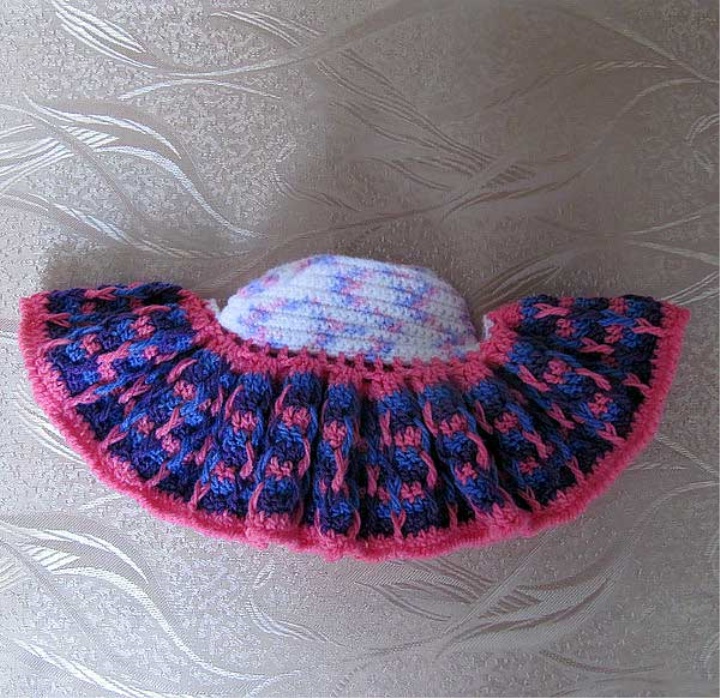
Dress
Knit Melange Yarn
We begin to knit according to the scheme, linking one detail thread cut.
Linking the second part of the thread is not cut knitting 13 row-32, 10 v. P., 32 on the first part, 10 v. P. Make a connecting column.
Attach a pink thread. Knit in a circle skirt: 2 rows of Fileynoy mesh (PRSs, VP), then Knit ruche on the Fileynoy grid.
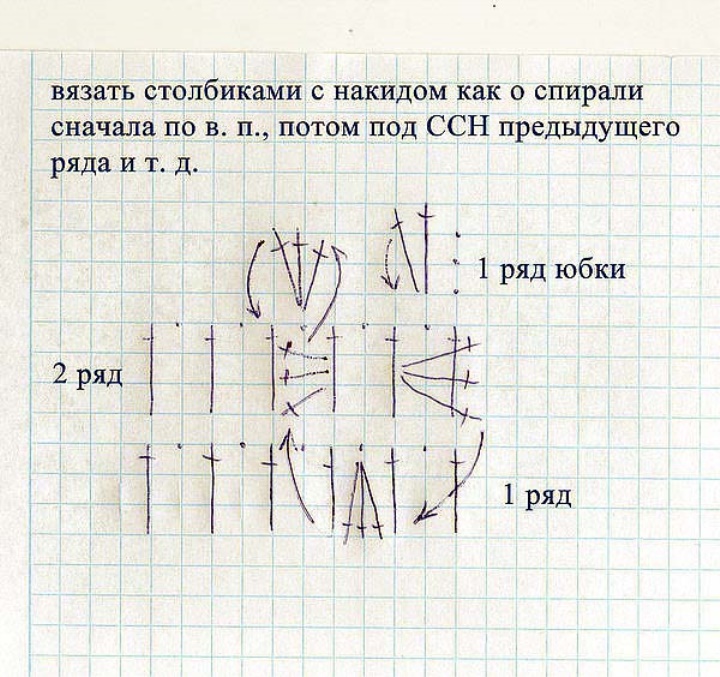
Then knit the PRSs to the desired length. You can knit any picture.
Sleeves.
Knit Pink yarn.
Leave a long end of a thread, Dial 40 v. P., lock in a ring.
1 – 8 row: 40 PRSs
9 row: PRSs, v. P. To the end of the series behind the front wall of the loop
10 – 11 row: Knit Ruche as a dress.
The end of the thread which we left stretched through the initial chain, strongly bind, tie knot, the tip of the buckle. (See photo)
We take the same thread, which was knitted and from the wrong in the 9th row behind the back of the loop hold it, but not bind, we will do then when we fasten our hands.
Assembly
The legs are nailed. Toning the doll (optional), cheeks, nose, ears, knees, heels and toes.
Now fasten the handles. We plan with pins of a place of fastening on hands and in area of shoulders. Take a long needle with a strong thread (I-Corporal which knitted doll), start with the left hand (see the photo), then in the sleeve of the dress from the wrong side (approximately in 3-4 a row of ruffles), in the body (see photo), in the second sleeve of the face, in the right hand (see photo), then in reverse order them in their sleeves and body at the same hole in which was injected. The ends of the thread by hand and from the wrong sleeve of the bind and tie tightly firmly on two knots, the ends of the buckle in the sleeve. Bind threads on the ruche which we have left, tie on a knot, tips to hide.
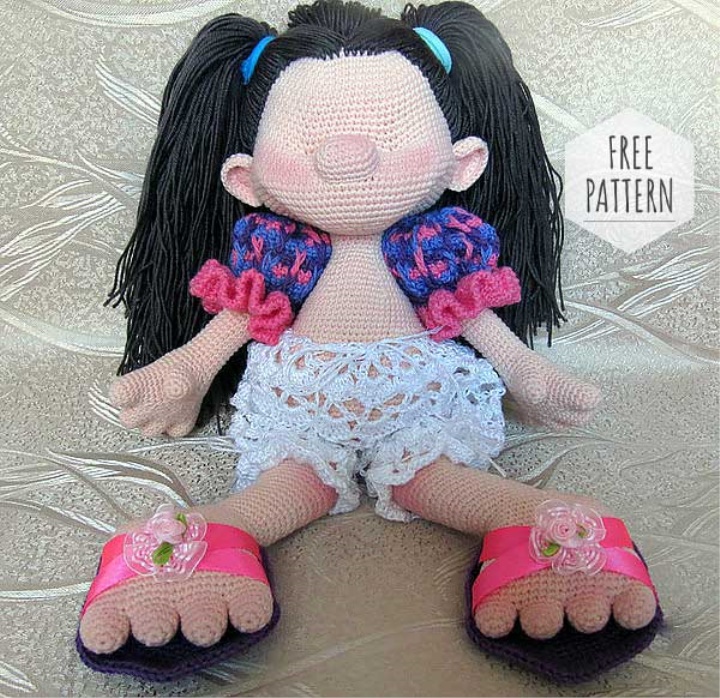
Dress up, do on the sides lacing, while fastening the dress to the body (if you wish, I have fastened so as not to fall).
Decorate the hairstyle, if you need to cut, tie ponytails/braids.
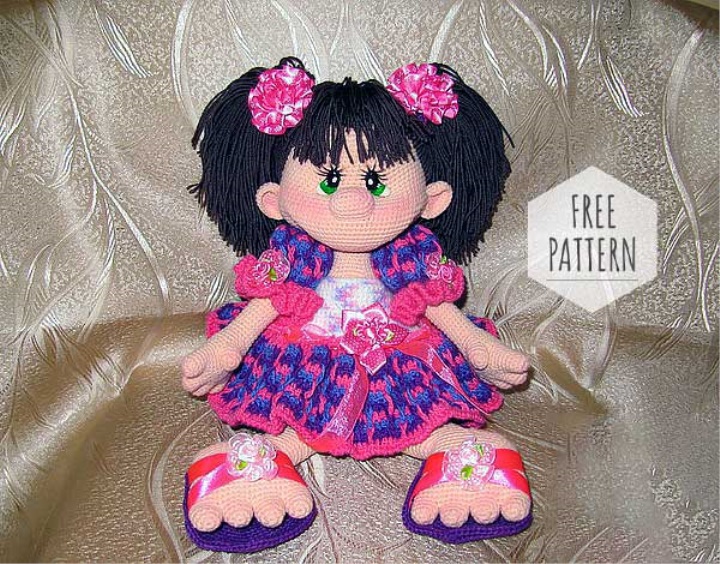
Left to decorate the face and the doll is ready!
For the manufacture of eyes, we need:
1. White plastic (any firm)
2. Acrylic Paints
3. Pins Ordinary
4. Cutters (Plastic molds) if there is
5. Super Glue
6. Nail polish
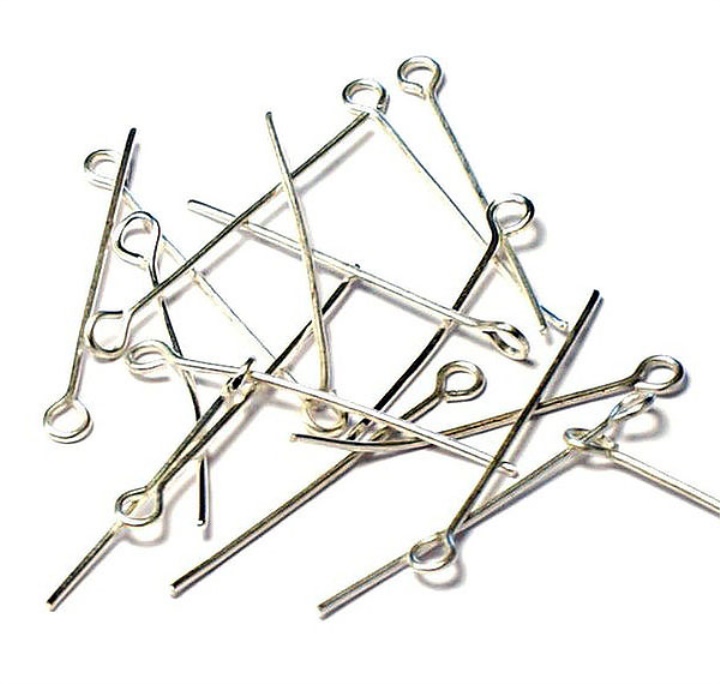
Clay razminem and roll out on the surface (I have a glossy magazine, it is then easy to remove the blanks). form or a clerical knife on a template cut out a form of an eye. We attach the necessary form.
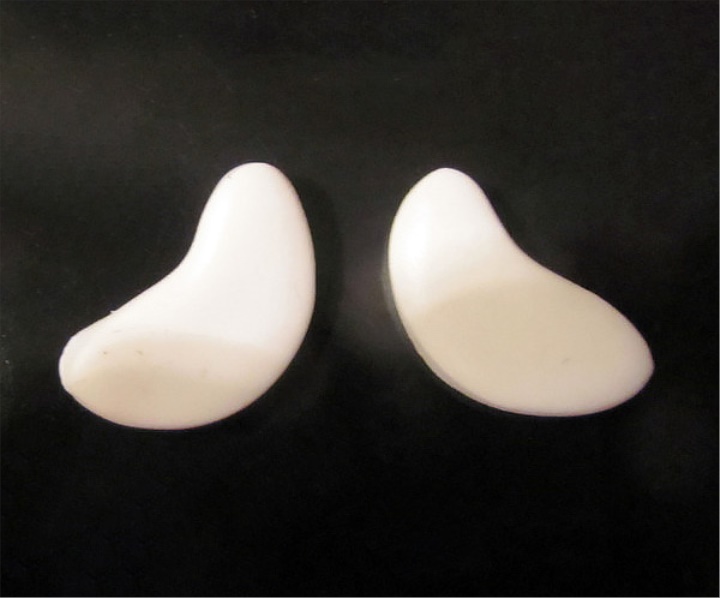
Take a pin and bite pliers at her edge, insert from the back of the eye. Put in the stove. Attention!!! We look at the instructions for plastic, different firms, different baking times! Bake, we are.
If the blanks of the eye are not even possible to use a shallow skin. Wipe the workpiece with alcohol (Degrezhrivayem, that paint well lay and varnish then not exfoliate). Before you decorate your eyes, you need to glue the fasteners from behind, pull it out of the workpiece, dripping a drop of super glue and again insert fasteners. Paint the blanks with acrylic paints, when the paint will dry cover with varnish for reliability. When the varnish is completely dry, not less than 12 hours, it is possible to glue lashes.