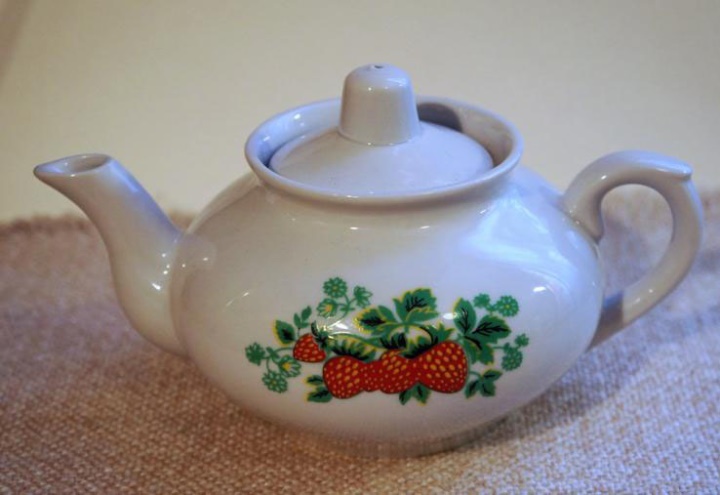
I really like to knit all sorts of cozy things for the house. Recently, I got carried away knitting warmers on teapots. Maybe you will also want to tie a heater with a nice hedgehog for yourself or as a present.
Despite the fact that the techniques of knitting this hot-water bottle are the simplest, I defined the complexity as average. The fact is that the sizes and shape of the teapots are different for all and the number of increases, and the number of rows you will have to determine yourself, by experience.
Nevertheless, with some diligence, even beginners are quite capable of coping with this task. I will tell you a secret - I have to dissolve and bandage a couple (and sometimes more) of the rows when knitting each heating pad. And I have already imposed quite a lot of them.
The main thing is not to be lazy to re-do it every time, as you noticed an error. And then everything will turn out!
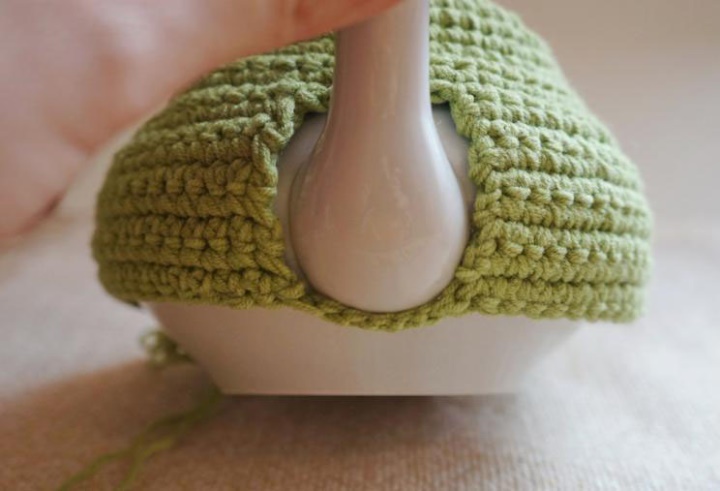
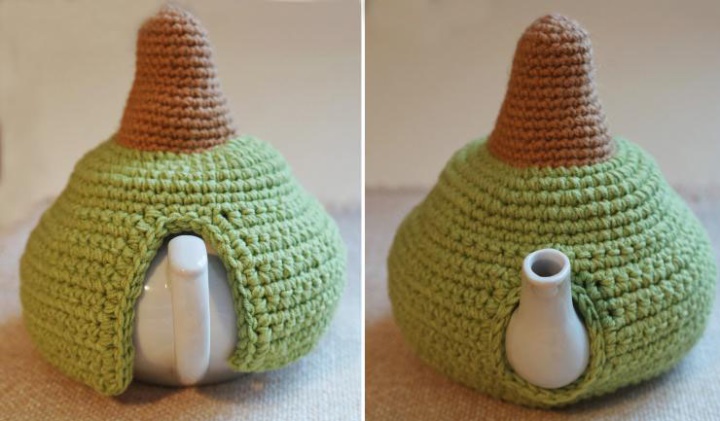
The hot-water bottle is dressed over the top and fastened under the handle to the button. You can do without a button - with two holes for the spout and for the handle. How to do it, you can see in the master class .
The yarn is brown or beige in color - for the body and head of the hedgehog. I used half-woolen yarn Semenovskaya "Natasha", 250 m in 100 gr.
Yarn of gray and white (can be light gray) colors - for a fur coat of a hedgehog. I had acrylic yarn (no name), about 200 m in 100 grams.
Yarn is green for a heating pad. I have an acrylic yarn thinner than "Natasha". Knitted in two strands.
Fine yarn (the best cotton is Iris, chamomile, coco, rose): black for nose and muzzle, for flowers.
Crochet hooks.
Monofilament.
Sewing needle.
Needle with a large eye (the so-called "Gypsy").
Two beads for the peephole (eyes can also be embroidered or used purchased).
Wire for frame legs.
Beads, beads, sequins, etc. for finishing the product.
Filler for the head and body of a hedgehog.
Acrylic paints and a brush (optional).
Kettle.
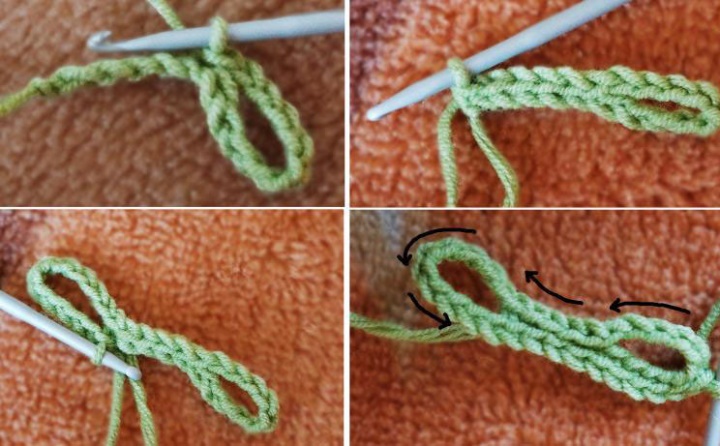
vn - the air loop; an increase - two bars in one loop; reduction - two loops we sew together;
ring amigurumi - we wind the yarn (two turns) on the finger, we tie the resulting ring with the columns without the crochet. Remove from the finger and tighten by pulling the free end of the thread.
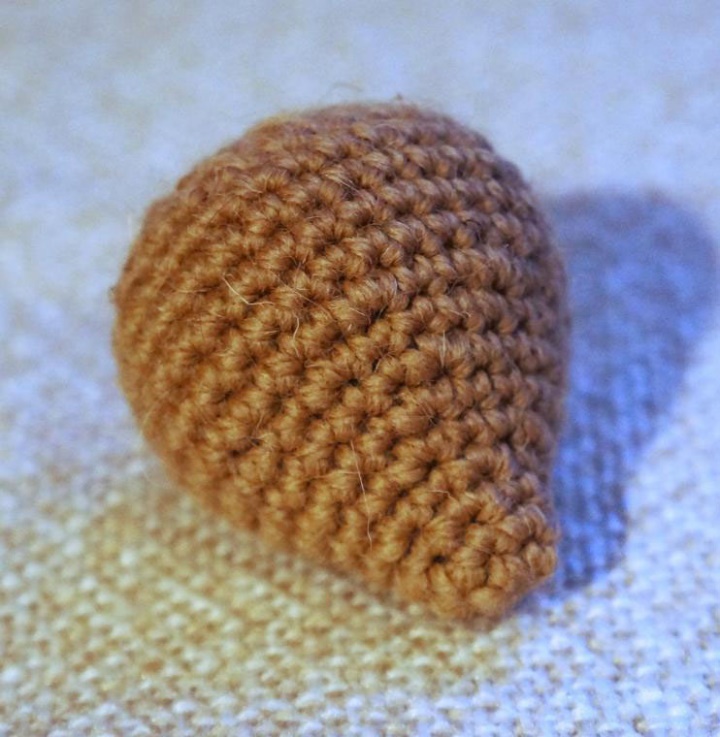
1) We knit the hedgehog body (the top of the warmer).
We knit the columns without a crochet in a spiral (without lifting loops).
1st row: 6 sb in the ring amigurumi
2-3 rd series: 6 increases in each row = 18 sbn
4-9th series: one increase in each row = 24 sbn
Additions are made with a shift, so that the knitting will expand evenly.
10-12th series: 3 increments per row = 33 sbn
13-15 series: 33 seats each
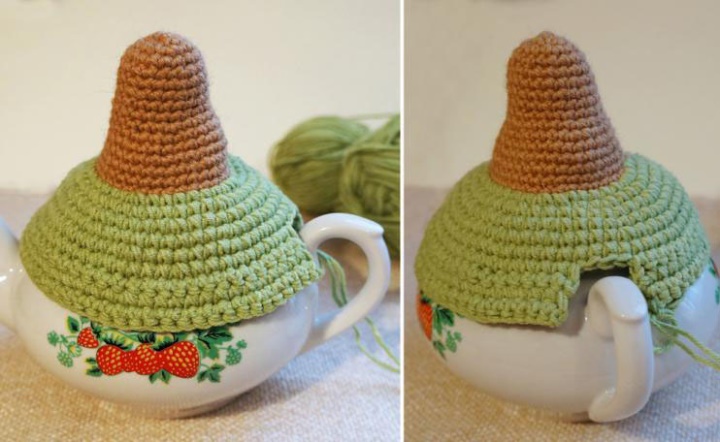
2) We knit the heater base
We attach yarn of green color and weave in a spiral. Additions are made according to the shape of the kettle. I got 3 increments in a row.
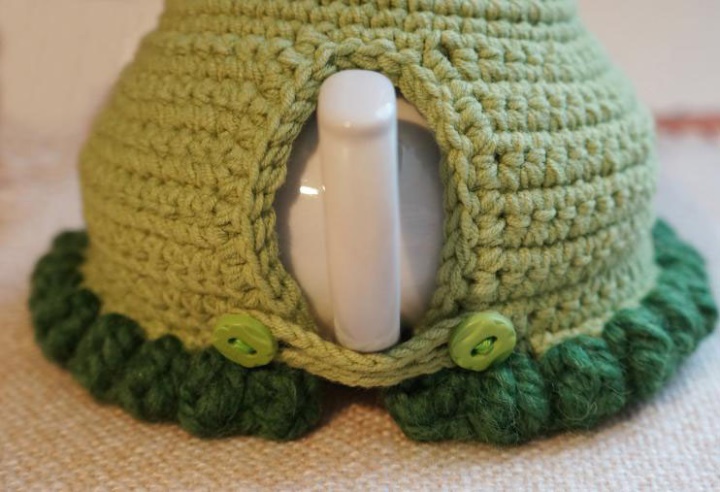
3) When we are tied up to the upper bases of the spout and handle, we knit the two side panels separately (in the event that the spout and the handle are on the same or almost the same level). Thus, I knitted a heating pad "Sheep on a hillock" . But on this teapot the upper base of the handle is higher than that of the nozzle. Therefore, I continued to knit in a swivel row with one sheet. For the cut-out under the handle, three loops were unbroken.
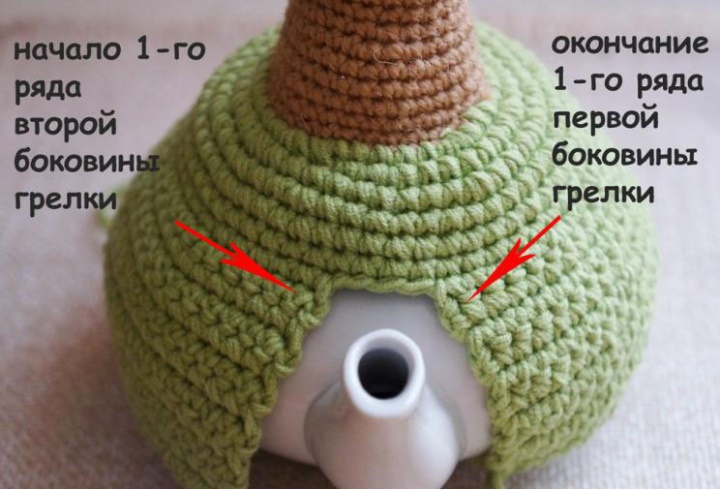
4) Having tied up to the upper base of the spout, continued to knit the two halves (side) of the warmer separately. I did one increment through the row, on each side of the heating pad. When knitting reached the maximum width of the teapot, she continued to knit without a raise. If the last row of the first sidewall ends near the spout, then we knit a chain of air loops and leave it loose. This chain we then need to connect the two halves of the heater.
When knitting with swivel rows, the fabric texture differs from the texture when knitting in a spiral. Therefore, so that the sides of the hot-water bottle look exactly the same, the second sidewall starts knitting, as if continuing the knitting of the first row of the first sidewall, leaving several loops untangled (I have three loops). I hope I did not explain it very clever :)
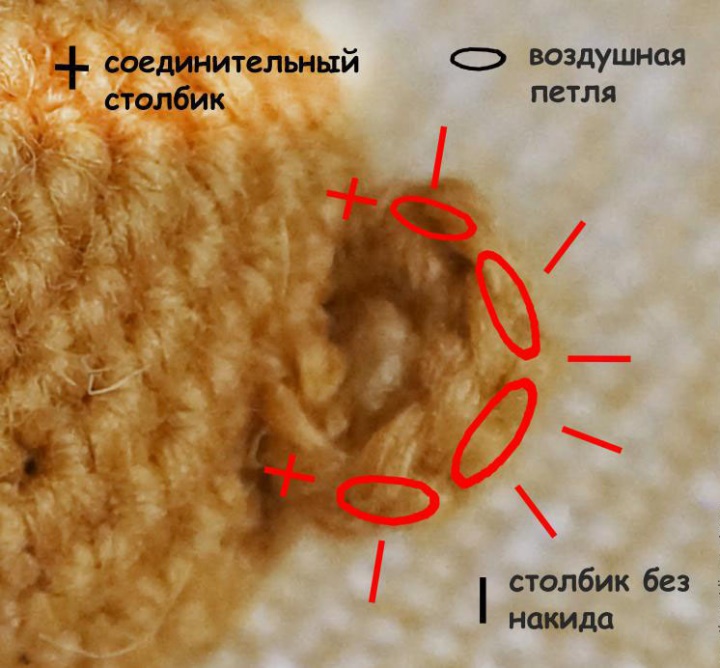
5) When both halves are connected, connect them with a chain of air loops. The chain is made so long that it spans freely enough. Attach the chain by tying the connecting bar into the first loop of the row.
6) Next, we knit one sheet with swivel rows.
Attention! When tying a chain of air loops under a spout, the chain is not tied with bars, but we knit the bars on the semi-loops of the chain.
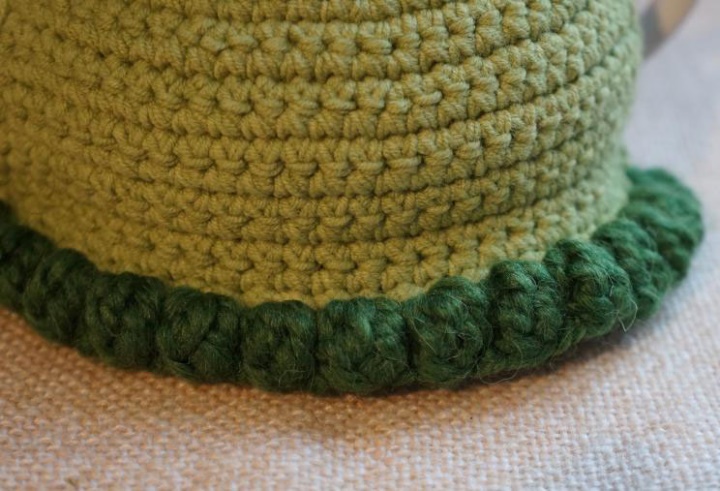
We do not knit a hot-water bottle to the very bottom - we leave a place for the strapping.
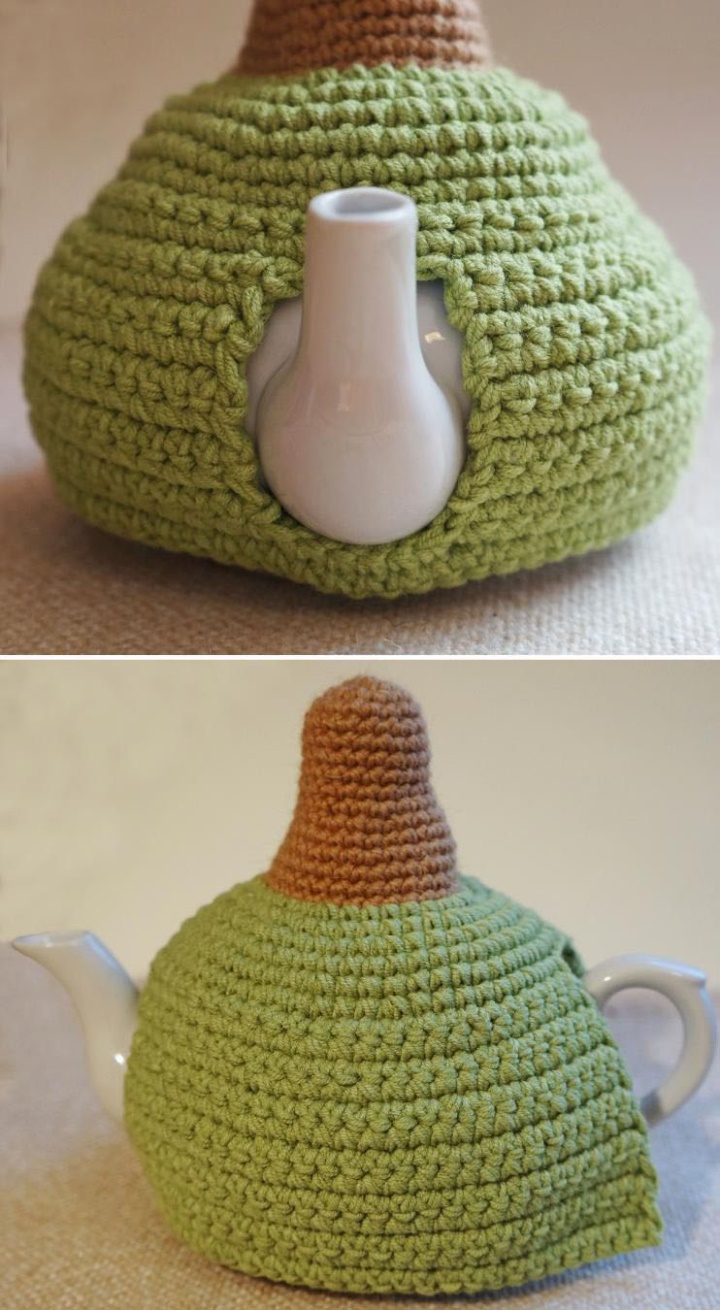
7) Cutout for the handle and a hole for the spout we tie a row of columns without a crochet and a row of connecting posts.
8) We cover the bottom of the heating pad with lavish poles.
Tying with magnificent columns. In the first loop of the series we sew a column without a crochet. In the second loop we sew a magnificent column of 3-5 columns with a crochet, then we knit an air loop and again a column without a crochet in the third loop of the row. So we knit the whole row. A more embossed pattern is obtained if a pillar is not fastened between lush pillars without a crochet, but a connecting column.
9) For the fastener-jumper, we dial a chain of air loops of the necessary length (I have 4 loops). Then we continue to knit the chain for the buttonhole under the button (I got 10 air loops). We form a loop with the help of a connecting column (I performed ss in the 11th loop from the hook). Connected, tried on - the button should go through the loop effortlessly. We use connecting bars on the semi-loops of the chain. Having reached the end of the chain, we knit the continuation of the chain from the air loops and connect them to the ring. We map cs on the second half loop of the chain and continue to knit cc on the chain that forms the loop, and then along the circle (shown by black arrows). Having pierced the sce on the second loop, you can stop at this. If you want to make a jumper wider, you can tie another circle of connecting posts
10) We sew the buttons on the stalk. There are many master classes on sewing buttons on the Internet. And you can immediately take a button with a leg.
The base of the heating pad is connected!
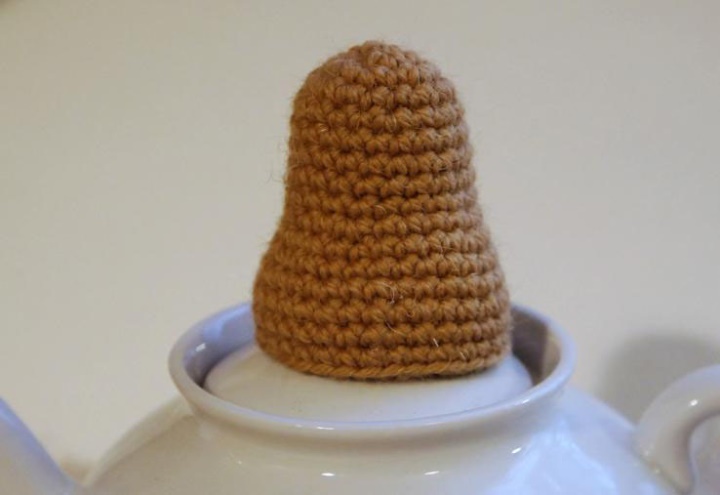
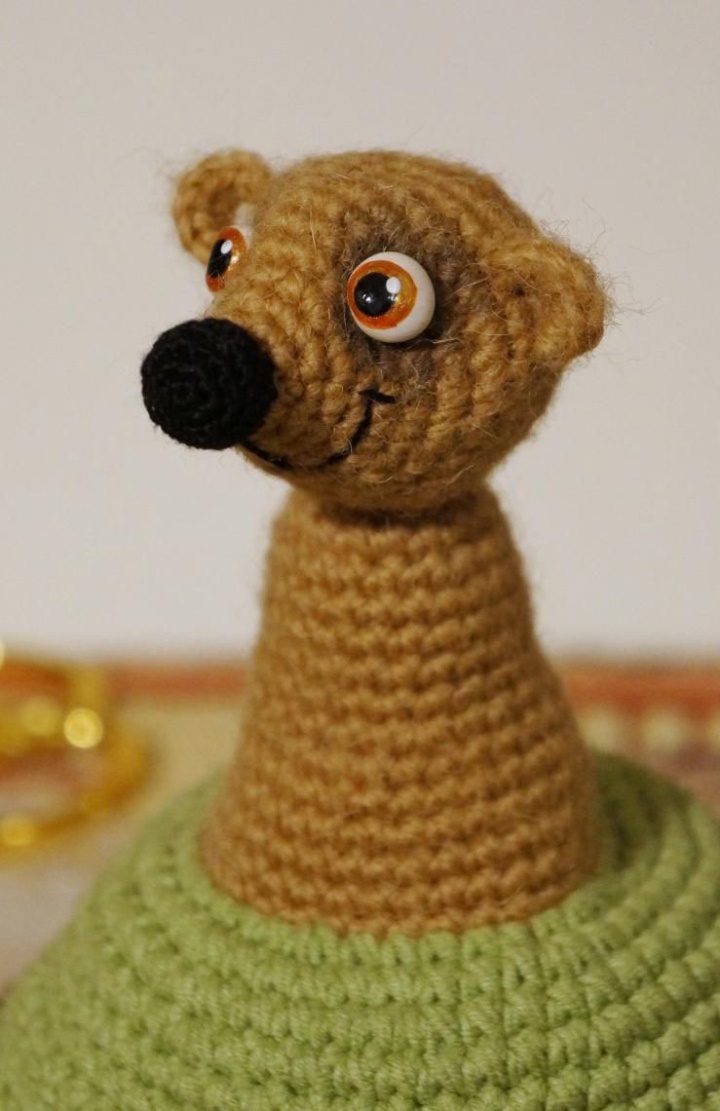
11) Let's return to our hedgehog. In order for it to be tight and keep in shape, we need to fill it. But at the same time he should be free to put on a pennant for a teapot. For this, we will tie here such an internal part - a cone.
1st row: 6 sb in the ring amigurumi
2-3 rd series: 6 increases in each row = 18 sbn
4-7th series: 3 increments per row = 30 sb
8-9th series: 1 increase in each row = 32 sbn
Note. We make in the last row one column less than did in the last row of the outer cone-body. This is to ensure that this inner part, like a nested doll, is freely embedded in the outer one.
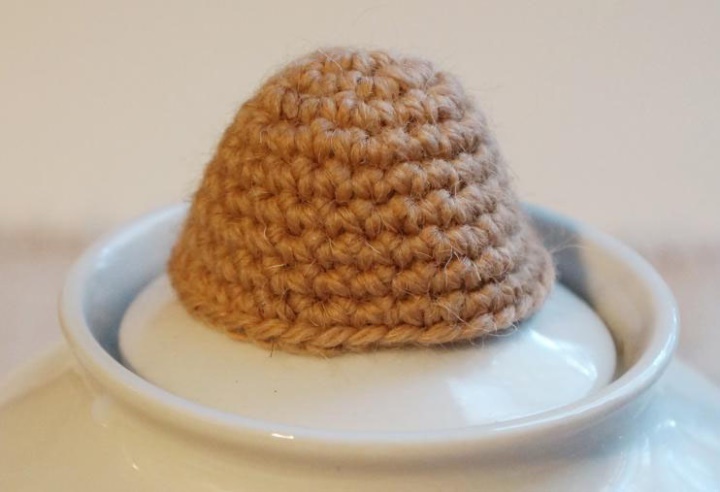
12) Put the cone in the hedgehog's body. Carefully sew the monofilament, leaving a hole for stuffing. In the top of the head we put the filler, but so that the bottom does not stick out - we make the packing medium density. Between the walls of the outer and inner parts of the packing is not necessary - the thickness there and so it is sufficient. Sew the hole and again try on the heating pad.
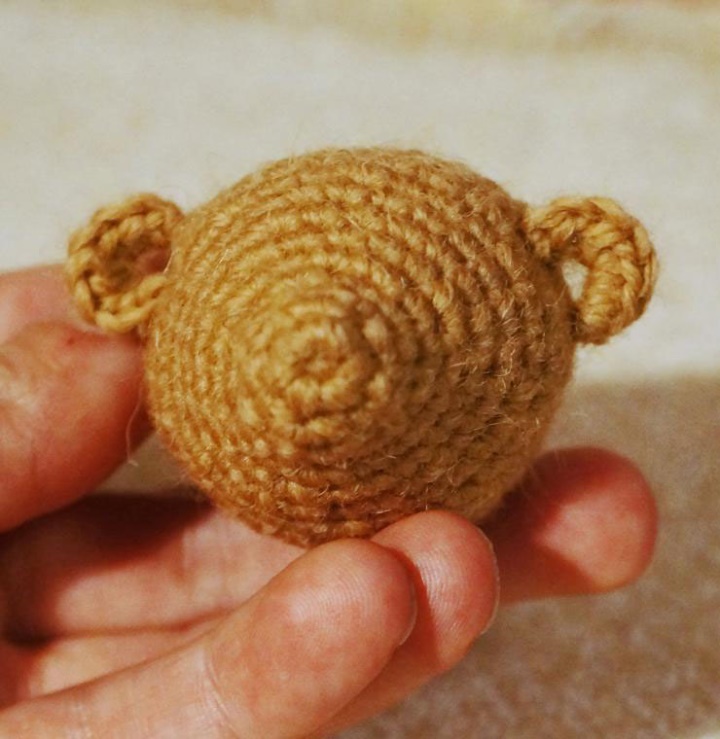
13) We knit the head of the hedgehog
1st row: 6 sb in the ring amigurumi
2-7th series: 3 increments per row = 24 sbn
8th row: 6 increases = 30 sb
9-11th series: 30 sc.
12th row: 3 decreases = 27 sb
13th row: 3 penalties = 24 sb
Next, we knit by doing 6 adjustments in a row. When there is a small hole, tightly fill the head and bind, making the cuts and closing the hole.
That's such a garbage-head we got
14) The ears are knitted in this way. We introduce a hook under the stem of the column in the intended place and pull out the loop. We knit a chain of four air loops. With a little retreat, we attach the chain with a connecting post to the head. The loop was obtained - the base of the eyelet. Turn the knitting and tying a loop 6-8 sb (crochet, inserting the hook under the chain, and not in the loop of the chain). We finish with a connecting post in the same place where the chain started. Tails we deduce on a nape, through thickness of a cloth by means of a needle and we fix knots.
Similarly we knit the second eyelet. That's how we got. Already looks like a muzzle.
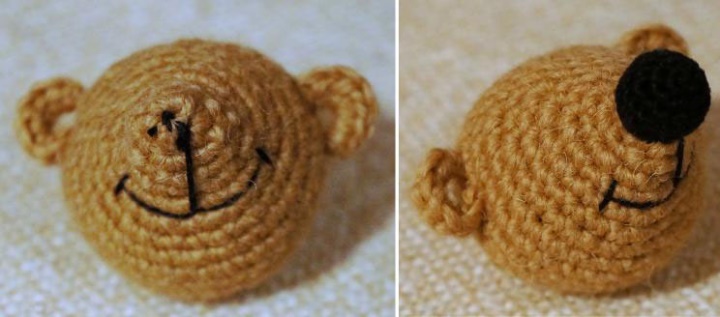
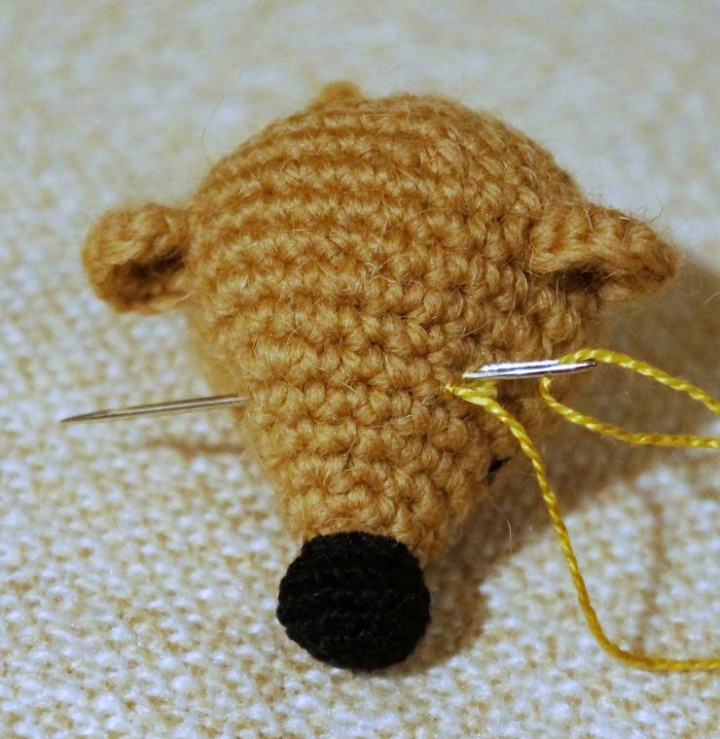
15) We embroider a muzzle . The initial and last nodules, we do on the tip of the muzzle. Then this place will be closed by the nose.
16) We knit the nose
1st row: 6 sb in the ring amigurumi
2-4th series: 6 additions in each row = 24 sbn
5-7 series: 24 sc
8th row: 3 decreases = 21 sbn
We leave a long tail and with it, we sew a nose to a muzzle (we do not forget to enclose a lump of a filler).
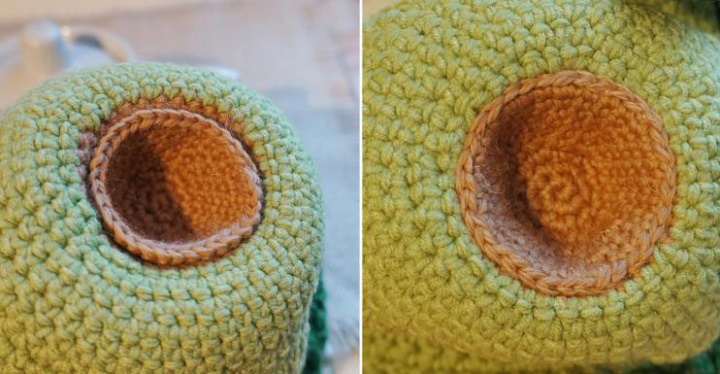
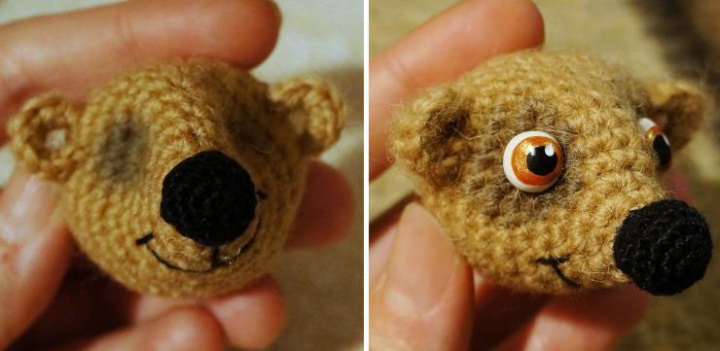
17) We make a tightener for the eyes . Thin marker mark two points where we plan to make the eyes (I was too lazy to do it and then reworked the duck). We take a thin, but strong thread in the tone of the head (I have "Iris") and a long needle. We fix the thread with a knot in the intended place. We pierce the head with the needle and take out the needle at the second planned point. We make a small stitch and pass the needle in the opposite direction, taking it out at the first point. We tighten the thread to make a hollow. We repeat the whole procedure one or two more times. We fix the thread and hide the tail in the thickness of the canvas.
18) Toning the cavities with acrylic paint . This step is optional, but I like to do it - the eyes are more expressive. We take a brush and moisten the cavities with clean water. The area is wetted a little more than necessary. We raise the brown paint to the state of the ink, we collect it on the brush and apply it to the middle of each cavity. The paint itself will be distributed along the wet cloth as needed. Dry and repeat if necessary. It is better to use universal acrylic paint for artistic or design work. Unlike acrylic paint for fabrics, it does not require heat treatment for fixing. When drying, it becomes indelible, and the hot water bottle can be washed smoothly.
19) Sew or glue the eyes .
The muzzle is ready!
20) Monofilament we sew the head to the body.
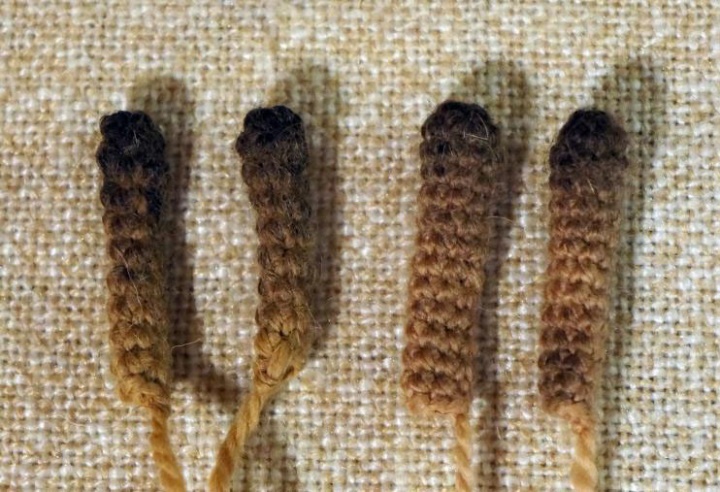
21) We knit the paws.
The upper ones.
1st row: 6 sb in the ring amigurumi
2nd row: 2 increases = 8 sbn
3rd row: 8 sbn
4-th row: 1 reduction = 7 sbn
5-6th series: 7 sbn
Leave a long tail
Lower.
1st row: 6 sb in the ring amigurumi
2nd row: 3 increases = 9 sbn
3-5-rd series: 9 sbn each
6th row: 1 reduction = 8 sbn
7-13th series: 8 seats each
We leave a long tail.
You can foot the feet. To do this, wet them to the middle of the length with clean water (you can directly dip into the water and squeeze). Then we dip into the diluted brown paint a third of the length and then into the black paint the very tips of the paws. Dry it. If necessary, repeat the procedure. In the photo already tinted and dried paws.
22) We twist the wire by a length equal to the length of the upper foot. We pierce the body through the free end of the wire (first make a hole with a thick needle or knitting needle). We twist the wire for the second foot, the tip is cut off.
23) We put the paws on the frame and sew it with the remaining tails of the yarn.
24) Likewise do the lower legs. Only the wire must not pass through the entire body, but between the outer and inner layers. We bend the paws, as we like.
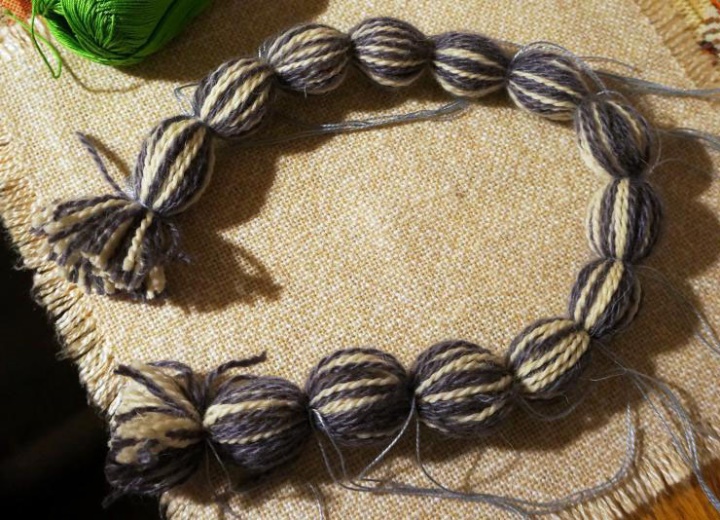
25) Master pom-poms for a fur coat of a hedgehog .
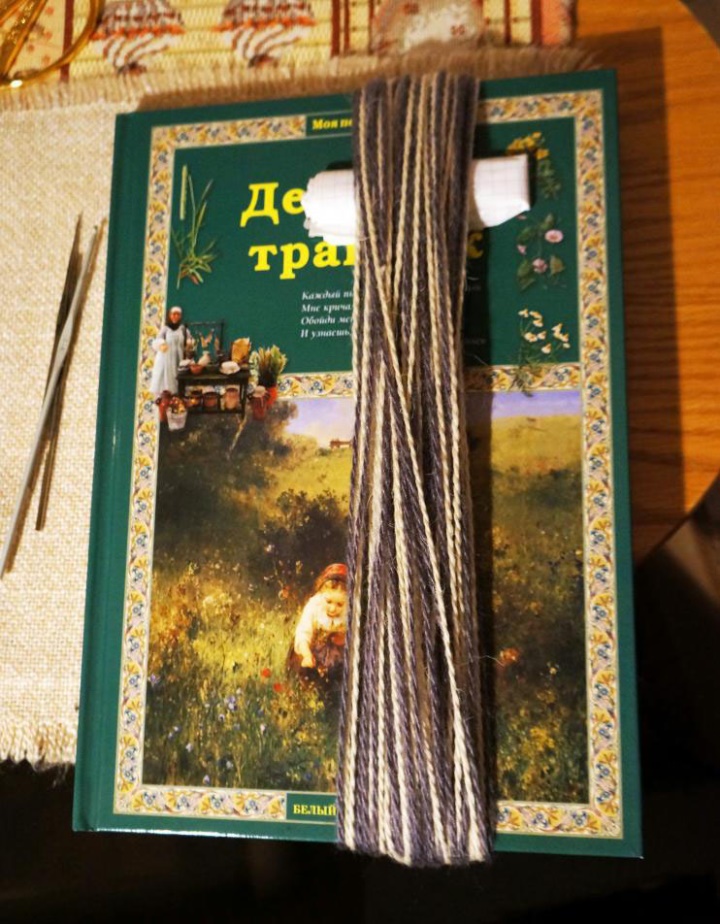
We take yarn of two colors (I have a dark gray and the color of an unbleached cloth).
We wind the yarn on the template (the book). It is not necessary to reel up tight, for this it is better to put something (I put a twisted sheet of paper). The number of turns is determined experimentally - it all depends on the thickness of the yarn. You can first make one pompomchik on a small piece of cardboard and see how much yarn is needed.
After the yarn is wrapped, remove the backing (twisted paper) and divide the winding into 4 cm lengths, tying with strong thin threads (I used "Iris" in gray color). We twist the yarn two times, then make a straight knot and additionally a couple of simple knots. Tails left more authentic.
It turned out like a bunch of wieners. We cut our bundle between knots.
The resulting pompoms are slightly trimmed (we cut off only too protruding thread).
If you do not get the necessary number of pompoms, then several pieces can be wound in addition on a small piece of cardboard.
How to knit a straight knot, there is a lot of information.
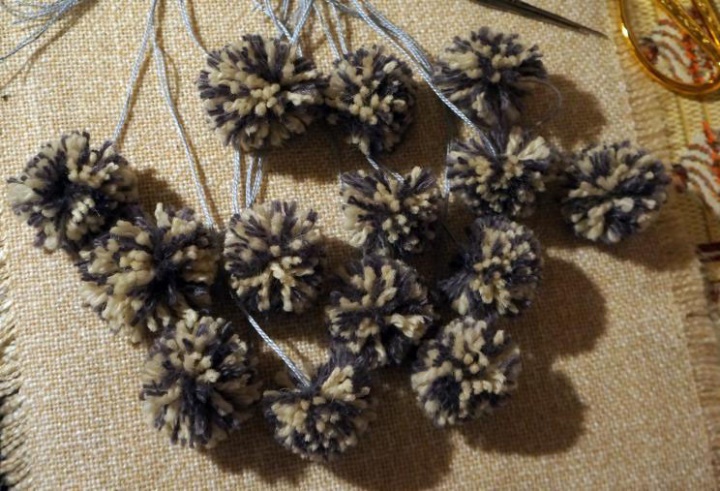
26) We begin to dress our hedgehog.
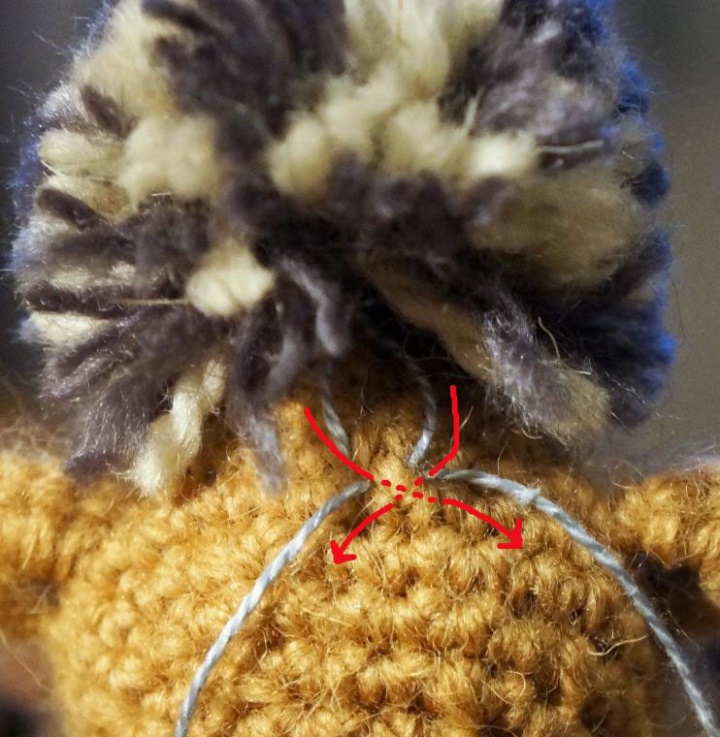
The first pompon is attached to the "forehead" of the hedgehog. With the help of a hook we drag the tails under the foot of the sbn in the right place (pompom first attach and see where it is necessary to fasten).
We tighten both ends of the thread and tie it with a straight knot and for reliability with a couple of simple knots. We cut the thread.
Do not cut the thread near the nodule, leave small tails - there will be a guarantee that the knot will not exactly untie, and in the mass of the pompoms, the threads will not be visible.
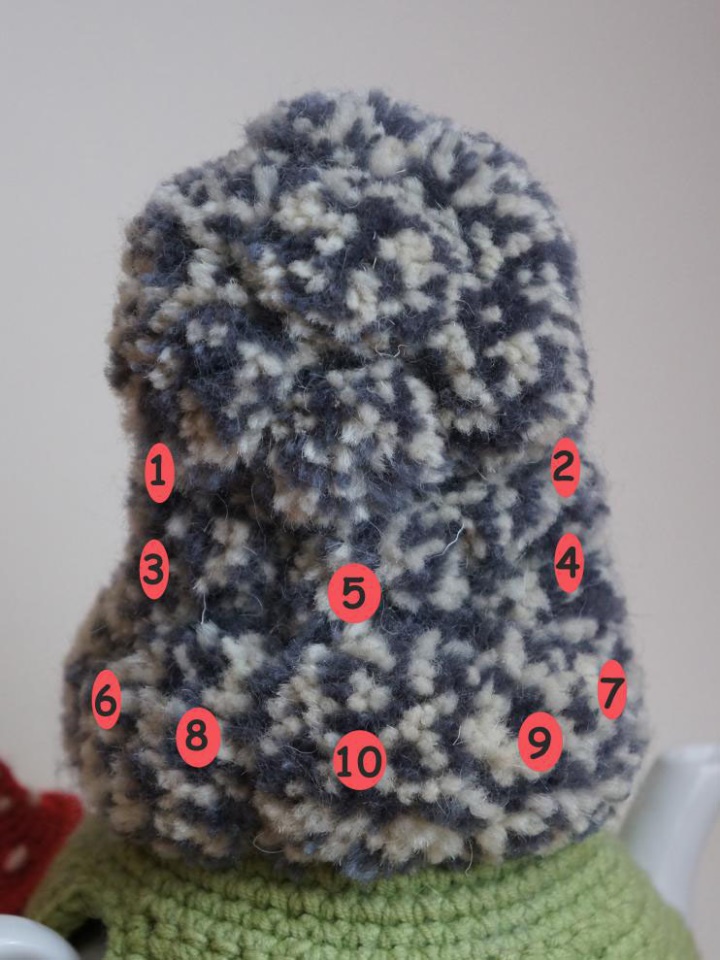
We continue to tie pom-poms. In the photo, figures show the order of attachment of pompoms on the head of a hedgehog.

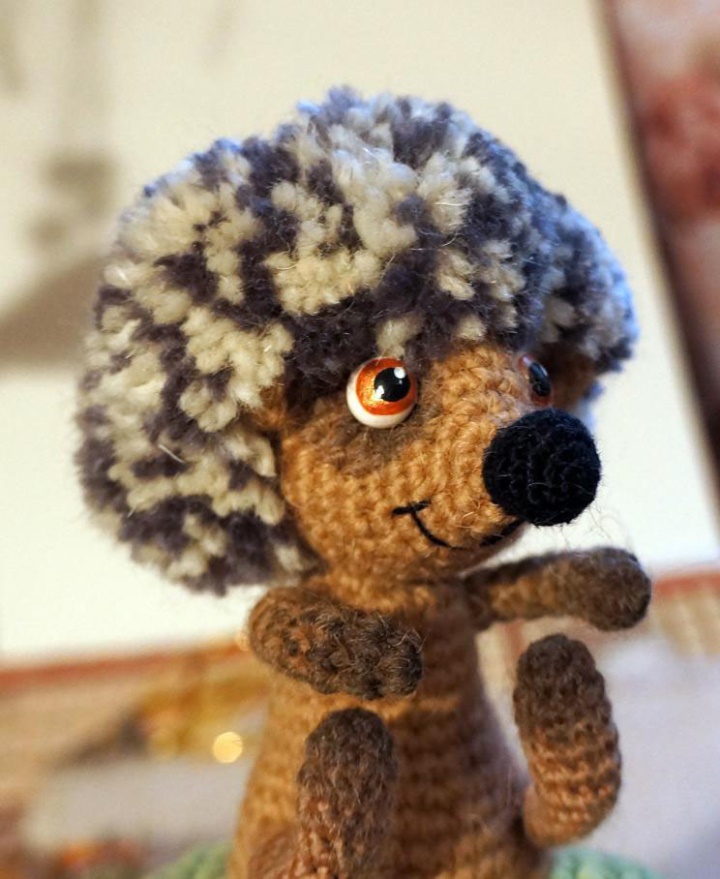
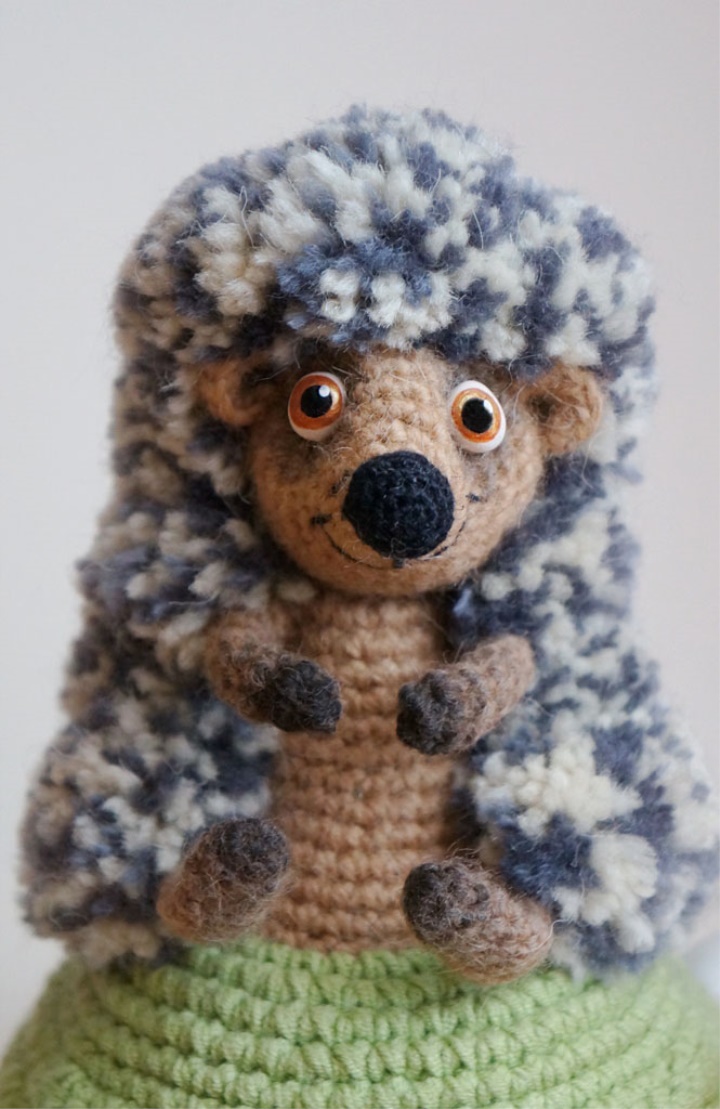
Here is such a papakha we turned out :)
This photo shows the sequence of attachment of pompoms on the trunk of a hedgehog.
After all the pompoms are tied, we make a model haircut. And now, the hedgehog is ready!

We cultivate fly agarics
27) Large mushroom
Hat
1st row: 6 sb in the ring amigurumi
2-11th series: 2 increments in each row = 26 sb
12-14th series: 4 additions in each row = 38 sbn
Leg
1st row: 6 sb in the ring amigurumi
2nd row: 3 increases = 9 sbn
3 rd series of 9 sbn
5-th row: 1 reduction = 8 sbn
6-7th series: 8 sbn
8-th row: on the front (near) half-loops we knit 2 rows of sb, each time tying up 2 sb in each half loop. It turns out the collar of the fungus. We finish knitting by a connecting column, the thread is cut off. Again, attach the thread and tie 8 sbn on the purlins (distant) half loops.
Next, we knit as usual - for both half-loops.
9-11th series: 8 sbn
12-16th series of 6 additions in the series = 38 sbn
28) Small mushroom
Hat
1st row: 6 sb in the ring amigurumi
2nd row: 6 increases = 12 sbn
3-6th series: 1 increase in each row = 16 sbn
7-8 series: 2 additions in each row = 20 sb
9th row: 4 increases = 24 sbn
Leg
1st row: 6 sb in the ring amigurumi
2nd row: 2 increases = 8 sbn
3-6th series: 8 sbn
7-8th series: 6 additions in each row = 20 sb
9th row: 4 increases = 24 sbn