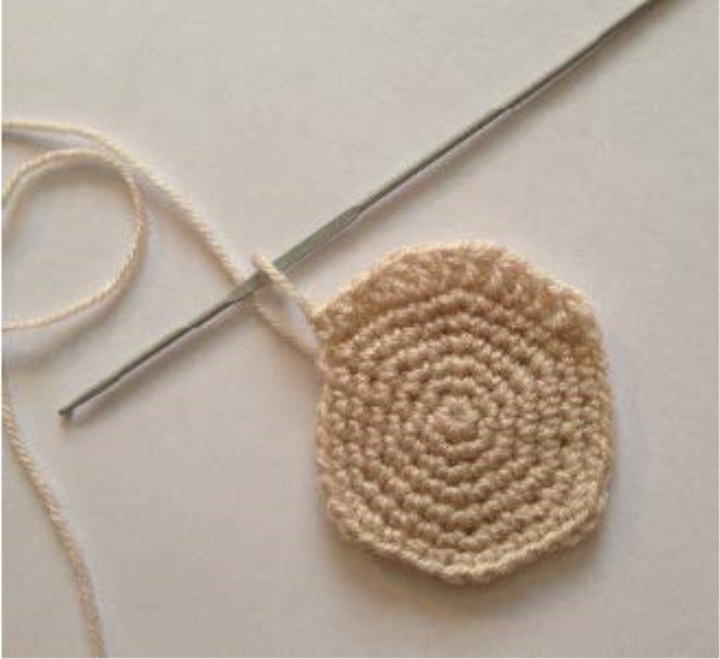
is fundamental. Of fine yarn
thick - more.
thickness of the selected yarn.
1. 5 VP
2. In the second loop from the hook
3. In 1 loop of the PR, then 1 RLS, PR,
OL, 1 RLS per trace 2 loops. (14)
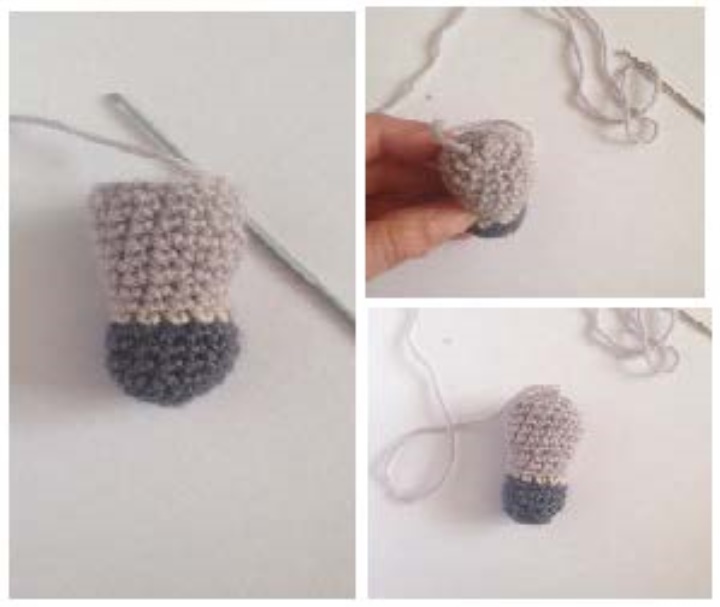
4. 1 RLS, RR, 1СБН, ПР, 4 СБН, ПР, 1
5-6. 18 RLS (end of row and color change
7. Change the thread to the main, gray
(color of the trunk) 18 RLS
8. 6 RLS, 6 RR, 6 RLS (24) (loops
The increase is
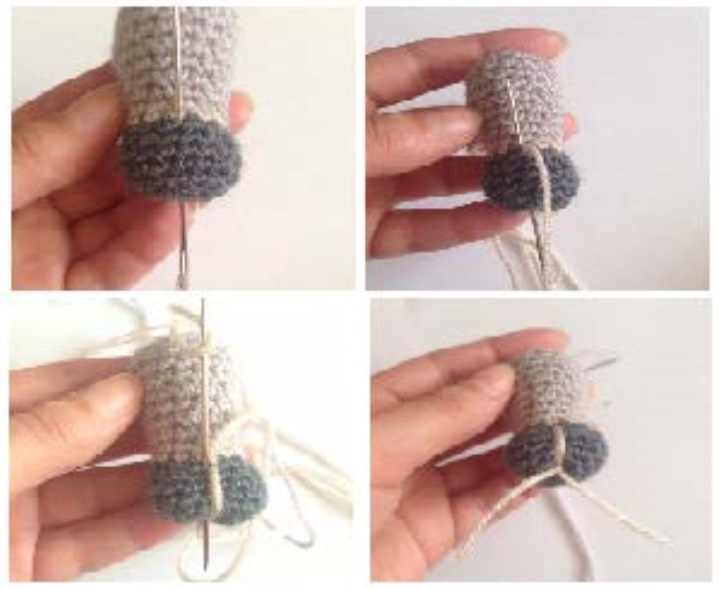
The side of the spout opposite
where the seam is a change of color (he is on his chin)
9. 24 RLS
10. (3 SCR, OL) * 6 (30)
11. (4 SCR, PR) * 6 (36)
12. (5 SCR, OL) * 6 (42)
13- 18. (42) - 6 rows
19. (5 СБН, УБ) * 6 (36) Decreases are made for
front half loop (see photo), canvas
it turns out that the level is not visible.
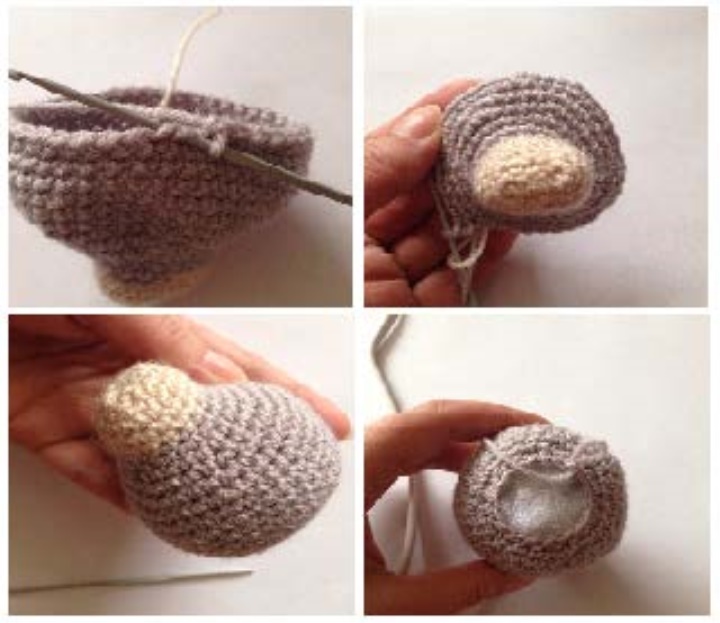
Filling the head with filler
20. (4 СБН, УБ) * 6 (30)
21. (3 RTS, UB) * 6 (24)
22. (2 SC, UB) * 6 (18)
Adding filler
Nuance! If your eyes are regular
sewing, further we subtract and
close the hole in the head. If
screw (like me), do otherwise.
We correct the snout of the donkey
tighteners, only after them we attach
screw eyes, so far
hole do not close.
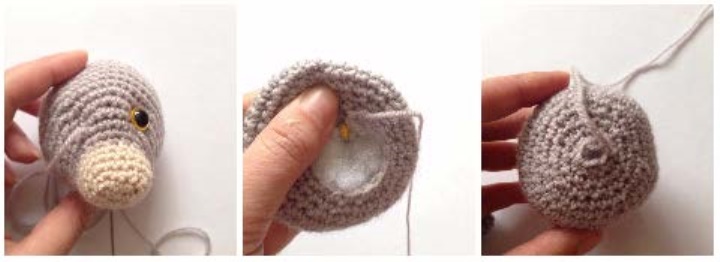
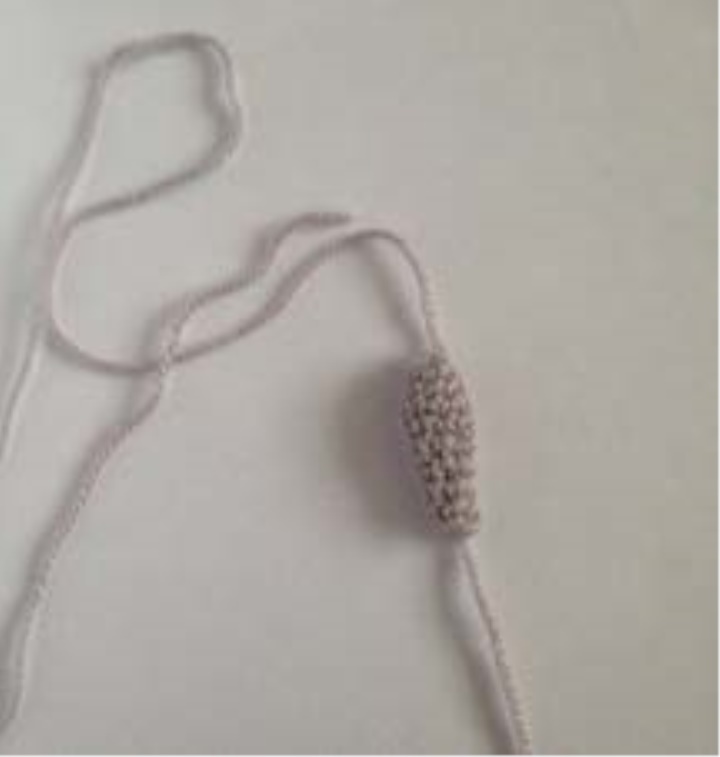
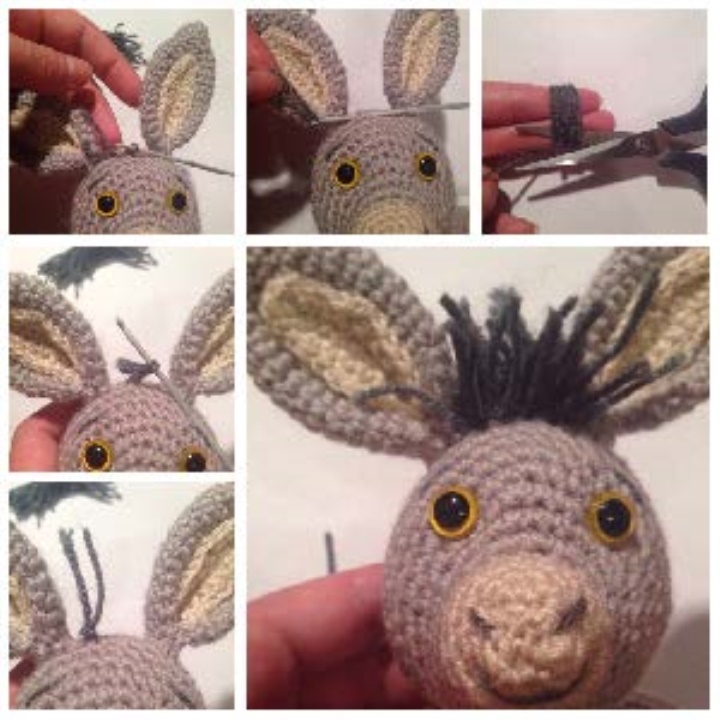
We make a tightener for the peephole (see photo). The thread is the same color as the head
We insert the needle approximately between 11 and 12 rows (closer to the nose), between
with the eyes of 8-9 hinges, we draw a little higher on the sides and wider by 1 loop (for
symmetry of the muzzle). .Tak 2-3 times, the thread is fixed. The ends can be tied and
hide inside the head. We insert the eyes, check the symmetry, get a little
from the top of the filler's head, to fix the eyes, to fill the head.
23. (1СБН, УБ) * 6 (12)
24. 6 UB (6)
25. Use the needle of the loop to tighten and sew
We will do the tightening on the spout after fixing the ears

Ears
The main part, we knit gray.
1. SC, (6) RLS
2. (1 SC, PR) * 3 (9)
3- 4. (9)
5. (2 SC, OL) * 3 (12)
6. (1 SC, OL) * 6 (18)
7. (18)
8. (5 SCR, OL) * 3 (21)
9 -16. (21)
17. (5 СБН, УБ) * 3 (18)
18. (1 СБН, УБ) * 6 (12)
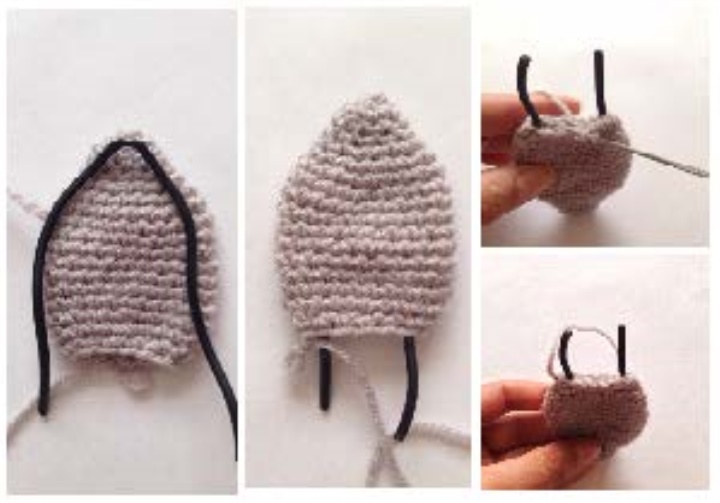
To ears bent in different directions, at this stage, you need to insert the frame-
wire. The length of the ear is 6 cm, so for each you need a wire 16 cm long,
(ends of 1.5 cm will be inside the head)
We fold the bottom of the ear, connect-bind the edge for both sides connect.
loops. We leave a long string for sewing
The second ear is knitted similarly.
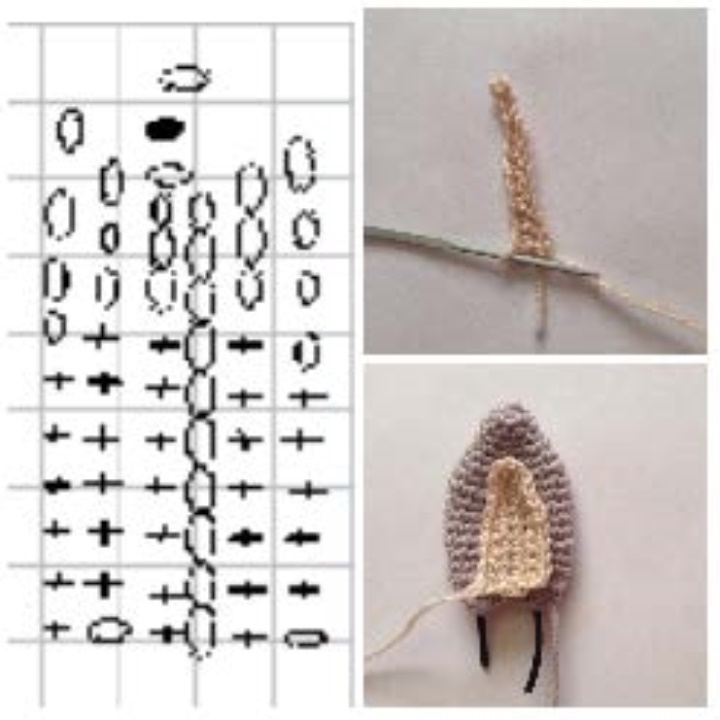
INSIDE THE EAR
knit with beige thread (like nose)
1. 11 VP, from the second loop from the hook
knit 3 connect hinges, 7 RLS.
2. Do PP, turn knitting,
we knit 6 RLS (lifting loop replaces
first loop), 3 will connect the loops further
1 VP, knit on the second side
mirror 3 connect loops, 7 sc.
3. PP, turn knitting, 5 sc, 4
connect the loops, the fifth to the top
details, 4 hinges, 6 RLS
We leave the thread for sewing.
Apply this part to the main
ear, we sew (we do not introduce the needle
Through, and sew over the top
wall of the main ear, everything will be
look exactly and neat)
CULTIVATION
1. SC, 6 sc
2. 6 PR (12)
3. (1 SC, PR) * 6 (18)
4. (2 SC, OL) * 6 (24)
5. (3 SCR, PR) * 6 (30)
6. (4 sc, ap) * 6 (36)
7. (5 SCR, PR) * 6 (42)
8. (6 SCN, OL) * 6 (48)
9.- 16. (8 rows) (48)
17. (6 СБН, УБ) * 6 (42)
18. (42)
19. 6 RLS, (3 RLS, UB) * 6, 6 RLS (36) (in
this set of 6 deductions, after 3 can
put a marker, this will be the middle
pusik, when assembling a convenient landmark
to observe symmetry)
20. (36)
21. (4 SCN, UB) * 6 (30)
22. (3 SCN, UB) * 6 (24)
23. (2 SC, UB) * 6 (18)
24. (4 SCN, UB) * 3 (15)
Leave a thread of 20 cm for sewing the head
Fill the body with filler
TUM
(like the gray donkey in the photo)
1 OPTION
1. SC, 6 sc
2. 6 PR (12)
3. (1 SC, PR) * 6 (18)
4. (2 SC, OL) * 6 (24)
5. (3 SCR, PR) * 6 (30)
6. (4 sc, ap) * 6 (36)
2 OPTION (like a blue donkey) - on
a photo
1. SC, 6 sc
2. 6 PR (12)
3. (1 SC, PR) * 6 (18)
4. (2 SC, OL) * 6 (24)
5. (3 SCR, PR) * 6 (30)
6. (4 sc, ap) * 6 (36)
7. Make a more elongated, oval shape. 6 СБН, 3СБН in one loop, 8 СБН, 3
in 1 loop, 7 SCN, 1 SSN, 2 PRSP, 2 SSN, 1 PRSP, 2 SSN, 2 PRSP, 1 SSN, 1 SSN
Leave the sewing thread 20 cm
LEGS
We knit in dark gray color
1 . SC, 6 sc
2. 6 PR (12 sc)
3. (3 SCR, OL) * 3 (15)
4. (4 SCR, OL) * 3 (18)
5. (18)
6. (4 СБН, УБ) * 3 (15)
7. (3 RTS, UB) * 3 (12)
8. (12 СБН) beige color
The ends of the threads are fixed inside
We knit the main color
9-10. (12 sc)
11. (3 SCR, OL) * 3 (15)
12. (15 sc)
13. (4 SC, OL) * 3 (18)
14.-16. (18 sc)
We fill the leg
17. (4 SCN, UB) * 3 (15)
18. (3 RTS, UB) * 3 (12)
19. 6 UB
Remove the remaining hinges and sew them with a needle. We leave the thread for sewing 30
cm (we will sew both legs)
The second leg is knitted similarly, the edge of the gray thread at the end of the knitting is fixed and
we hide inside of a leg
Leg Formulation
Take the beige thread, 30 cm, insert the needle on the
soles in the spacecraft, show in the top
perpendicularly, on the border between beige
and dark gray edge, a little tighten, so
2 times. (it will be in front of the legs, do it
so that the transition of the rows in colors remains
behind) The needle is at the outlet at the top, we enter
it is half a loop to the left and we bring it down into the spacecraft,
tie both ends, hide inside the legs
ARMS
CC - connect the column
We knit in dark gray color
1 . SC, 6 sc
2. 6 PR (12 sc)
3. (3 SCR, OL) * 3 (15)
4. (4 SCR, OL) * 3 (18)
5. (4 СБН, УБ) * 3 (15)
6. (3 СБН, УБ) * 3 (12)
7. (12 СБН) beige color
The ends of the threads are fixed inside
We knit the main color
8-10. (12 sc)
11.-12. 4 RTS 4 SS 4 SBN (12)
13.-17 (12 sc)
Fill with filler
18 (6 UB)
We close the part - sew it with a needle and thread. We leave the thread 30 for sewing
both hands.
The second knitting is similar, at the end of knitting we fix and fix the thread

Hand writing.
In the 12-13th series we formed an ulnar
bend, take the handle, inside of the elbow to yourself
, in the middle from below, we introduce a needle between
beige and dark gray series, as if
wrapping along the handle, above
also between these rows, a little
tighten, straighten the thread so she went
smooth.
Then again, enter the bottom in the same place and
we deduce above, in the likeness as we did on
We insert the needle either to the left or
To the right and to the bottom.
linen-as will be more accurate). On the picture
worked a little higher on the floor of the loop. At the bottom
we tie the thread and hide it inside
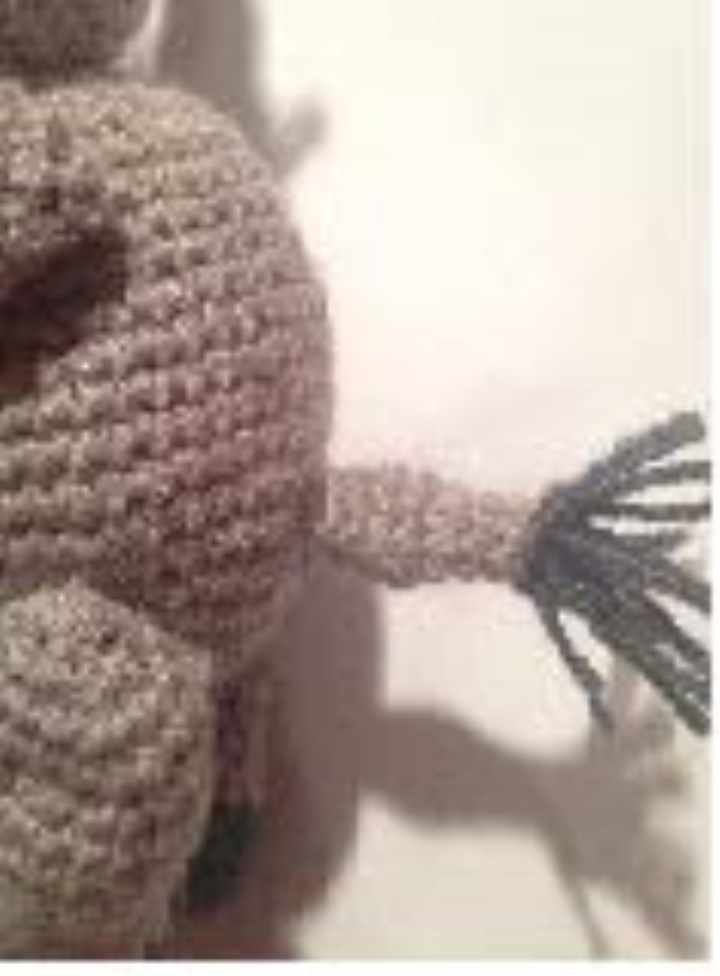
TAIL
We knit with a gray thread
We retreat to the threads of 20 cm, we make a spacecraft (this
thread we sew the tail)
1. SC, 6 sc
2. (2 SC, OL) * 2 (8)
3.-5. (8 sc)
6. (2 СБН, УБ) * 6 (6)
7.-8. (6CBN)
We fix the thread, so we leave everything, for
The remaining loops will be fastened with a brush
tail
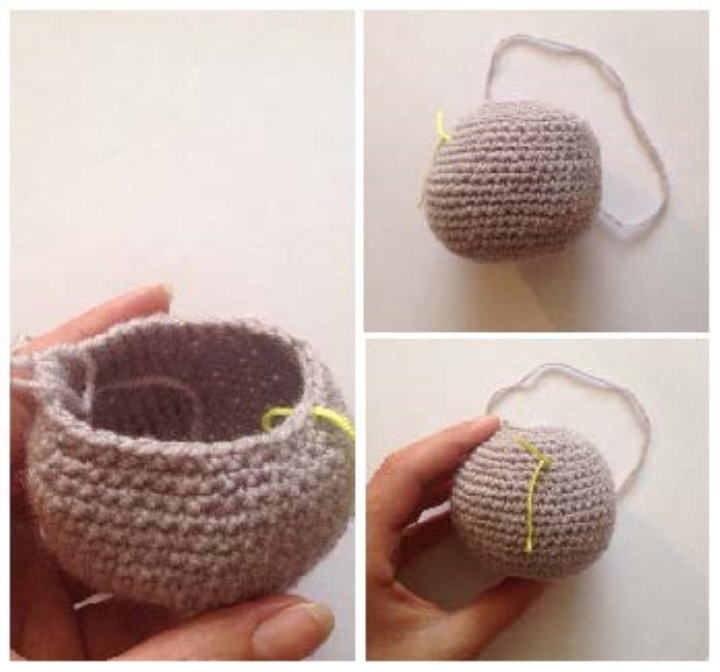
Collecting the head
The bottom of the ears is folded in half, sewed, fixed to the head with needles, between
ears 3 cm, the hat sits perfectly. Ears are fastened approximately between 15-17
rows.
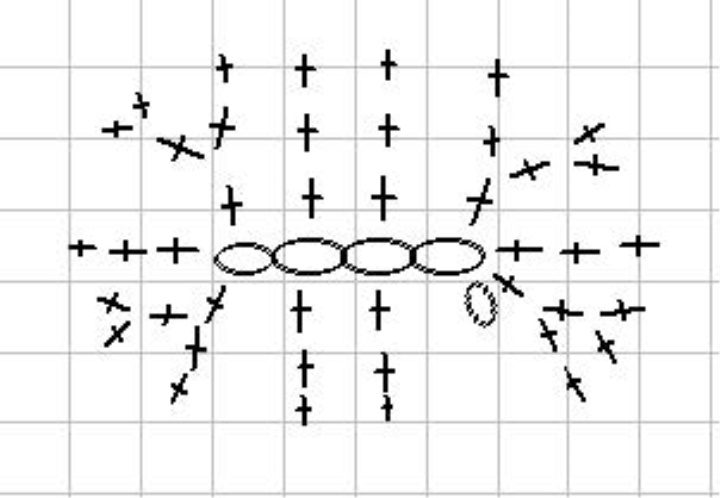
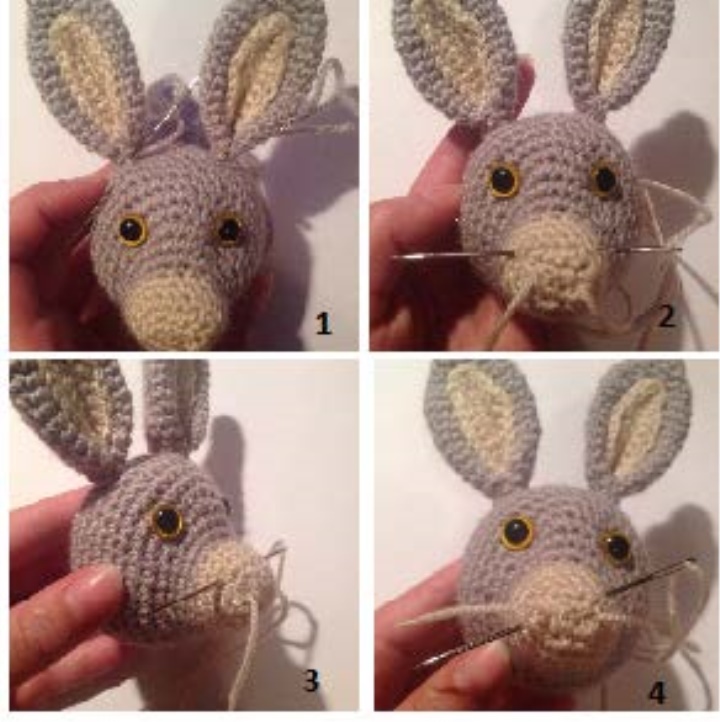
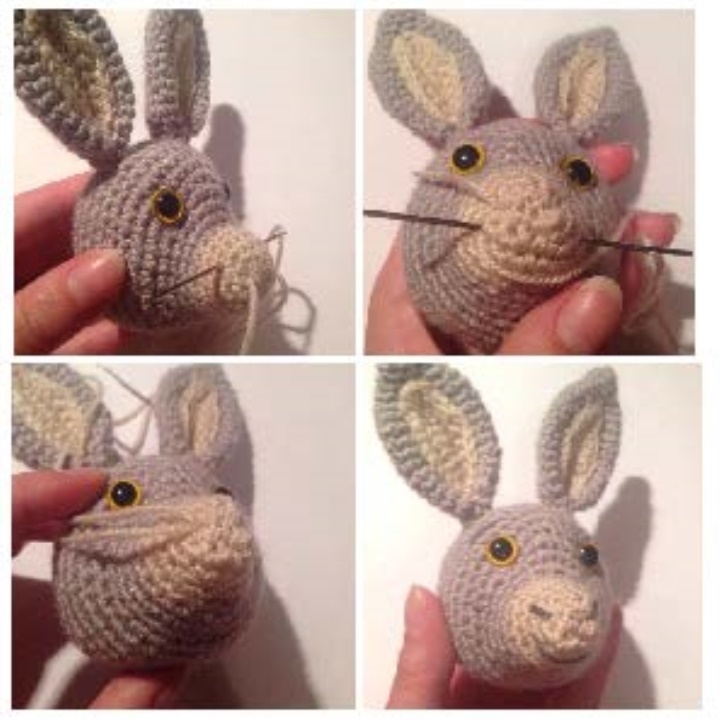
We form the spout with the thread of the spout color. We introduce the angle θ into the first loop of the first series
nose (it can be seen in the canvas, the left corner of the nose) - we show in the same row in the right
extreme loop. We enter at an angle of 45 degrees between 4 and 5 rows (slightly tighten
thread), we draw the needle symmetrically in the opposite left side, and enter in
the first loop (whence started the contraction). Then we draw the needle at the same angle
below -
between 4 and 5 rows, approximately 3 loops lower from the upper corner of the nose and
insert the needle symmetrically to the right, directing the needle into the very first loop. Nostrils and
the mouth is formed. So repeat again, pulling the thread. . However, not so
It is important to observe exactly this order, the main principle is to understand and
form the nostrils and mouth. Then we go through a black or a dark thread the same
image on the ready-made features of the muzzle and, if desired, make the eyebrows
We sew our hands, we make a thread, (you can be buttoned). Prikalyvayu
both hands to the trunk to fix them, I sew this way-
we stick the needle from the outside of one hand through the trunk and bring it out
The needle is on the outside of the second arm, retreating 3 loops to the side (along the row)
we stick the needle and pass through the trunk back outside the second hand
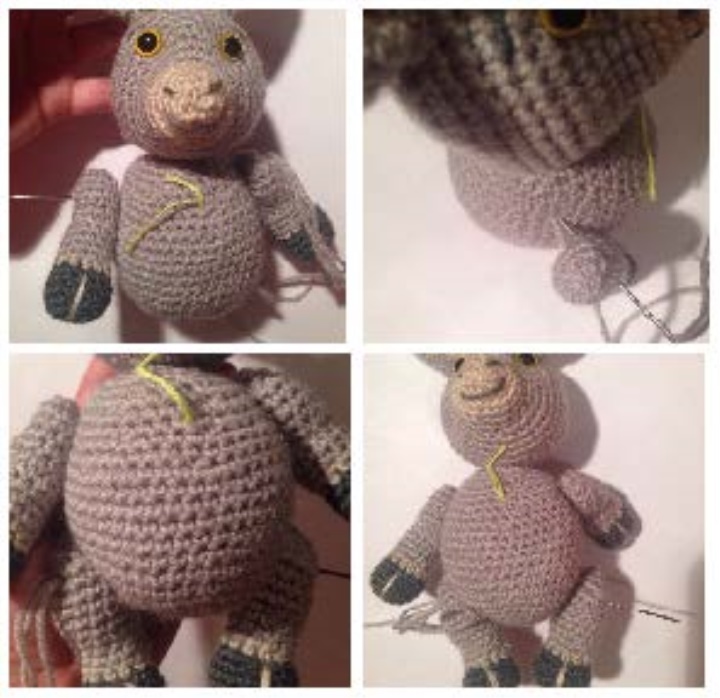
To the limbs remained mobile,
On the outside of the hand is a small
stitch, and from the inside of the hand we hold
needle all the time through one hole. A thread
we fix from the inside of the hand, so that
it was not seen. Legs sewn similar
way.
Sew a tail when it is sewn,
the last stitch is done through the trunk
and remove the needle in the lower abdomen,
In the middle, through one loop we introduce a needle
again in a pussy and put out through the trunk
to the tail, we just tighten the thread, fix it,
the navel is obtained.
HAIRSTYLE
We wrap the thread around 2 fingers, from the bottom cut the entire beam, it's a set for
tail brushes and hair. We fix the threads as shown in the photo, the area on the
head determine how you like. In this donkey it is from ear to ear, in
width - 3 rows, if the "shock" was a little long, you can cut it. On
ponytail fasten on the edge
MARACAS
1. SC, 6 sc
2. -6. 6 RLS
7. (1 SC, PR) * 3 (9)
8.-9. 9 RLS
10. (2 SC, OL) * 3 (12)
11. 12 RLS of colored thread
12. 12 RLS
13. (2 СБН, УБ) * 3 (9) we fill
filler
14. (1 СБН, УБ) * 3 (6) close
hole
BUCKET
1
BUCKET
1.KA, 6 sc
2. 6 PR (12)
3. (1 SC, PR) * 6 (18)
4. (2 SC, OL) * 6 (24)
5. (3 SCR, OL) * 6 (32)
6. We knit the back half loop for 32 RLS
7.-19 (32 sc)
20. (3 sc, vp) so until the end of the series, under
VP skip one loop of the base,
Repeat 4 loops. Obtained through
every 3 hole loops in which we
let's pass the lace.
21.-22. (32 sc)
In a bag to pass or a ready lace,
or bind 30 VP and after passing through
connect the chain.
Choose colors for accessories
any, drawing too.
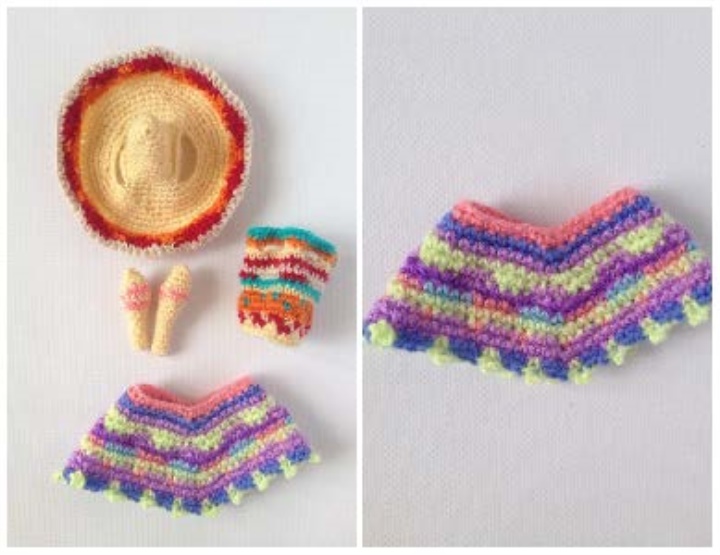
PONCHO
(hook can take 2.5 or 2 slightly
free to knit)
1. 32 VP
2. 32 VP
3. 7 sc, 3 sc in one loop) * 4 (40)
4. 40 RLS
5. 8 sc, 3 sc in 1 loop, (9 sc, 3
SBN in 1 loop) * 3, 1 sc (48 sc)
6. 48 RLS
7. 9 sc, 3 sc in 1 loop, (11 sc, 3
RLS in 1 loop) * 3, 2 sc (56)
8. 56 RLS
9. 10 sc, 3 sc in 1 loop, (13 sc, 3
RLS in 1 loop) * 3, 3 RLS (64)
10. 64 RLS
11. 11 sc, 3 sc in 1 loop, (15 sc,
3 sc in 1 loop) * 3, 4 sc (72)
12. 72 RLS (in each 4 picos-3 loop
RLS blue, 1 RLS light green + pico,)
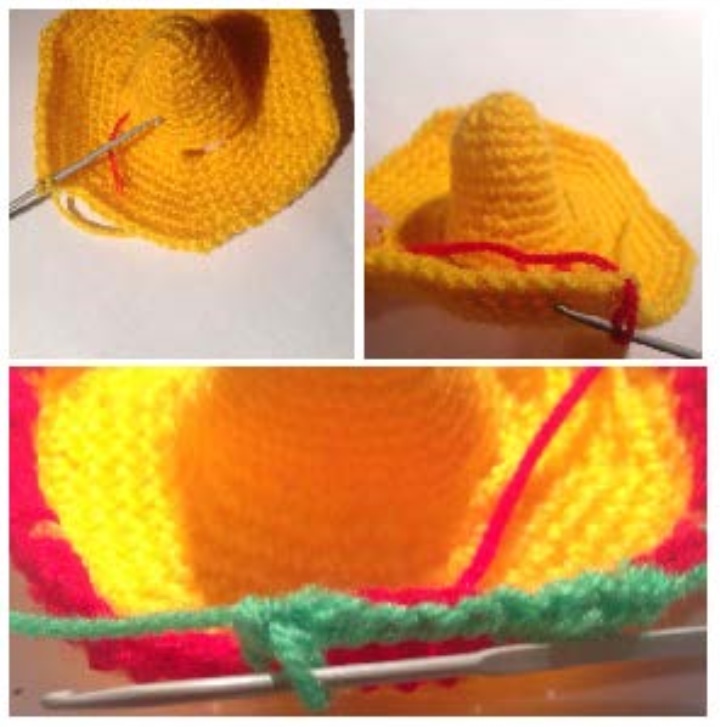
SOMBRERO
1. SC, 6 sc
2. (1 SC, PR) * 3 (9)
3. (2 SC, OL) * 3 (12)
4. (3 SCR, OL) * 3 (15)
5. (4 SCR, OL) * 3 (18)
6. 18 RLS
7. (5 SCR, OL) * 3 (21)
8. 21 RLS
9. (6 SCR, OL) * 3 (24)
10. 24 RLS
11. 24 RVS
12. (3 SCR, PR) * 6 (30)
13. 2 RLS, RR, 2 RLS, 7 VP (at the bottom we pass 7 loops of the base, we inject
hook in 8 loop), 2 RLS, RR, 2 RLS, RR, 2 RLS, 7 VP (at the bottom we pass 7 loops
bases, we stick a hook in 8 loop), 2 RLS, PR (34)
14. (16 SCR, OL) * 2 (36)
15. (5 SCR, OL) * 6 (42)
16. (6 SCR, OL) * 6 (48)
17. (7 SCR, OL) * 6 (54)
18. (8 SCN, OL) * 6 (60)
19. (9 SCR, OL) * 6 (66)
20. (10 SCR, OL) * 6 (72)
We turn the hat and knit from the wrong side (see photo). When we do
Lapel, to the outside turned out the front side
Change color
21. (RLS, PRSP, 3SSN, PRSP, SSN, SS) * 9 (72)
Change color
22. (PRSP, SSN, 3SS, RLS, PRSP, CLO) * 9 (72)
Change color
23. 72 RLS.
That's all ! To all obedient loops and beautiful toys !!!