Click For Crochet Abbreviations List
Initially, I did not plan to make a description, so not everything
photographed and not all the changes in the MK recorded. But anyway
I'll try to display clearly. I'm doing this for the first time. Yes, and the photo is not very.
I photographed on the phone, at different times of the day, under different lighting conditions.
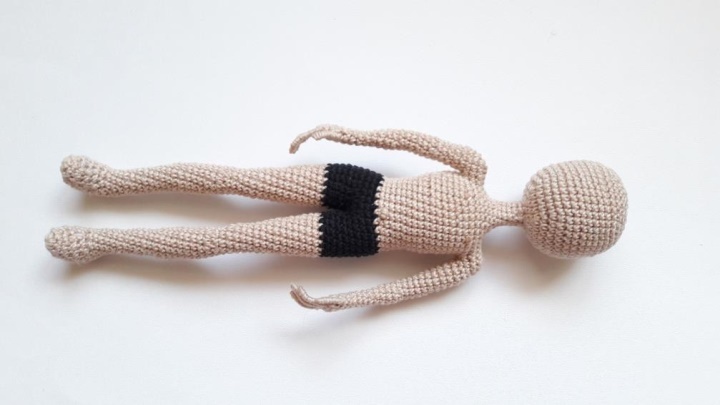
The figure of a scuba diver is connected to the Boy Band MC,
translation by Zaryany Kozyryatskaya. For more convenience and understanding here
I result the scheme of knitting from this MK. All my changes and additions
are executed in a font of red color.
Legend:
Вп - air loop
vpp - air lifting loop
sb - column without crochet
ss - connection bar
prib - an increase - 2 bars tied from one loop
уб - reduction - 2 bars we tie together.
ZZPP - for the back half loop
STD - for the front half loop
Materials:
Threads COCO VITA cotton beige for body and black for swimming trunks,
blue and blue for a vest.
Hook 1.25
Filler.
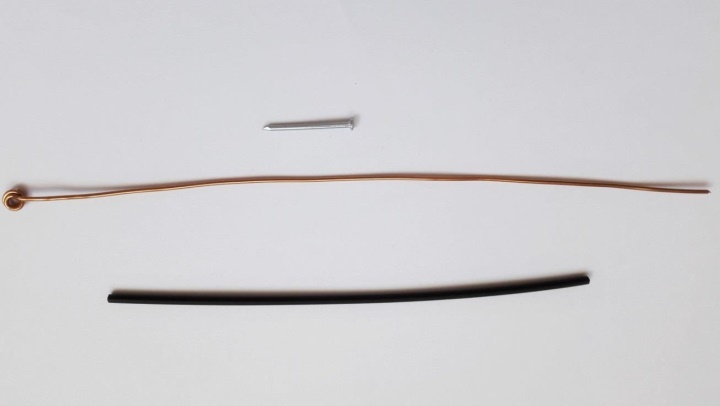
Wire for the frame, I have a copper D-1.2 mm.
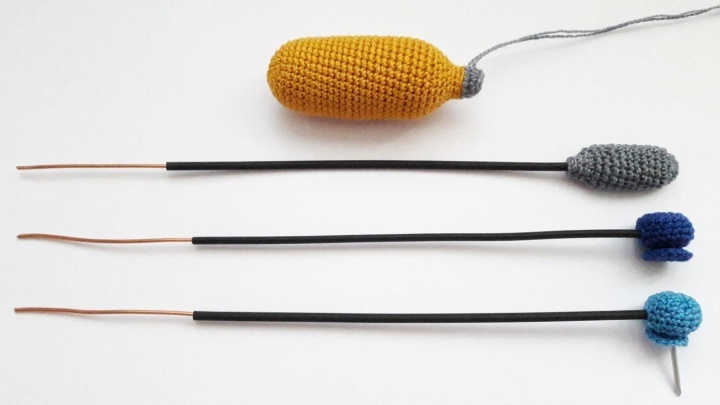
ARMS. We knit a string of beige COCO VITA cotton. Hands decided
do with fingers. Fingers made on a wire frame
Determined with the size of the fingers, based on the future size of the figurine
(presumably, 21-22 cm). I take a piece of styrofoam and insert
small carnations. I wrap the carnations with bead wire
I'm starting with the thumb. I flatten the wire and needles
I apply the glue Crystal Moment. I'm wrapping a thread on a wire with glue
evenly and with tension. Going to the top, my finger form
crown. If necessary, then add more glue needle. The glue dries quickly and
there is an opportunity for one reception of the crown to form. Then the lower
part of the finger slightly smeared with glue and wrap it back down.
Then I move on to the next finger. Leave long tips
thread. Due to the fact that the carnations are fixed, fingers on both
hands are the same. The photo shows that the carnations "walk"
Now I put foam board on cardboard (for children's creativity) further all
also.
These fingers are made for another toy. I think the principle is clear.
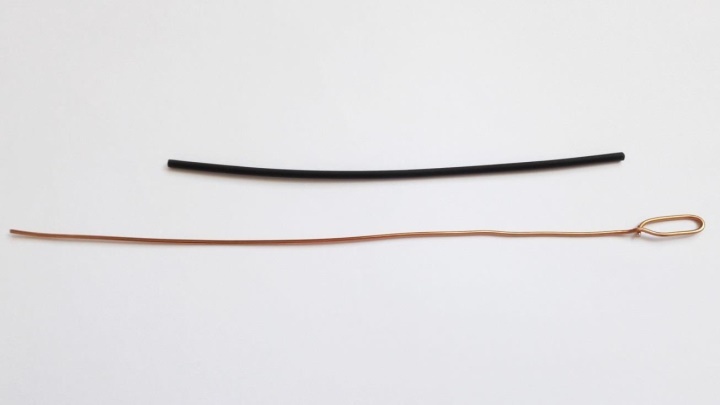
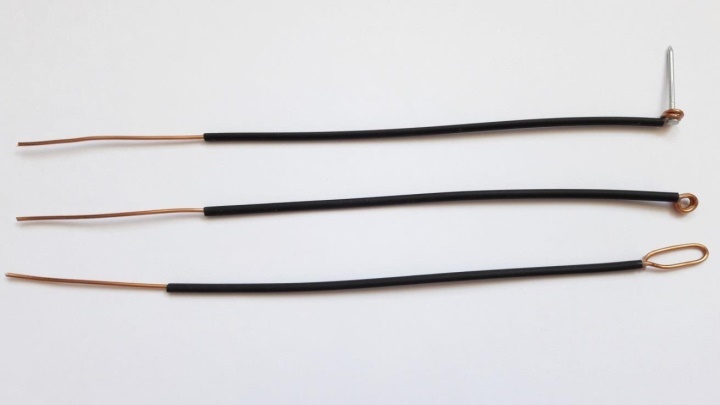
Cut off the wire for the frame of the handle (15 cm), do the end
loop and place it in the palm of your hand. Using the needle and left
the tip of the thread we fix the eyelet in the palm. We connect the wire for
Beadwork with wire frame and the same thread with glue,
again wrapping, fasten together. Extra fine wire
Cropped. Such compounds are proposed to be done with the help of
paper tape or sticking plaster. I use thread and glue Moment
Crystal. It turns out neatly and reliably.
The idea podsmotrena on the Internet. Thanks to the master!
W-h-x! Really with this stage coped? I understand everything. But as
You?
Make the handles on.
1 row: dial a chain of 8 in, join in a ring. When typing, we leave
The long tip of the thread, which will then connect the knitting between
fingers.
2nd row: 8 sc.
3 series: 7 sc., Ap. (9 sc.)
4 series: 8 sc. (we do not bind one column), we transfer the marker.
5 row: we dress our "hand" on the palm and tie a thumb,
skipping at the same time our unbound column of the 9th row (it turns out
hole for the thumb), we knit 8 сбн.
All fingers are in our places. Next we knit around the wire
skeleton.
6 series: 8 sc.
7 series: ub., 2 sc., Ub., 2 sb. (6 scales)
8-9 series: 6 sc.
10 series: 3 sc., Ap., 2 sc. (7 sc.)
11 series: 6 sc., Arr. (8 scales)
12-14 series: 8 sc.
15 series: ub., 2 sc., 2 arr., 2 sb. (9 sc.)
16 series: 3 screechers, 2 ub., 2 sb. (7 sc.)
17 series: sb., Prib., 6 sc. (8 scales)
18-20 series: 8 sc.
21 series: appr., 7 sc., (9 sb.)
22-23 series: 9 sc.
Fill the filler as you knit.
Finish the knitting, fix the thread and cut. On the palm of the STD
we connect our knitting between fingers. Similarly, link the second
hand, but additionally associate 4 sc., to get the right and left
pens.
STOP, FOOT. (2 pieces). We knit on the MC "Boy Band", the translation of Zaryana
Kozyryatskaya.
We begin knitting by a beige thread COCO VITA cotton.
1st row: 11th c., From the second st. from the hook we knit the 2nd row.
2 series: 9 sc., 3 sc. in one loop, on the other side of the chain 8 sbn, prib.
(22 sc.)
3 series: 10 sc., Ap., 10 sc., Arr. (24 sc.)
4 series: 4 sb., Ub., (Sb., Уб.) Х4, 6 сбн. (19 sc.)
5 series: 2 sc., Ub., (Sb., Уб.) Х4, 3 сбн. (14 sc.)
6 series: 3 scales, ub., (Sb., Уб.) Х2, 3 сбн. (11 sc.)
7 series: 3 scales, ub., Sc., Ub., 3 sc. (9 sc.)
8-15 series: 9 sc.
16 series: 8 sc., Ap. (10 sc.) The marker is strictly centered behind!
17 series: 10 sc.
18 series: 9 sc., Arr. (11 sc.)
19 series: 11 sc.
20 series: 9 sc., Ap., Sc. (12 сбн.)
21 series: 12 sc.
22 series: 9 sc., Ub., Sc. (11 sc.)
23 series: 11 sc.
24 series: 9 sc., Ub. (10 sc)
25 series: 10 sc.
26 series: 3 sc., Arr. 2 times, 3 sc., Ub. (11 sc.)
27 series: 3 sc., Ub. 2 times, 4 sbn. (9 sc.)
28 series: 9 sc.
29 series: 8 sc., Ap. (10 sc)
30 series: 10 sc. Marker in the center !!! If necessary we knit loops
offsets.
31 series: 8 sc., Ap., Sc. (11 sc.)
32 row: 11 c.
33 series: 8 sc., Ap., 2 sc. (12 сбн.)
35 series: 9 sc., Ap., 2 sc. (13 scales)
36 series: 13 sc.
37 series: 10 sc., Ap., 2 sc. (14 sc.)
38 series: 14 sc.
39 series: 11 sc., Ap., 2 sc. (15 sc.)
40 series: 15 sc.
41 series: 12 sc., Ap., 2 sc. (16 sc.)
42-44 series: 16 sc. Change the thread to black (smelting).
45-46 series: 16 sc. (black color)
Fill the filler as you knit.
BODY. The first six rows are knitted in black (melting), then
change to beige. Up to the 60th row we knit on the MK, then - my changes.
47 row: We connect the legs and tie the sb. (hereinafter it is not taken into account and not
is tied up). We knit 15 sb. on the first leg and 15 sc. on the second leg. (thirty
) A marker in the center of the priests.
48-51 series: 30 sc.
52 row: (3 scales, уб.) Х6 (24 сбн.) We change color on beige.
53-57 series: 24 sc.
58 series: 6 sc., Ap., 12 sc., Ap., 4 sc. (26 sc.)
59 series: 26 sc. Insert the frame.
I cut two pieces of wire into 25 cm, I make loops for my feet
and insert into the legs. Subsequently, in the chest area I twist well. This
The twisted wire will pass through the neck to the head. To her will be
fasten the skeleton of hands.
60 series: 7 sc., Ap., 12 sc., Ap., 5 sc. (28 sc.)
Next - my changes.
61-62 series: 28 sc.
63 series: 8 sc., Ap., 13 sc., Ap., 5 sc. (30 sc.)
64-66 series: 30 sc.
67 series: 9 sc., Ap., 13 sc., Ap., 6 sc. (32 sc.)
We put our hands in. Determine the location of the connection from the armpit.
If necessary, we sew the offset loops. Do not forget to define
right and left hands. The marker is strictly centered on the back.
68 series: 8 sc. on the back, (4 sb., ub., 3 sb.) on the left hand, (3 scales, ub., 6
sb., уб., 3 сбн.) across the chest, (3 scales, уб., 4 сбн.) on the right hand, 8 сбн. on the back.
(46 sc.)
At this stage, finally form the skeleton of the doll. Wire
the armature is bent by the letter "P". The first vertical is the arm, the second is the shoulder,
We trim the third one to the desired size and connect it to the carcass of the body. We have
two wires from two hands and a twisted wire of the body frame are obtained.
All this is fixed with the help of thread and glue Moment Crystal or any
another way.
Now it is possible to fill the filler densely.
69 series: (3 screeches, truncations, 3 scales) x2, 14 scales, (3 scales, slash, 3 scales) x2 (42 scales)
70 series: 7 sb., 3 sc., Ub., 2 sc., 3 sc., Ub., 4 sc., Ub., 3 sc., 2 sc., Ub., 3
sb., 7 sc. (38 сбн.) Mark is strictly in the middle of the back!
71 ranks: 4 sb., Skip 10 stakes, 10 sb., Skip 10 stakes, 4
sb. (18 сбн) From the passed loops the shoulders will be formed.
72 series: (sc., Ub.) Х6 (12 сбн)
73-76 series: 12 sc.
77 series: 12 sc. STDs
78 series: (sc., Arr.) Х6 STD (18 сбн.)
79 series: (2 sb., Arr.) X6 (24 sb.)
80 series: (3 scales, arr.) X6 (30 sb.)
81 series: (4 sb., Arr.) X6 (36 sb.)
82-91 series: 36 sc.
Densely fill with filler as you knit. On frame inside
we make a loop, we cut off too much.
93 series: (4 scales, ub.) Х6 (30 сбн.)
94 series: (3 scales, уб.) Х6 (24 сбн.)
95 series: (2 sb., Уб.) Х6 (18 сбн.)
96 series: (sb., Ub.) X6 (12 sc.)
97 row: (sb., Уб.) Х4 (8 сбн.) To pull the crown behind the front half-loops by 8-m
columns without a crochet. Finish the knitting.
Through the holes on the shoulders finally fill with filler.
Sew the shoulder seams for the front half-loops. Thread and clip.
It turned out this way:
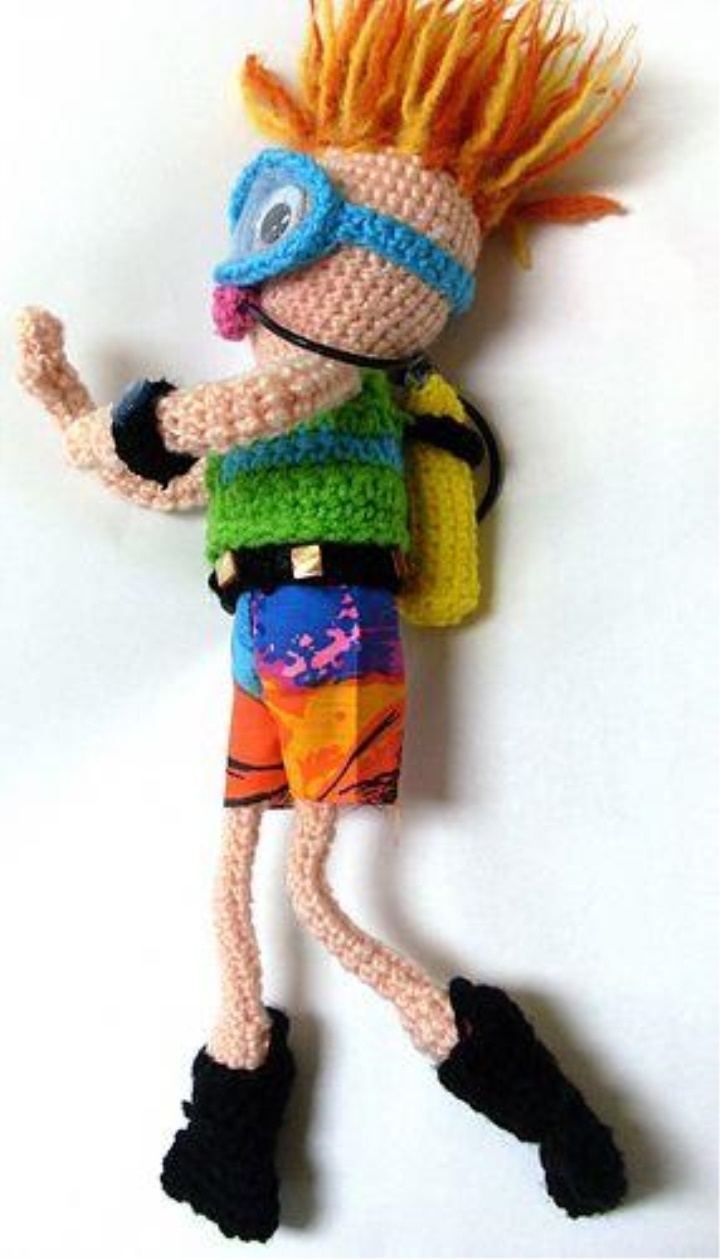
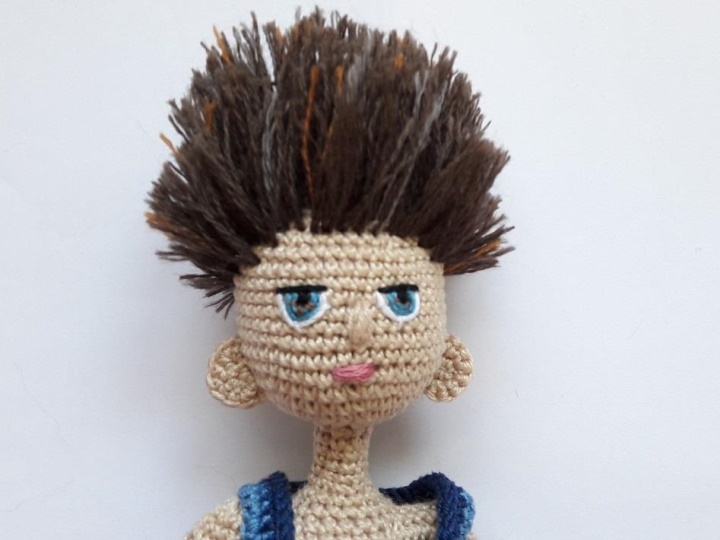
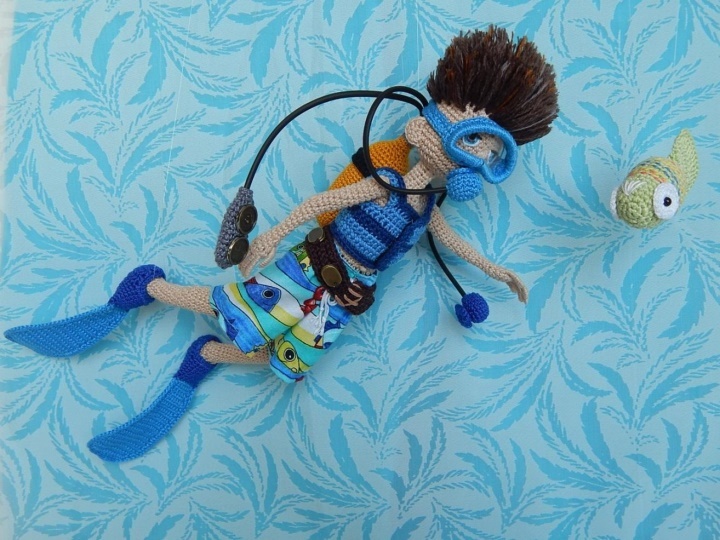
EARS (2 parts). We knit the ears. Sewing after it will be ready mask for scuba diving. 1 row: 6 scales. in the ring amirurumi, the air loop of the ascent. To turn knitting without closing the row. 2nd row: (pr., Sc.) X3 (9 sc.) Finish the knitting, leave the thread for sewing. The second stage is ready! Underwater equipment for a scuba diver (growth figurines of 21 cm.) All ideas for design are taken from the MC "Fun and Fabulous Free projects for children, Miss Julep, from yarnjulepsontheveranda.com. "on English language. With the translation did not work, knitting "on the picture." Here these pictures. Maybe someone will help.
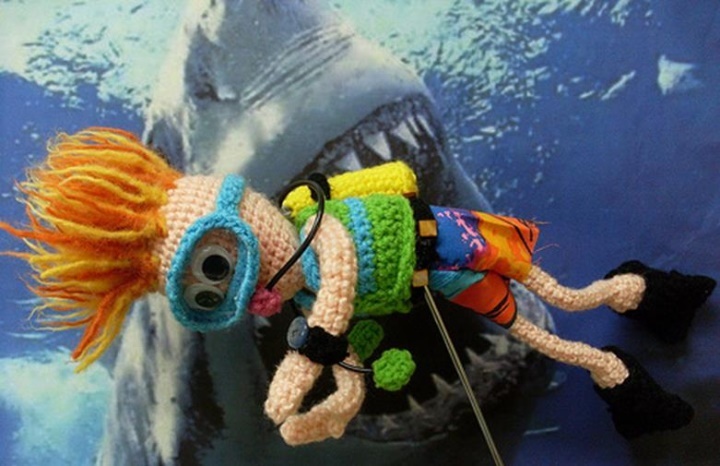

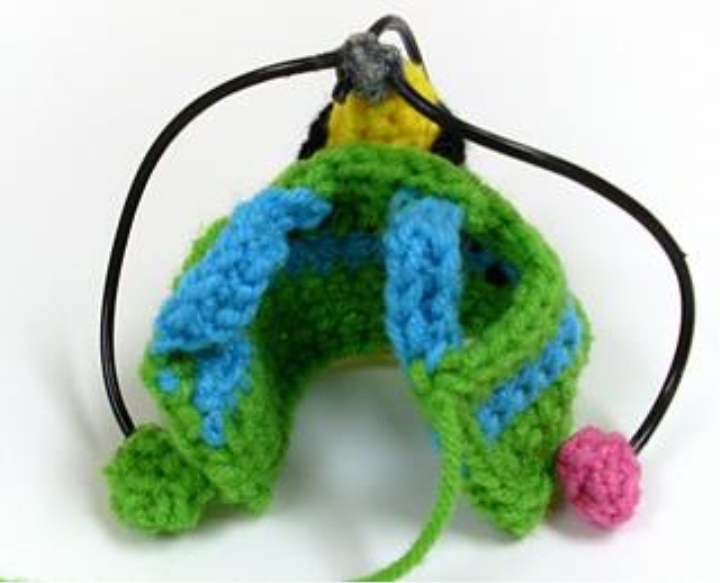
Now the most interesting is the technical part! ZHILET (buoyancy compensator). A string of blue and blue color COCO VITA cotton, hook 1.25. We knit with turning rows. We begin knitting with a thread of blue color. 1 row: 41 in, from the second loop from the hook we knit the second row. 2-5 series: 40 сбн. Change the thread color to blue. 6.7 series: 40 сбн. Change the color of the thread to blue. 8 row: 40 сбн. 9 series: 8 scales, 12 volts, skip 5 scales, 14 scales, 12 volts, skip 5 scales, 8 sb. (40 sb. + 24 vp.) 10 series: 64 sc. Finish the knitting, cut the thread. For binding, fix the blue thread in a convenient place (I have middle backrest). At the same time, leave a long tip of the thread to to the end of the row. 1 row: tie the waistcoat around the contour with the pillars without the cape tying at the same time and left us a long tip of the thread. 2 row: to tie the columns without the crochet with connecting posts

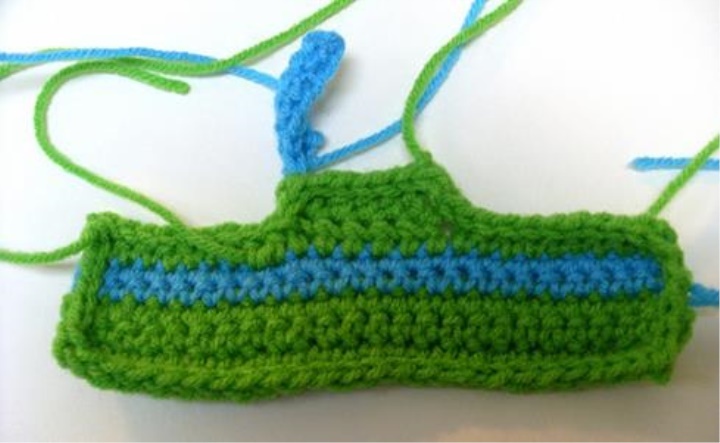
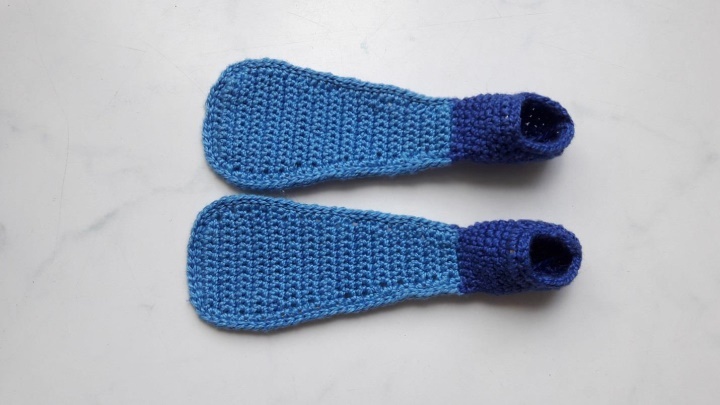
Now we tie our knitted thread together a bit, at the top Parts are smaller, mostly on the bottom. This will give the vest a volume. We try, fix the thread and cut it. My vest is removed, sewed small pieces of Velcro. But you can also sew during assembly. The vest is ready! SHEETS: Blue and blue threads are used Vita IRIS, hook 1.0. We begin knitting with blue. We knit with turning rows. 1 row: type a chain of 10 loops, the second from the hook loop increase sbn, 8 sb, increase, air lifting loop (wpp) (12 sb) 2 series: 12 sb., Vpp. 3 series: ap., 10 sb, prib, vpp. (14 sb) 4-9 series: 14 sb., Vpp. 10 series: уб., 10 сбн, уб., Впп. (12 сбн) 11-15 series: 12 sc., Vpp. 16 series: ub., 8 sb, ub., Vpp. (10 sb) 17-20 series: 10 sc., W.p. 21 series: ub., 6 sb, ub., Wpn. (8 sc) 22-25 series: 8 sc., Wpp. 26 series: ub., 4 sb, ub., Wpn. (6 сбн) 27-30 series: 6 sc., Wpp. 31 series: tie the contour of the shields, tying the wire while leaving, leaving long tails on both sides for future use. I have wire for bead weaving 0.4 mm in two pieces. 32 series: sc. In the 31st row, tie up the connecting posts. Next, change the color to blue and knit in circular rows. 33 series: 2 sc. in the loop of the harness, 6 c. for the front wall of loops of the 30th row, 2 sc. in the loop of the strapping on the other side, 6 sb. for the remaining half loop. (16 сбн) 34 series: 16 sc. 35 series: ap., 7 sc., Ap., 7 sc. (18 сбн) 36 series: prib., 8 sc., Ap., 8 sc. (20 sb) 37-39 series: 20 sc. 40 series: 13 sb., Vpp. Further we knit with turning rows. The beginning and the end of the series should be located symmetrically on both sides of the flipper. The wire all this time is inside the knitting and not yet tied. 41-44 series: 13 sc., Vpp. 45 series: 5 sb., 3 loops together, 5 sb., Vpp. (11 сбн) 46 series: 4 sb., 3 loops together, 4 sb., Vpp. (9 сбн) 47 series: 3 scales, 3 loops together, 3 scales. (7 sc) We form the heel and begin the strapping. Connector we connect the opposite ends of knitting. Hook is in the middle heels. We wrap the wire so that it turns out a full circle with one hand and exactly the same - on the other. We tie the edge of the bootskin fins, grabbing the wire. It turns out 4 wires (initially I have 2 addition, then they are superimposed one on top of the other). 48 row: sb, how many - did not count. 49 series: tie the connecting posts, thread secure and cut. Trim excess wire. It turned out like this. Well, very pretty !!!
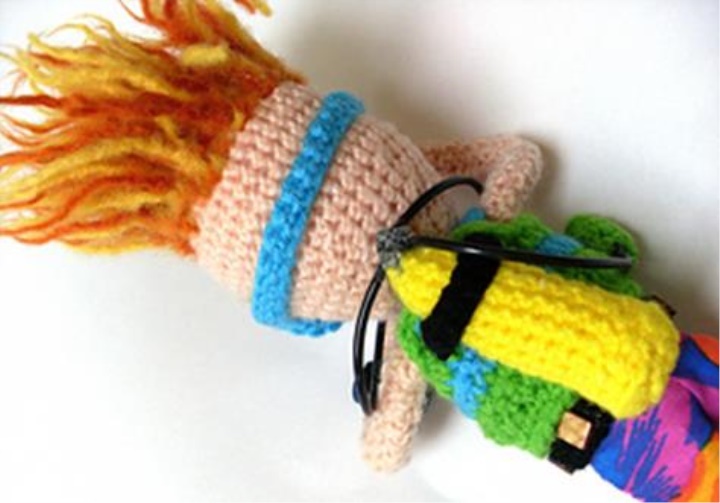
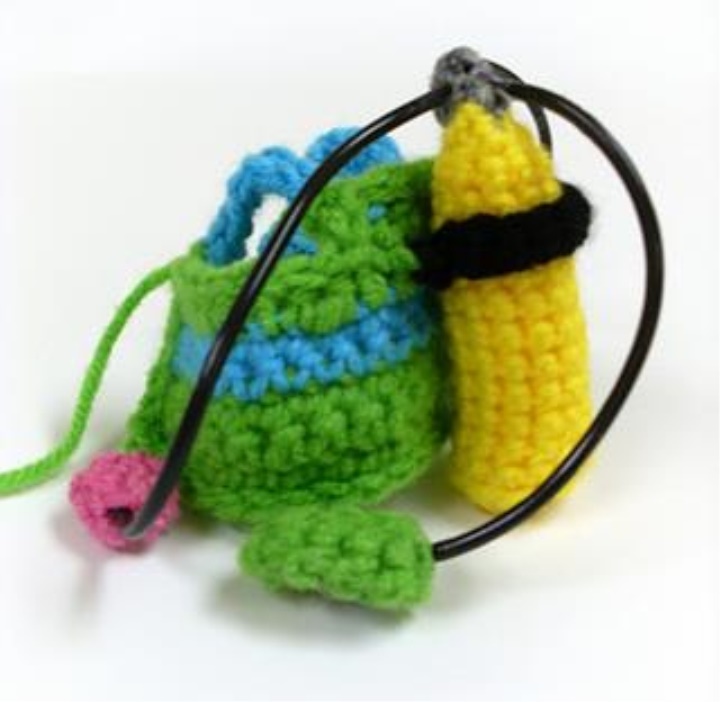
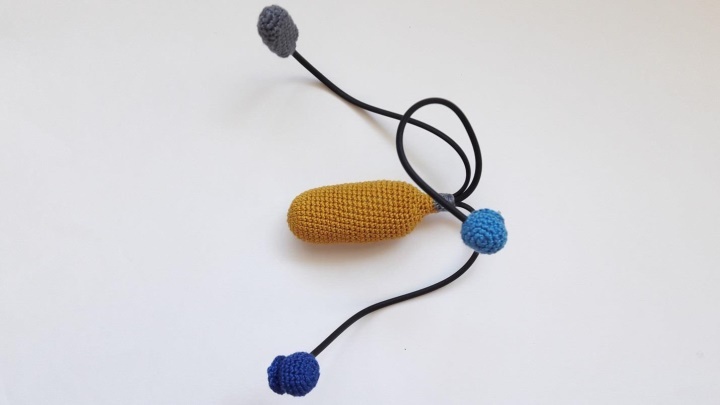
BALLOON. Threads of yellow Vita IRIS and gray Kirov iris flowers, hook 1.0. We begin knitting with yellow color in circular rows. 1 row: 6 sb in the KO. 2nd row: 6 arr. sb. (12 сбн) 3 series: (sc., Arr.) Х6 (18 сбн) 4 series: (2 scales, arr.) Х6 (24 сбн) 5 series: (3 scales, arr.) X6 (30 sbn) 6-27 series: 30 sc. 28 series: (13 scales, уб.) Х2 (28 сбн) 29 series: (5 scales, уб.) Х4 (24 сбн) 30 series: (4 screeches, уб.) Х4 (20 сбн) 31 series: (3 scales, уб.) Х4 (16 сбн) 32 row: (2 scales, ub.) Х4 (12 сбн) 33-35 series: 12 sc. Change the color to gray. 36-38 series: 12 sc. End the knitting, leave the thread to anchor fittings and trim. Fill the filler tightly as you knit. At the top fill not up to the end, leave a place for our armature. ARMATURE. We prepare the armature (I do not know what word it is possible name these details). Cut three pieces of cambric by 15 cm. (These are tubes with a diameter of 1.6 mm, bought in the store "Batteries", something for installation of radio engineering circuits). And three pieces of copper wire 1.2 mm. 20 cm. For the mouthpiece made small round loops, and for the console - long oblong. Prepared carnations for fixing the mouthpiece to head.
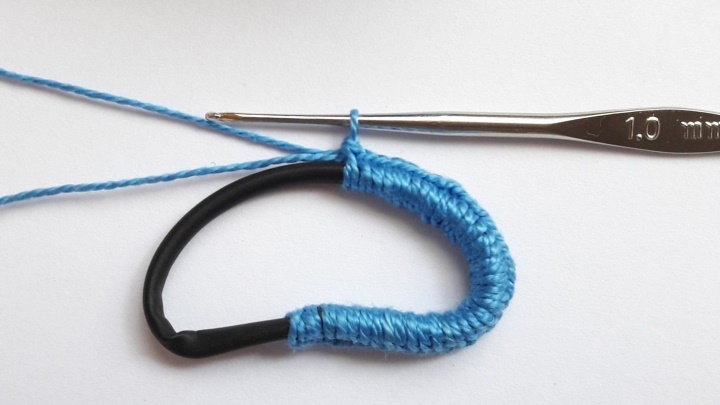
I inserted the wire into the tubes, the carnations into one of the loops. For Reliability greased the wire with glue Crystal Moment before the loop on 2-3 cm.
FAN (respiratory machine). We knit two mouthpiece with a thread blue and blue color (one worker, the other spare) Vita IRIS, hook 1.0. We knit in circular rows. 1 row: 6 scales. in the spacecraft. 2nd row: 6 arr. sb. (12 сбн) 3 series: (sc., Arr.) Х6 (18 сбн) 4-5 series: 18 sc. 6 row: 5 sb., Air loop, one loop to skip, mark with a marker, so as not to lose, 12 sc. (17 scales and 1 in) 7 series: 18 sc. 8th row: (sb., Уб.) Х6 (12 сбн) At this stage, well "roll" a ball of filler, put in our knitting. Then insert the reinforcement with the stud into the hole in the 6th row. Then we tie the studs. In the variant without a carnation simply we knit further. 9 row: 6 ub. sb. (6 сбн) 10 series: 6 sc. 11th row: 6 arr. (12 сбн) 12 series: (sc., Arr.) Х6 (18 сбн) 13 series: tie the connecting posts, fix the thread and cut off. PULLIC. On the panel there is a device for measuring the pressure in balloon and depth gauge. We knit a thread of gray color, Kirov iris, hook 1.0. We knit in circular rows. 1 row: 6 scales. in the spacecraft. 2nd row: 6 arr. sb. (12 сбн) 3-11 series: 12 sc. At this stage, we insert our oblong loop and in advance cooked pattern of dense material (I use packaging from wadding sticks). Fill slightly with filler from the side of the eyelet the opposite side was smooth. There we will stick our devices. 12 row: 6 ub. sb. 13-14 series: 6 sc. Thread and fasten the thread, leaving a small tail. With help glue and this tail further strengthen our design.
On pultik glued with Moment Crystal glue devices. Used pendants purchased at the needlework store. She cut off excess and ready!
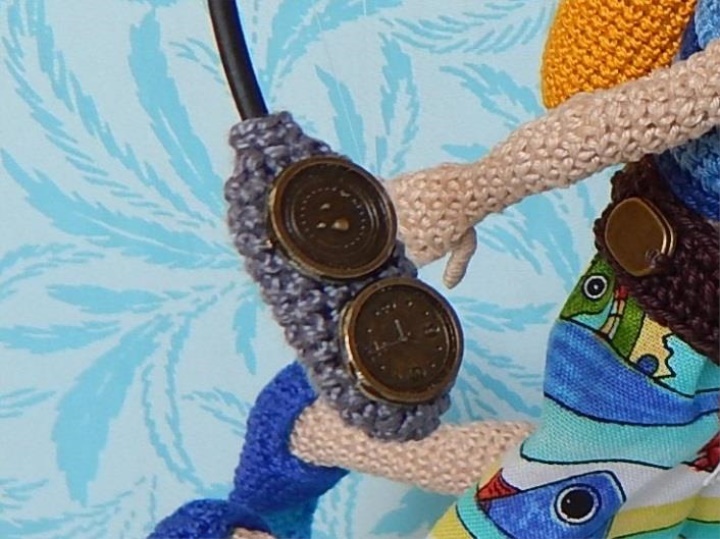
With the help of thread and glue, I connected three parts, an extra wire cut off. The design was greased with glue and inserted into the cylinder. Additionally strengthened the junction. Tied the strap for fastening to the vest.
MASK. Prepared a template for the mask. I tried on the finished head of the figurine. Cut out the "glass" of transparent plastic.
Tied and sewed the strap (just tied a chain of VPS from two parties). I pasted the glass. It turned out here is such a set.
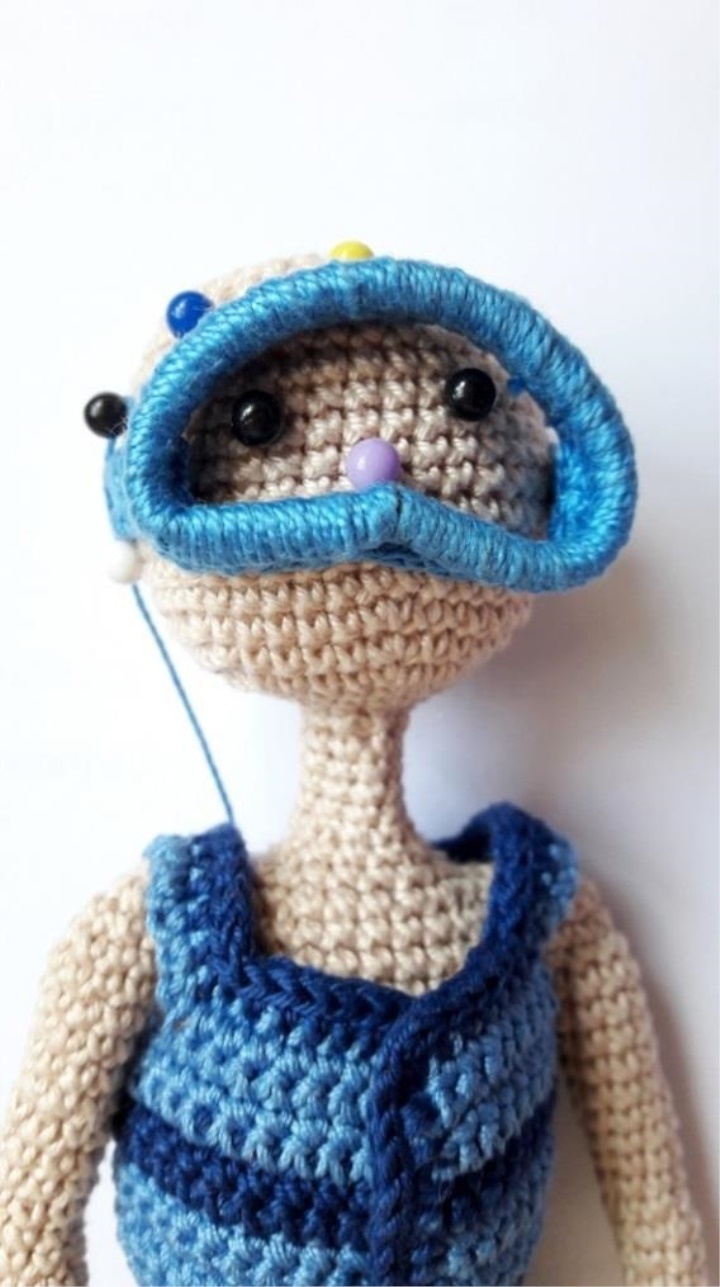
Embroidered eyes, mouth, nose. Under the mouth you can see a hole in which will be inserted carnations of the mouthpiece.
BELT WITH GROUPS. Knitted a dark thread COCO VITA cotton, the hook 1.25. We knit in circular rows. 1 row: 51 in., From the second loop we knit the second row. 2 series: 49 sb., 3 sc. in the last loop, 49 sb. on the second side of the chain, vp., ss. in. 3 series: 49 sb., 3 arr., 49 sb. 4 series: tie a piece of ss. I embroidered the buckle. For goods used suspension, bought in shop of needlework. Sewed and glued with Moment Crystal

Finally, everything was dressed, fixed and sent her scuba diver to the sea- oceans to meet with his dream, fish Bul-Bul! "Fish Bul-Bul" is connected by Marina Chuchkalova's MK
Source : https://vk.com/lyubov_komkova_knitting