Click For Crochet Abbreviations List
Owl Hook. Description.
Amigurumi-These are small toys, which are most often knit crochet. This wonderful art came to us from Japan.
Usually Amigurumi knit on a spiral columns without a throw. Therefore knitting of these toys is available for beginners. The main thing-to read carefully the description and count the columns:)
We suggest you to link here such cute sovjat.
For knitting we will need the following materials:
Colorful yarn. The size of the toy will depend on the thickness of the yarn.
Hook. Choose it depending on the yarn.
Eyes. You can buy special eyes for toys in the store or use the buttons.
Scissors.
Filler.
Knitting Head Wreath:
1 row: 6 loops lock in the ring Amigurumi.
2 row: 2 columns without throwing in each loop (12 loops).
3 row: * A column without a throw, a raise *-repeat 6 times (18 loops).
4 row: A column without a throw in each loop (18 loops).
5 row: * 2 columns without a throw, raise *-repeat to the end of the row 6 times (24 loops).
6 Row: * 3 columns without a throw, raise *-repeat 6 times (30 loops).
7 row: * 4 columns without a throw, raise *-repeat 6 times (36 loops).
8 row: A column without a throw in each loop (36 loops).
9 Row: * 5 bars without a throw, raise *-repeat 6 times (42 loops).
10-14 series: A column without a throw in each loop (42 loops).
15 Row: * 5 bars without a decrease *-repeat 6 times (36 loops).
16 Row: * 4 columns without a decrease *-repeat 6 times (30 loops).
17 Row: * 3 columns without a decrease *-repeat 6 times (24 loops).
18 Row: * 2 columns without a throw, decrease *-repeat to the end of the row 6 times (18 loops).
Fasten the thread.
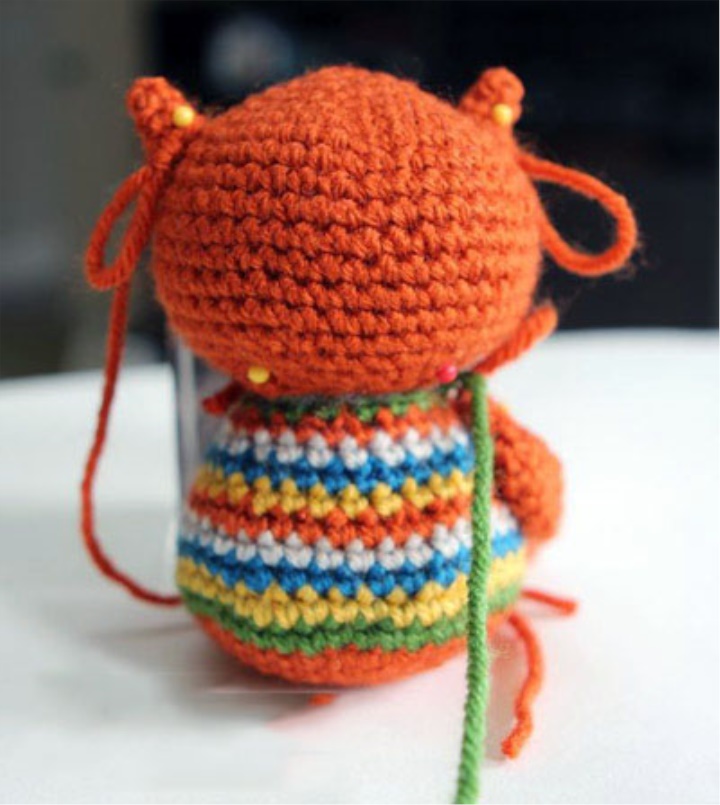
Knit ears:
1 row: 4 loops lock in the ring Amigurumi.
2 row: A column without a throw in each loop (4 loops).
3 row: * A column without a throw, a raise *-to repeat 2 times.
Fasten the thread and leave a long "ponytail " to priishit the ear to the head.

Knitting of the body of the wreath:
1 row: 6 loops lock in the ring Amigurumi.
2 row: 2 columns without throwing in each loop (12 loops).
3 row: * A column without a throw, a raise *-repeat 6 times (18 loops).
4 row: * 2 columns without a throw, raise *-repeat to the end of the row 6 times (24 loops).
5 row: * 3 columns without a throw, raise *-repeat 6 times (30 loops).
6 Row: * 4 columns without a throw, raise *-repeat 6 times (36 loops).
7 row: * 5 bars without a throw, raise *-repeat 6 times (42 loops).
Take the yarn of a different color. Next, change the color of the yarn in each row.
8-9 series: A column without a throw in each loop (42 loops).
10 row: * 5 bars without a throw, decrease *-repeat 6 times (36 loops).
11-12 rows: A column without a throw in each loop (36 loops).
13 Row: * 4 columns without a decrease *-repeat 6 times (30 loops).
14 row: A column without a throw in each loop (30 loops).
15 Row: * 3 columns without a decrease *-repeat 6 times (24 loops).
16 row: A column without a throw in each loop (24 loops).
17 Row: * 2 columns without a throw, decrease *-repeat to the end of the row 6 times (18 loops).
Fasten the thread and leave the tail.
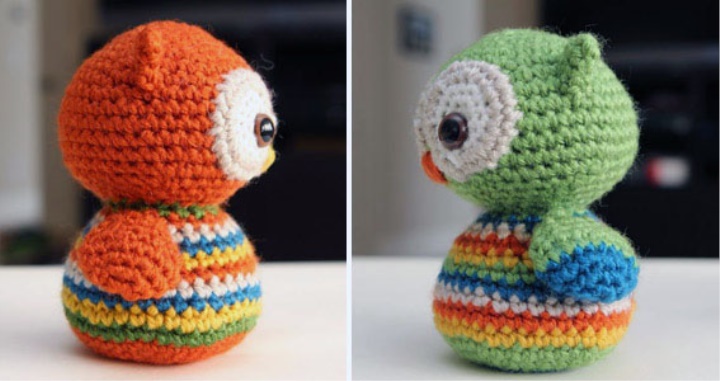
Knit eyes:
We start knitting with white yarn.
1 row: 6 loops lock in the ring Amigurumi.
2 row: 2 columns without throwing in each loop (12 loops).
3 row: * A column without a throw, a raise *-repeat 6 times (18 loops).
Change the color of the yarn to light gray.
4 row: * 2 columns without a throw, raise *-repeat to the end of the row 6 times (24 loops).
Fasten the thread and leave the tail.
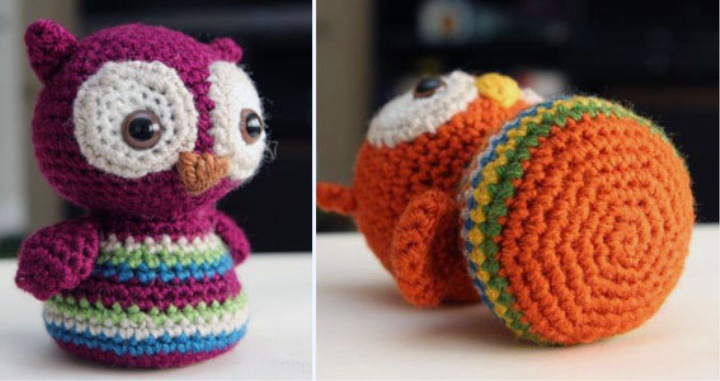
Knit Wings:
1 row: 6 loops lock in the ring Amigurumi.
2 row: 2 columns without throwing in each loop (12 loops).
You can change the color of the yarn If you want the wings to be of several colors.
3 row: * A column without a throw, a raise *-repeat 6 times (18 loops).
4 row: A column without a throw in each loop (18 loops).
5 row: * The column without a decrease *-repeat 6 times (12 loops).
6 row: * 2 columns without a decrease *-repeat 3 times (9 loops).
7 row: * A column without a decrease *-repeat to the end of a row (6 loops).
Fasten the thread and leave the tail.
Now we only have to collect the details. In order to determine the location of the eye and ears, choose the best position, use pins with ears.