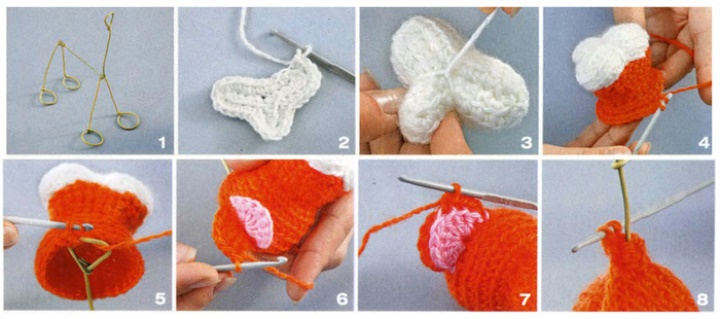
Decide on the size of the lion. From the braided wire, bend the frame of the future toy. Dimensions of my lion: legs 10cm + loop, diameter 1.5-2cm, neck and trunk 8-9cm. The frame must be strong! Subsequently, to change it or strengthen it will have to dissolve almost the entire toy.
Copper wire in the flight can be purchased at any construction store, tell the seller "cherished words: PPPP 2x1.5 or 3x1.5"
2. Tie the front part of the muzzle out of the thread of white color - type a chain of air loops (10pcs), go back on it, tying the bars without the crochet, to the middle. From the middle, remove five more air loops, and then continue to knit a flat "three-petal" detail. At the tops, add 3-4 loops. Having connected a detail of the necessary size, tie several rows. without adding (for volume), then start cutting the number of loops to get a "bag". Fill the part with sintepon, close the hinges. Do not cut the thread.
3. With the thread left, drag the finished part of the muzzle so that the part becomes expressive. (Look carefully at the photo). Fix the end of the thread and hide it.
4. Using a thread of the main color (orange), type a row of columns from the part web. Knit a narrow part of the muzzle with decreasing, so that it is narrowed a bit ("cone"). After engaging a sufficient number of rows (3-4 rows), start knitting the canvas in the opposite direction, tying 2 loops per loop of each column. Knit your head, gradually adding columns (add 4-5 loops in a row).
5. After tying about to the middle of the forehead, "turn on" the knitting frame. "Tie" the top of the frame, connecting parts of the toy. Continue to knit your head, as necessary, reducing the number of posts. After completing the work, fill the head with a sintepon. If this operation seems difficult for you, before you fill the head of the lion with a sintepon, simply use the wire to fix the head on it. We will close this place later with a mane, and it will not be visible.
6. Tie the ears. Type from the same loops of the base several columns with 1 crochet - the inner part of the ear. Repeat by loosening the back of the ear.
7. Connect both parts by "sewing" them with a hook. Similarly, make the second ear. Make sure they are symmetrical about the neck.
8 Tie the frame. Collect from the base a circular row of several loops (5-6) and continue to knit in a circle, hiding the frame. Tie the neck and torso. If necessary, add the number of loops (if necessary, to make the chest more.) This part can be filled with sintepon).
Then tie your paws. When you reach the wire loops at the ends of the paws, begin to add first, and from the middle, loosen the loops.
Finish the lion tie the eyes and nose.
Open the mane from the fur and glue it or wash it.
Tie the tail with a chain of air loops. At the end, glue a small piece of fur.