-Main and additional color yarn, as well as a little black. White and blue for the eyes;
Needle and scissors.
Head.
The foreground color.
Tie a chain of 6VP.
1: Starting from the second of the hook loops 4SBN, 3SBN in the last loop chain, continue knitting around the chain. 3SBN, 2SBN in the last Loop (12)
Fill your head well, giving it a shape.
Finish the knitting, cut off the thread, leaving the long end.
Now let's make a Utjazhku face (well or muzzle) Dragon. Utjazhka will be easy. We're just going to make our dragon smile.
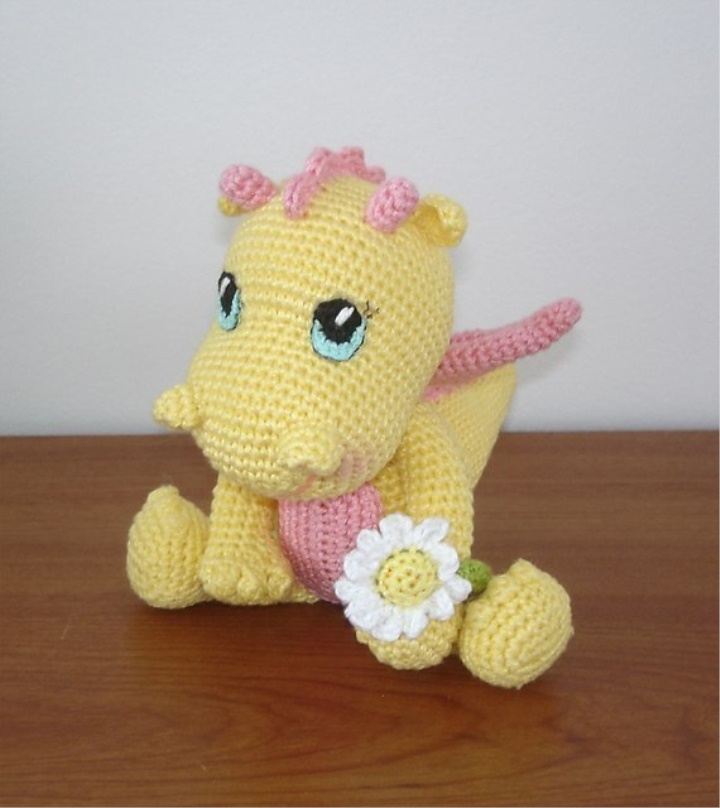
That's how the head should look before utjazhki.
Thread in the needle (the thread that knitted the head).
Place 4 pins on the head, indicating the places where the Utjazhka will be made: 2 for the eyes and 2 for the tips of the mouth, which we will do.
We begin to utjazhku from the end of knitting. Enter the needle inside and put it in the place where we marked the left eye. Place the needle again inside the head through one loop and take out in the left corner of the mouth. Slightly slide the thread. Once again through one loop enter the needle and put in place of the right eye, slide thread. Further to the right corner of the mouth and to the end of the knitting (back of the head). In such a sequence make utjazhku, forcing Dragon to smile.
Then hide and cut the thread.
Dragon Mouth.
Eyes-2 details.
Start knitting with black yarn for the pupil.
1:6 PRS in Amigurumi Ring (6)
2:6 P (12)
Change the yarn to create the iris of the eye.
3:1 SS, 1p, 2p of PRSPs, 1p, 1СС, finish knitting.
Increase the white lines or points on each pupil.
Glue your eyes to the head or sew.
Ears-2 details.
The foreground color.
A chain of 4VP.
1 2SBN, 3SBN in the last loop of the chain, tie around the chain, 2SBN (7)
2:1 VP, turn knitting, 2SBN, 1p, 1p of PRSs, 1p, 2SBN (10)
Finish the knitting, leaving a long end for the stitching.
Nostrils-2 details.
The foreground color.
1:6 PRS in Amigurumi Ring (6)
2:2 P (12)
3:12 PRS (12)
Finish the knitting, leaving a long end for the stitching.
Horns-2 parts.
Additional color.
1:4 PRS in Amigurumi ring (4)
2: (1p, 1SBN)-2 times (6)
3-4:6 PRS (6)
Finish the knitting, leaving a long end for the stitching.
Fill in the details a bit.
Legs-2 details.
The foreground color.
A chain of 6VP.
1: Starting from the second of the hook loops 4SBN, 3SBN in the last loop chain, continue knitting around the chain. 3SBN, 2SBN in the last Loop (12)
2:1 P, 3SBN, 3p, 3SBN, 2p (18)
3:1 PRS, 1p, 4SBN, 1p, 1SBN, 1p, 1SBN, 1p, 4SBN, 1p, 1SBN, 1p (24)
4:24 PRS (24)
5:3 PRS, 1 popcorn, 1SBN, 1 popcorn, 1SBN, 1 popcorn, 16SBN (24)
6-7:24 PRS (24)
8: (1u, 1SN)-5 times, 6SBN, 1u, 1SBN (18)
9-18:18 PRS (18)
Fill and shape your legs well. Fold the last row in half and tie the 8SBN through 2 folded rows. Finish the knitting, leave the thread for sewing.
Hands-2 details.
The foreground color.
A chain of 6VP.
1:1: Starting from the second from the hook loops 4SBN, 3SBN in the last loop of the chain, continue knitting around the chain. 3SBN, 2SBN in the last Loop (12)
2:1 P, 3SBN, 3p, 3SBN, 2p (18)
3:18 PRS (18)
4: (1SBN, 1 popcorn)-3 times, 12SBN (18)
5:6. 6SBN (12)
6-9:12 PRS (12)
10:8 RSBN, 4SBN (12)
11-20:12 PRS (12)
Fill and shape your hands well. Fold the last row in half and tie the 5SBN through 2 folded rows. Finish the knitting, leave the thread for sewing.
Tail.
The foreground color.
1:6 PRS in Amigurumi Ring (6)
2: (1p, 2SBN)-2 times (8)
3:8 PRS (8)
4: (1p, 3SBN)-2 times (10)
5:10 PRS (10)
6: (1p, 4SBN)-2 times (12)
7:12 PRS (12)
8: (1p, 5SBN)-2 times (14)
9:14 PRS (14)
10: (1p, 6SBN)-2 times (16)
11:16 PRS (16)
12: (1p, 7SBN)-2 times (18)
13:18 PRS (18)
14: (1p, 8SBN)-2 times (20)
15:20 PRS (20)
16: (1p, 9SBN)-2 times (22)
17:22 PRS (22)
18: (1p, 10SBN)-2 times (24)
19:24 PRS (24)
20:6 P, 18SBN (30)
21:30 PRS (30)
Finish the knitting, leave the thread for sewing. Before sewing, fill the tail with a filling.
Torso.
The foreground color.
Connect the thread to the hole in the head with the help of 1СС (see photo).
1-3:18 PRS (18)
4: (1p, 2SBN)-6 times (24)
5:24 PRS (24)
6: (1p, 3SBN)-6 times (30)
7:30 PRS (30)
8: (1p, 4SBN)-6 times (36)
9:30 PRS (30)
10: (1p, 5SBN)-6 times (42)
11:42 PRS (42)
12: (1p, 6SBN)-6 times (48)
13-22:48 PRS (48)
23: (1u, 6SBN)-6 times (42)
24: (1u, 5SBN)-6 times (36)
25: (1u, 4SBN)-6 times (30)
26: (1u, 3SBN)-6 times (24)
27: (1u, 2SBN)-6 times (18)
Fill the body with a filling.
28: (1u, 1SBN)-6 times (12)
Add a filler if you want.
29:6 U (6)
Slide the hole using a needle. Hide the thread.
Wings-2 parts.
Additional color.
1:6 PRS in Amigurumi Ring (6)
2: (1p, 2SBN)-2 times (8)
3:1 P, 7SBN (9)
4:1 P, 8SBN (10)
5:2 P, 8SBN (12)
6:2 P, 10SBN (14)
7:2 p, 12SBN (16)
8:2 P, 14SBN (18)
9:2 P, 16SBN (20)
10:2 P, 18SBN (22)
11:2 p, 20SBN (24)
12-14:24 PRS (24)
15: (1u, 2SBN)-6 times (18)
16:18 PRS (18)
17: (1u, 1SBN)-6 times (12)
18: Fold the wing in half and tie the 5SBN through the two rows together.
Finish knitting, leaving a long thread for sewing.
Spot on the belly.
Additional color.
A chain of 10VP.
1: Starting from the second of the hook loops 8SBN, 3SBN in the last loop chain, continue knitting around the chain. 7SBN, 2SBN in the last loop (20)
2:1 P, 7SBN, 3p, 7SBN, 2p (26)
3:1 PRS, 1p, 8SBN, 1p, 1SBN, 1p, 1SBN, 1p. 7SBN, 1p, 1SBN, 1p (32)
4:2 PRS, 1p, 9SBN, 1p, 2SBN, 1p, 2SBN, 1p, 9SBN, 1p, 2SBN, 1p (38)
Finish knitting, leaving a long thread for sewing.
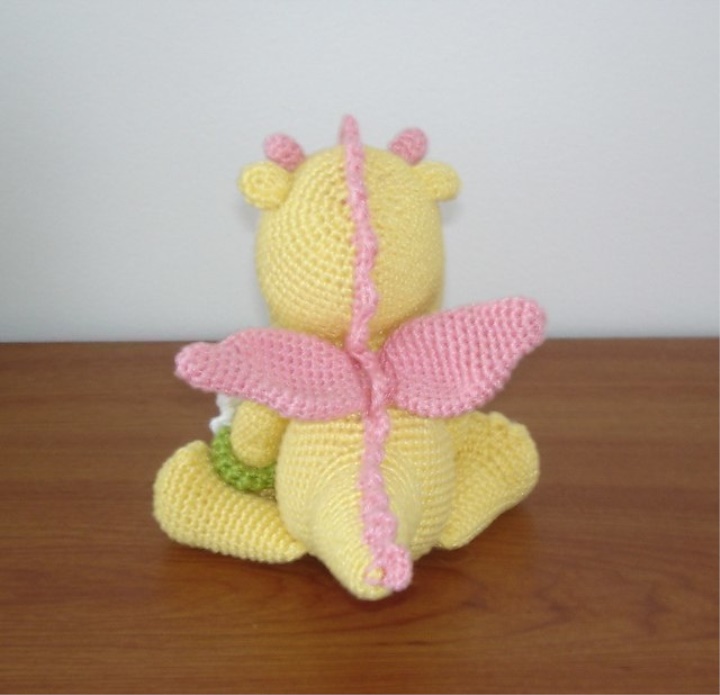
Comb.
Additional color.
Before you start to knit a comb dragon, sew to a trunk a tail.
We will knit the comb directly on the drakonchike. To tie the comb smoothly, pull the thread of the main color through the loops of the trunk and tail, marking the smooth line. If you take a good look at the photo, you will see this line. After the comb is contacted, this thread will not be visible at all.
Now untie the 1СС in the first marked loop on the head, thus attaching an additional color.
Then tie the SS into each loop that is marked with the auxiliary thread. You should get about 55 cc. However, this figure is not accurate. Everything will depend on how the auxiliary thread crossed the loops. So if you have got more or less SS, do not panic.
When you reach the end of the tail, tie 2VP, 4ssn in the third loop of the hook. And then tie (skip one loop, 1СС, skip one loop, 4ssn in one loop)-repeat to the end of the mated SS. When you reach the junction of the head and torso, skip the 3-4 loops to make it easier to work on, and the pieces of scallops do not overlap one on the other.
Small tip: For knitting the first row of scallops (from the SS) take the main color. Then, even if you do not guess with the number of loops, it will not catch your eye and your work will look perfect.
You can also tie the comb apart from the dragon and then sew it on. To do this, type a chain of 55 EAP and tie the second row as described above.
Connect all the parts together.
and enjoy your beautiful work!
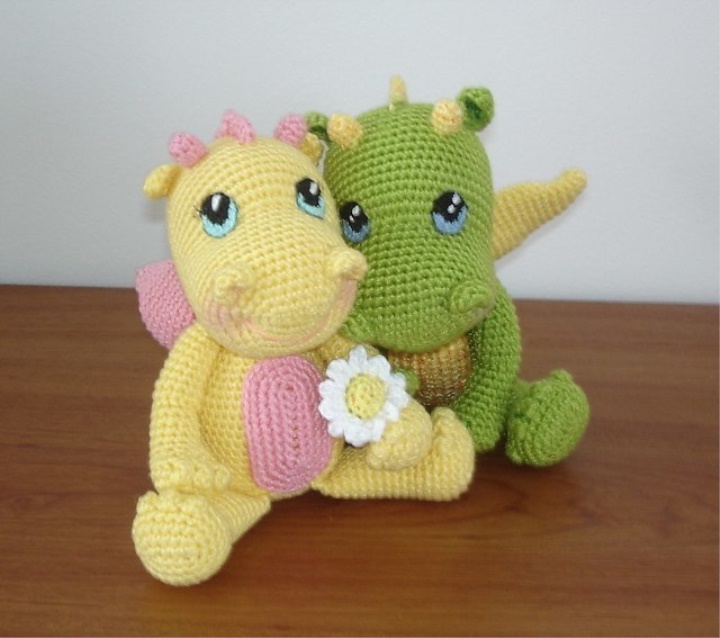
Dragon Amigurumi is very sweet and wonderful! Every time I look at him, he makes him smile. I hope you and your loved ones will smile as often as possible. And Dragon will help you in this!
Source :
https://vk.com/knitting?w=wall-5670814_993976