Rabbits of Anastasia wear red, blue, green and pink jackets, I chose between yellow and purple yarn for a long time, eventually decided to purple
The height of the rabbit turned out - 15 cm along with the ears.

In order to tie such a hare, you will need:
Threads of two colors of your choice (I have acrylics of white and turquoise color)
Hook # 2
Threads of a mulina pink or red (quite a bit)
Pair of eye pads
Filler
Scissors
Needle for sewing parts
For the hare, you need to associate: head (1 detail), trunk (1 piece), ears (2 parts), handles (2 parts), legs (2 parts), tail (1 piece), hood (1 piece),

head (1 detail)
1st row: make an amigurumi ring, type 6 loops (6)
2nd row: increase in each loop (12)
3rd row: (1 СБН, 1П) * 6 times (18)
4-th row : (2 sc, 1p) * 6 times (24)
5th row: (3 sc, 1p) * 6 times (30)
6th row: (4 sc, 1p) * 6 times (36)
7th row: (5 sc, 1p) * 6 times (42)
8th row: (6 sc, 1p) * 6 times (48)
9th - 13th series: (48 sc) (48)
14th series: (6 СБН, 1У) * 6 times (42)
15th row: (5 СБН, 1У) * 6 times (36)
16th row: (4 СБН, 1У) * 6 times (30)
17- 1st row: (3 СБН, 1У) * 6 times (24)
18th row: (2 СБН, 1У) * 6 times (18)
19th row: (1 СБН, 1У) * 6 times (12)
We finish knitting details with one connecting column.
Torso (1 piece)
1st row: make an amigurumi ring, type 6 loops (6)
2nd row: increase in each loop (12)
3rd row: (1 sc, 1p) * 6 times (18)
4 (2 sc, 1p) * 6 times (24)
5th row: (3 sc, 1p) * 6 times (30)
6th row: (4 sc, 1p) * 6 times (36)
7th row: (5 sc, 1p) * 6 times (42)
8th - 9th rows: (42 sc) (42)
We change the yarn.
10th row: (42 RLS) is tied behind the front wall of the loop, we end the row 1 CC and 1 air loop for lifting.
The hinges of the row, tied behind the front wall, deviate towards the face of the knitting.
11-th row: (42 СбН) we sew for a back wall of a loop of 9th row. If you push the edge of the part to yourself, then from the wrong side will be seen light sloping dashes - this is the back wall of the 9th row.
The 11th row also ends with 1 SS and 1 air loop for lifting. On the detail it turned out something like a curved outward hem, this is the bottom of a hare jacket.
12th - 14th series: (42 sc) (42)
15th row: (5 sc, 1y) * 6 times (36)
16th row: (4 sc, 1U) * 6 times (30)
17th row: (30 sc) (30)
18th row: (3 sc, 1U) * 6 times (24)
19th series: (24 sc) (24)
20th row: (2 sc, 1) * 6 times (18)
21st row: (1 СБН, 1У) * 6 times (12)
We finish knitting details 1 by a connecting post.
Ears (2 parts)
1st row: make an amigurumi ring, type 5 loops (5)
2nd row: increase in each loop (10)
3rd row: (4 sc, 1p) * 2 times (12)
4 6th series: (12 СБН) (12)
7th row: (2 СБН, 1У) * 3 times (9)
8th - 9th rows: (9 СБН) (9)
Finish the knitting parts 1 connecting column
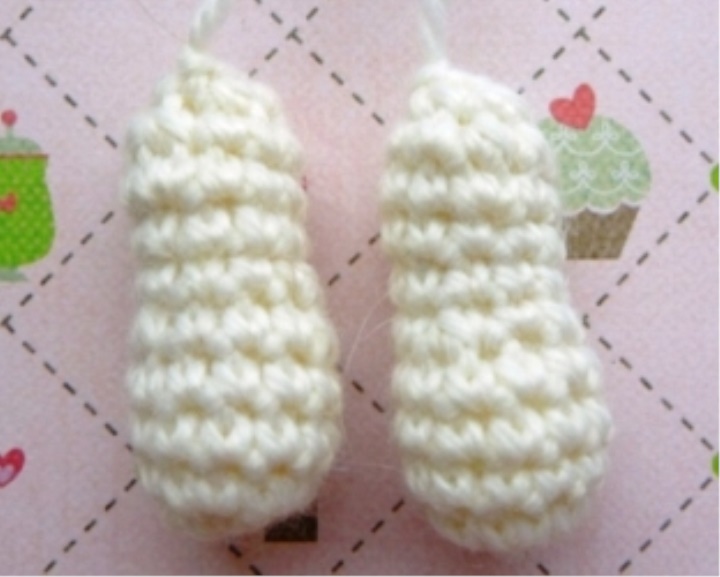
Handles (2 parts)
1st row: making an amigurumi ring, typing 5 loops (5)
2nd row: adding in each loop (10)
3rd row: (10 sc) (10)
Changing the yarn
4th - 8th rows: (10 sc) (10)
Finish knitting details 1 by connecting the stitch.
Feet (2 pieces)
Sliding knot and 2 VP (air loops).
1 row 6 SBN (columns without crochet) to the second from the hook VP [6]
2 row 6 П (increments) [12]
3 - 5 row 12 СБН [12]
6 row (1 у (убавка), 4 СБН) repeat 2 [10]
7 - 8 row 10 RLS [10]
9 row (1 P, 4 RLS) repeat 2 times [12]
10 rd row 10 RLS [10]
11 row 5 [[5]
Pull out the remaining loops using a stitching needle knitted goods. 7 (312x250, 68Kb)
Tail (1 piece)
1st row: make an amigurumi ring, type 5 loops (5)
2nd row: increase in each loop (10)
3rd row: (10 sc) (10)
4th row: ( 3 СБН, 1У) * 2 times (8)
Finish knitting details 1 by connecting the
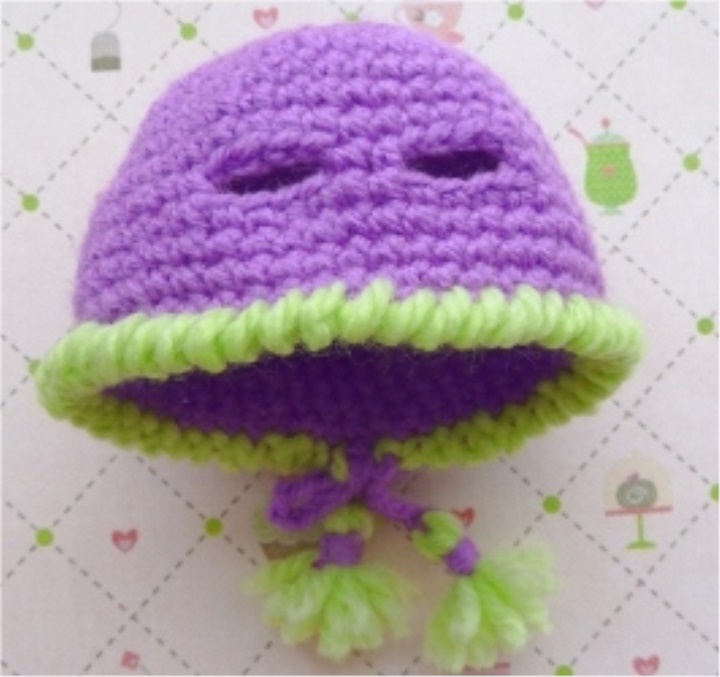
hood Hood (1 piece)
The hood is tied with holes under the ears, so that it can be removed and dressed when you want.
So, we make a sliding knot and knit 2 VP (air loops).
1 row 6 SBN (columns without crochet) to the second from the hook VP [6]
2 row 6 П (increments) [12]
3 row (1 П, 1 СБН) repeat 6 times [18]
4 rows (1 П, 2 СБН ) repeat 6 times [24]
5 rows (1 П, 3 СБН) repeat 6 times [30]
6 row (1 П, 4 СБН) repeat 6 times [36]
7 row (1 П, 5 СБН) repeat 6 times [ 42] the
8th row (1P, 6SCN) is repeated 6 times [48]
9 - 12 series 48 RLS [48]
13 Row 19 SCN, 4 VP, 2 RLS (passing 4 loops on the hood to the fifth), 4 VPs, 19BSN (passing 4 loops in the fifth) to the end of the row [48]
14 -17 row 48 RLS [48]
18 row tie stepping along the circle using yarn of contrasting color.
When the hood is ready, we knit the ties and sew bomb bunches of the same color as the edge of the hood.
In order to make the strings in the hood, you need to pull the thread to the edge of the hood, tie the two chains of air loops to the desired length. At me it turned out on 14 VP for each ponytail-string.
Fill the parts with filler, sew. I first sewed pens, legs and a tail to the trunk, separately collected a head, and then fastened a head to a trunk.
And at the end we attach the eyes and embroider on the muzzle laconic cross as a nose and mouth. The eyes of the
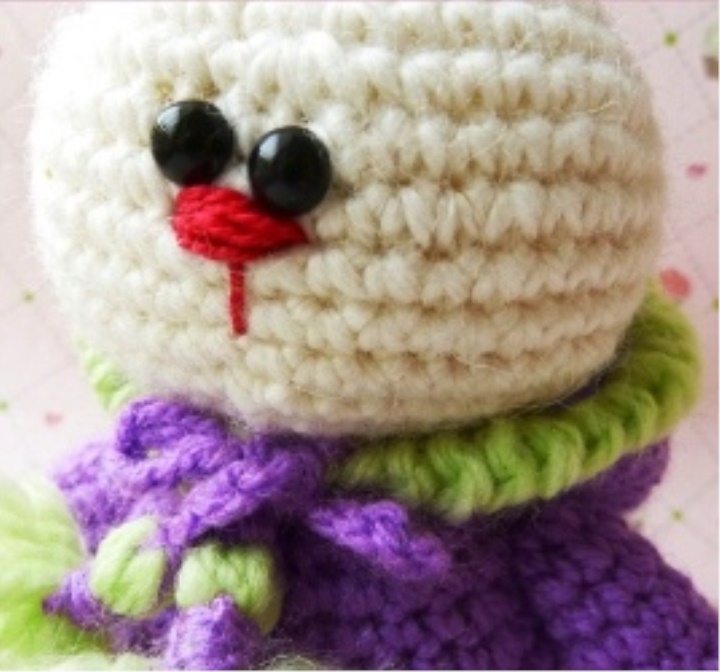
rabbit are safe, the nose is embroidered with "Iris" threads. 9
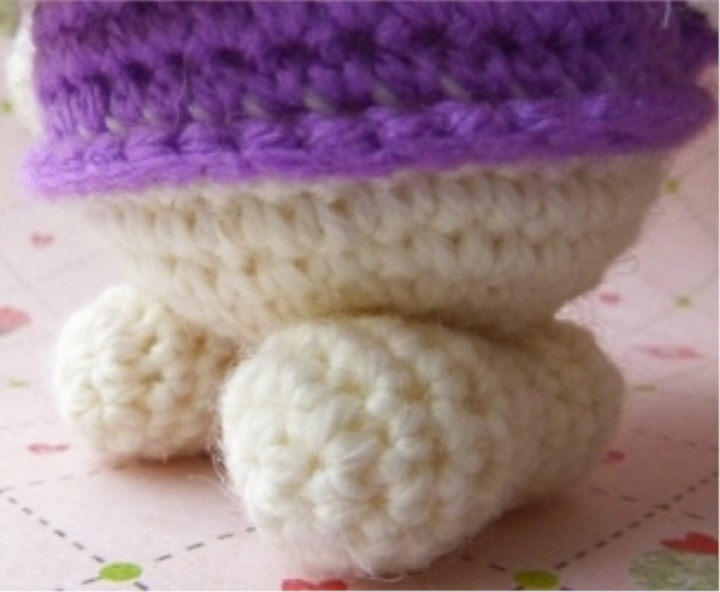
To allow the rabbit to sit steadily, the legs sewn them like this:
When "assembling" the rabbit, it is worth paying attention to the fact that the cap is first sewn to the base of the head (where the rabbit should have a neck ). Before you sew the cap, do not forget to align the holes under the ears (they should be located symmetrically in the center of the head). After the hood is sewn to the head, firmly sew the trunk.

Now it remains to sew up the legs, handles, tail and of course the ears. The needles should be sewn in such a way that they exactly coincide with the holes in the hood, otherwise it will be problematic to pull them out.