The secret of the original bag with funny bright cats is that it can perfectly match with clothes of any color.
A crocheted tablet bag with three-dimensional applications. In form and appearance, the bag resembles a peculiar tangle of threads, in which multi-colored cats have become entangled. Somewhere a cat's head sticks out, somewhere a paw, somewhere a tail ... On a wide strap too, two cats settled comfortably. Bag on the zipper, inside - silk lining.
Materials: gray wool, red, orange, yellow, blue, green, white yarn, black beads (for eyes), filler (cotton wool, sintepuh), lock - "zipper", lining fabric.
Bag is crocheted №3, №2,5, and №1,75.
Dimensions: the diameter of the front side is 27 cm, the thickness of the side (in the filled form) is up to 16 cm. The length of the handle is 92 cm. The "lightning" is 25 cm.
* ... * - rapport
1. The idea. Sketch. Draw on a large sheet a sketch of the front side of the bag in full size. This circle is a "tangle of threads" from which the heads, paws and tails of cats stick out. Figures of cats are not realistic, but somewhat exaggerated.
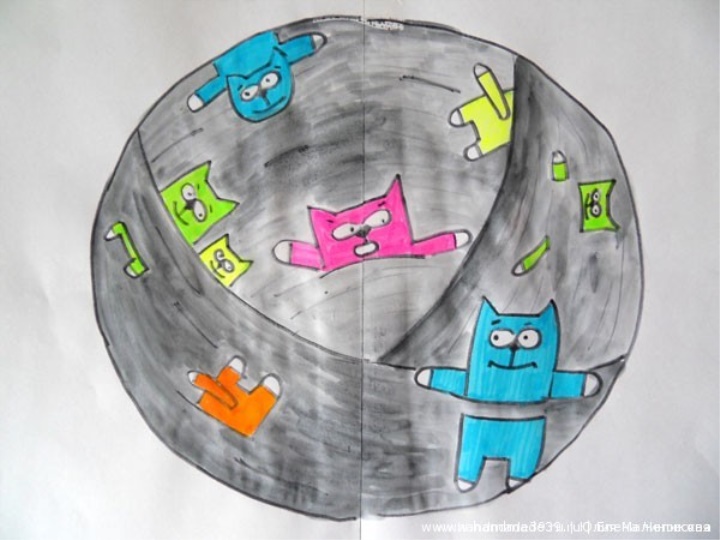
Color the sketch with bright markers, determine the color of the yarn.
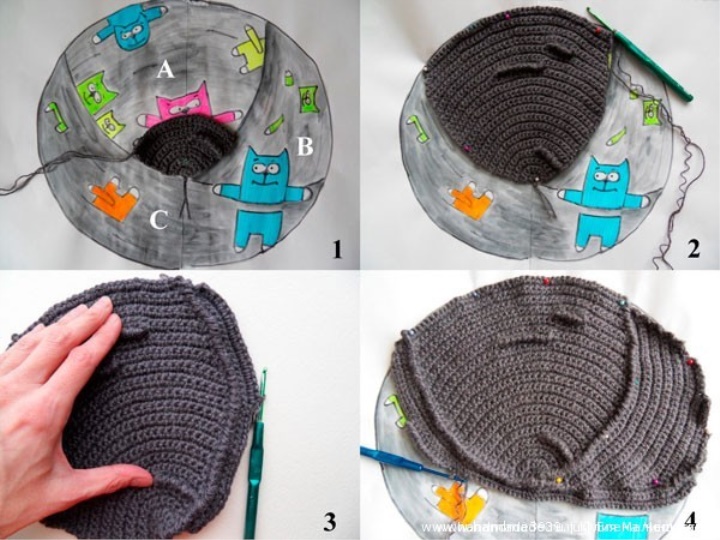
2. The base of the bag. "Clew". Our "ball of threads" consists of 3 parts. The direction of the thread in each part must be the same, that's why the parts are knit in a certain sequence. First, part A, then part B is attached to it, then part C is attached to these two parts. See photo # 1 - 4.
It is difficult to make an accurate description of knitting such a "coil": a lot depends on the chosen sizes of the bag, on the yarn, on the configuration of each of the parts. Therefore, I will explain the general principle of knitting using the example of part A, I will share small secrets, and then each of the masters will be able to continue the work by analogy.
So, part A. Look at the photos number 1 - 2. Begin to knit from the center. All fit RLS, for rounding we make a raise. Hook # 3.
We join the chain of 2 VP.
1 row: 2 scs = (2)
2 ranks: VP lift, 2 increments = (4)
3 ranks: VP lift, 4 increments = (8)
4 ranks: VP lift, * 1 increase, 1 scs * 4 times = (12)
5 ranks: VP lift, 10 sc, 1 decrease at the end = (11)
6 ranks: VP lift, * 3 sc, 1 increase * 2 times, 3 scs = (13)
7 ranks: VP lift, * 4 sc, 1 increase * 2 times, 3 scs = (15)
8 ranks: VP lift, * 2 sc, 1 increase * 2 times, then go back to the beginning of row
9 row (again - again 8th): UP lift, * 3 RLS, 1 increase * 4 times, 1 RLS = (21) At the beginning of the row, we insert the hook from the back side of the "crook step" - the maximum convexity is achieved.
10 ranks: VP lift, * 6 RLS, 1 increase * 2 times, 7 RLS = (23)
11 ranks: VP lift, RN = (23)
12 ranks: VP lift, 10 sc, 1 increase, 10 sc, 1 decrease = (23)
13 ranks: VP lift, * 8 sc, 1 increase * 2 times, 5 RMS = (25)
ATTENTION! The work must always be applied to the pattern (drawing) and accordingly make increases or decreases in the situation. Convex grooves of the "steppe's step" should be tied in predetermined places.
Try to ensure that the associated details are as closely as possible with the pattern-pattern.
Part B is knitted along the side of A. See photo # 3.
Part C is knitted along the side portions A and B.
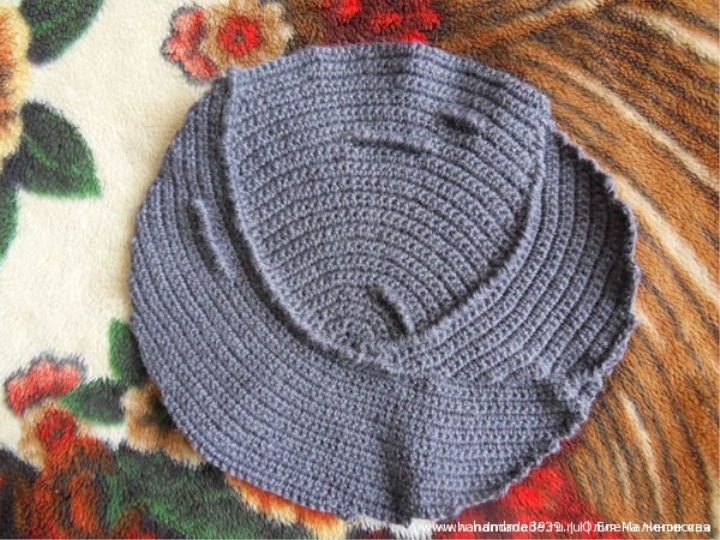
Here is a "tangle" should be in the end.
If the circle is not very smooth, there are waves, the part needs to be soaked in warm water, spread, pull in the right places and leave to dry on a flat surface. You can fix it with pins at the edges.
3. Application "Cat". Hook No. 1.75. Since our cats are entangled in a tangle, none of them fit.
The sequence of knitting the top of the cat: we knit the chain from the VP, then we scribe a Rectangle of the correct size. See photo №5. On both sides we tie the paws: 2 or 3 RLS - several rows. See the photo №6. With a white thread we untangle the tips of the paws: СБН, 2 С1Н in one loop, СБН. See the photo № 7 - 8.
The last step: we tie a piece around the RLS circle, at the same time we cut the ears on the head. Ears: СБН, 2 С1Н in one loop, С2Н, on an arc of this last column with two накидами we go down down columns without накида (them will contain 3 or 4). See photo # 9.
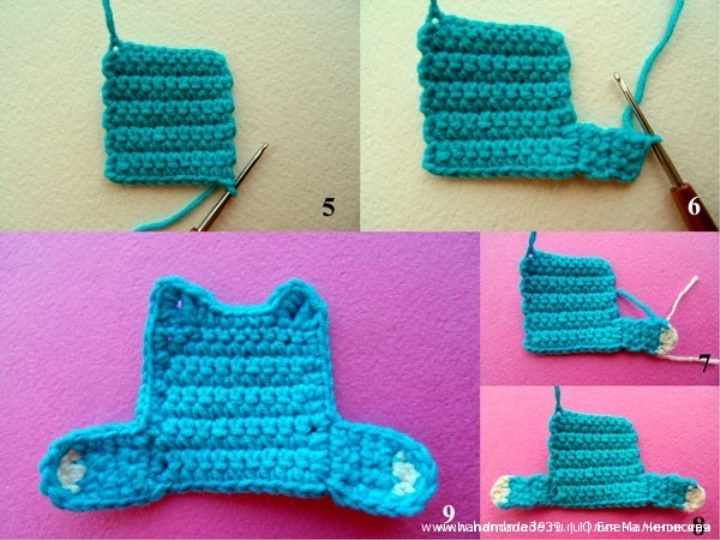
Since the part in the strapping around the circle will increase in size, initially knit the details a bit less than the intended cat.
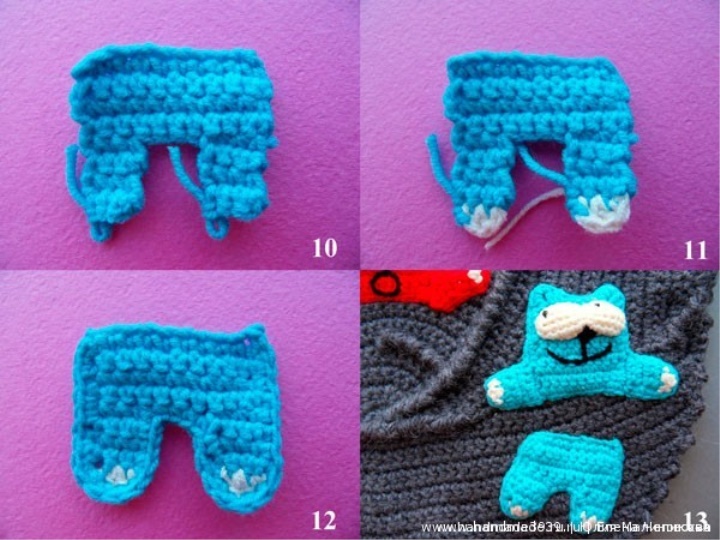
The lower part of the cat is knitted in a similar sequence: the body - paws - the white tips of the paws - the strapping.
How to knit the eyes, is detailed here .
Eyes fill with cotton wool or sintepuhom, sew black beads. We embroider with a black thread a spout and a mouth. Sew all application to the base. See the photo №13.
We knit several colorful "half-cats", distribute them on the bag in accordance with the intended.
Make a couple of details with the tail. The tip is white, and then the main color. Knit RLS in a circle.
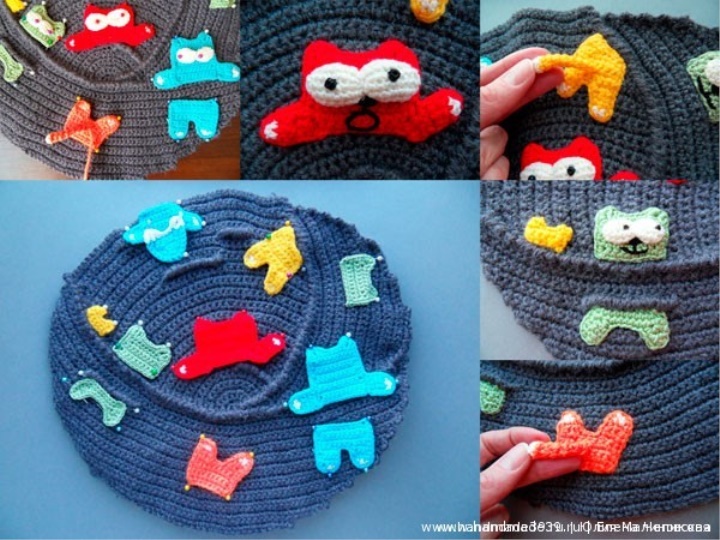
Try to give the cat's muzzles a different expression. Sew the beads in front of your eyes so that it would seem that the cats are looking at each other.
You can separately connect the cat's head and sew it to the body, and do not sew the ears.
When all the details are sewn, you can, if desired, in some places still add a few convex grooves of the "step of the step". They can be tied directly over the canvas.
The final touch - embroider a few dotted lines contrasting thread. This again emphasizes the different direction of knitting.
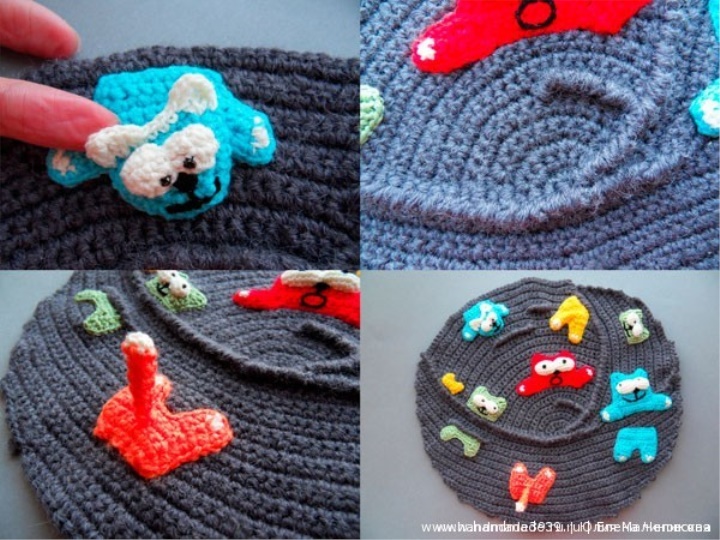
4. Rear wall, side walls, handles, lock, lining.
You can tie the back of the bag like the front, only without appliqués. You can simply link the classic circle from the RLS in a spiral. See the photo №14.
Lateral walls: they can not be knit at all, but simply sew the front and back parts - then the bag will be flat.
If you want to make a bag volumetric, then at the front, and at the back of the bag tie in 7 circular rows of RLS. And sew the parts, leaving the top place for sewing the lock. I recommend taking a smaller number hook, for example, №2,5.
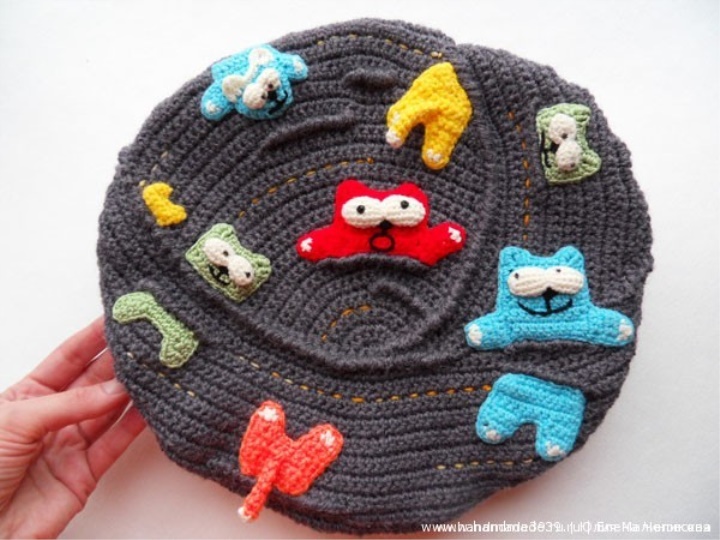
I wanted to "play" with the shape of the bag, experiment, make it even more unusual by the silhouette.
My "experimental" version (see photo # 17):
1 side row: sc in a circle
2 ranks: * 3 sc, 1 decrease *
3 - 7 row: sc
Decreases in the second row made the side walls not perpendicular to the front and back walls, but tapering. As a result, an empty bag as it were "folded", becomes flat. And when filling it becomes almost the right "pill". But - I agree - it's for an amateur. Perhaps, to someone such experiments seem superfluous. This is the beauty of creativity - each contributes something of its own.
The handle knits a wide, throughout the thickness of the bag, the rows of the "step of the crook" randomly tie.
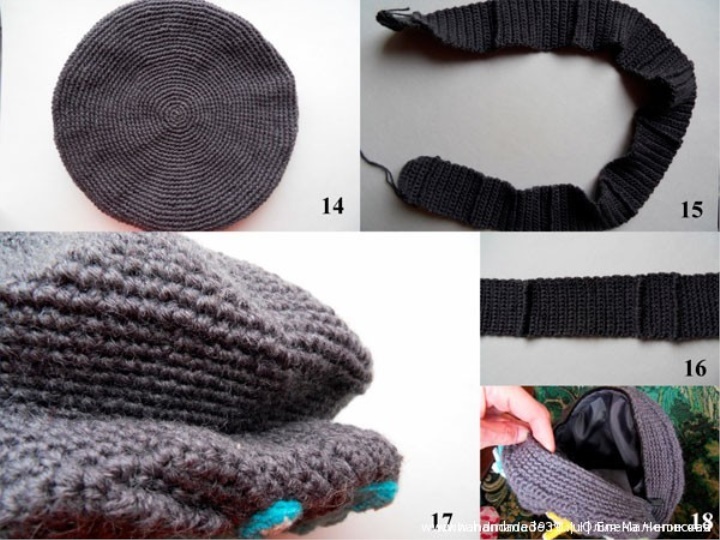
Sew a "zipper", sew a lining.
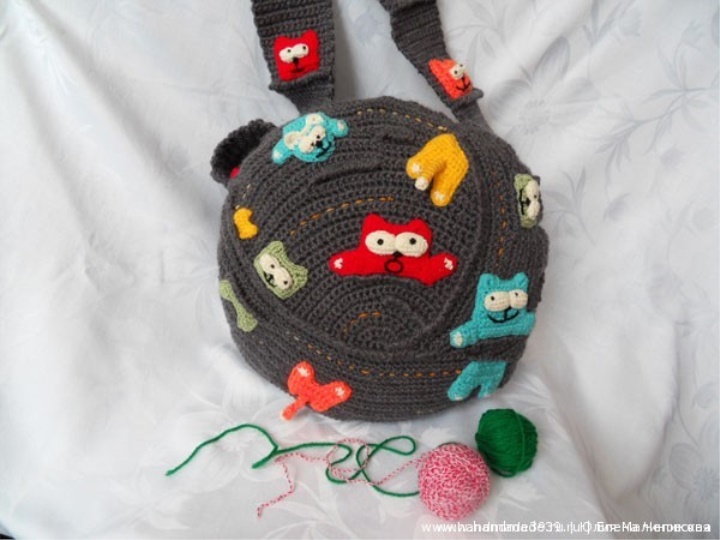
On the handle from both sides, too, sew on the cat's muzzle. It is better that they are located asymmetrically.
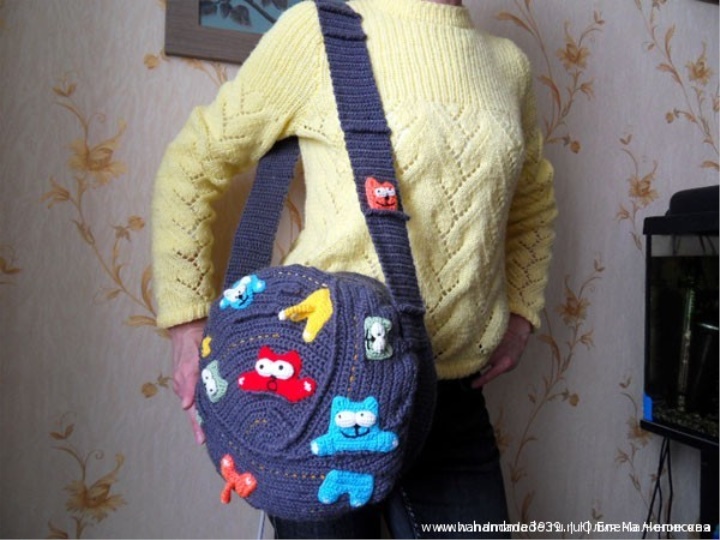
As you can see, the bag is quite roomy, and the color scheme allows you to combine it with a large number of clothes.