Legend
bn - air loop, sbn - column without a crochet, psbn - polustolbik without a crochet, ssn - column with a crochet, c2n - a column with two nakidami, pr - increase, уб - reduction
Head
1 row. 6 in the ring amigurumi
2 row. 6 pr (12)
3 row. (1 sb, pr) × 6 times (18)
4 - 5 rows. 18 сбн
6 ряд . 6 сбн, (2 ссн в 1 п) × 6 times, 6 сбн (24)
7 ряд . 6 сбн, (1 ссн, 2 ссн в 1 п) × 6 times, 6 сбн (30)
8 ряд . 30 сбн
9 ряд . (4 sb, pr) × 6 times (36)
10 row. 36 sb
11 series. (5 sbn, pr) × 6 times (42) 12-14
rows. 42 sbn
Now take one button, a needle with a floss and a thread of the primary color. At the bottom of the head, where there will be a neck, between 11 and 12 rows, we introduce a needle with a thread and we attach a button to the inside of the head, we remove the needle, retreating 2 loops.
15 row. (5 sb, ub) × 6 times (36)
16 row. 36 сбн
17 ряд . (4 сбн, уб) × 6 times (30) The
18th row. 30 сбн
We begin to fill our head with filler.
19 row. (3 сбн, уб) × 6 times (24)
20 row. (2 sb, ub) × 6 times (18)
21 rows. (1 сбн, уб) × 6 times (12)
22 row. 6 ub.
The hole must be pulled off, the end of the thread must be hidden inside the part.
Ears (2 parts)
1 row. 6 in the ring amigurumi
2 row. (1 сбн, пр) × 3 times (9)
3 row. (2 sbn, pr) × 3 times (12)
4 rows. 12 сбн
Attach the thread, leave it for sewing.
Make a muzzle
Find the center of the muzzle and outline the points of the eyes and the shape of the spout.
We take a needle with a thread of brown color and embroider a spout.
Now we take a needle with a thread of black color. We introduce the needle into the place where the trunk will be fastened, and we deduce at point A, we plant the beads, stepping back from point A, we return the needle back to the original position. Stepping back one loop, we remove the needle at point B and repeat the procedure. We pull the threads, fix it and hide it inside the head.
We embroider the edges of the brown color.
The muzzle is slightly toned around the eyes with a pastel of orange color.
Upper legs (2 parts)
1 row. 6 in the ring amigurumi
2 row. (1 sb, pr) × 3 times (9)
3 row. 3 sbn, 3 pr, 3 sbn (12)
4 rows. 12 сбн
5 ряд . 4 sb, 2 ub, 4 sbn (10)
6 row. 3 sbn, 4 psbn, 3 sbn (10)
7 - 13 series. 10 sb We
shift the beginning of the series to 1 loop.
14 row. 3 sbn, 4 psbn, 3 sbn (10)
15 series. 4 sbn, 2 pr, 4 sbn (12)
16 - 21 series. 12 сбн
We fill the foot.
We take one button, a needle with a floss and a thread of the primary color. Between 20 and 21 rows in the middle of the foot (on the side where we knitted half-shells without a crochet) we introduce a needle, we attach a button to the inside. Output the needle by skipping one loop.
22 row. 6 уб Pull the
hole, the end of the thread is hidden inside the part.
Legs (2 pieces)
We knit a thread of orange color chain of 6 vp,
1 row. from the second loop, 4 cbn, 3sbn in 1 n, continue to knit along the other side of the 3 sb, np (12)
2 series. pr, 3 sbn, 3 pr, 3 sb, 2 pr (18)
3 rd. 18 sc.
Change the thread to yellow.
4 - 6 row. 18 сбн
7 ряд . уб, 3 сбн, 4 уб, 3 сбн, уб (12)
We start to stuff a leg.
8 row. 4 sb, 2 ub, 4 sbn (10)
9 row. 10 sb
10 row. pr, 3 sbn, 2 pr, 3 sbn, pr (14)
11-12 series. 14 sb
13 series. уб, 5 сбн, уб, 5 сбн (12) We
continue to stuff a leg.
We take one button, a needle with a floss and a thread of the primary color. Between 12 and 13 rows, in the middle of the leg, we introduce a needle, we attach a button to the inside. Output the needle by skipping one loop.
14 row. 6 уб Pull the
hole, the end of the thread is hidden inside the part.
When knitting the second part, we make the fastening of the button on the other hand, so that we have a right and left legs.
Torso and assembly
1 row. 6 in the ring amigurumi
2 row. 6 pr (12)
3 row. (1 sb, pr) × 6 times (18)
4-6 rows. 18 сбн
7 ряд . 8 sbn, 2 pr, 8 sbn (20)
8 row. 8 sbn, (1 sbn, pr) × 2 times, 8 sbn (22)
9th row. 5 сбн, пр, 10 сбн, пр, 5 сбн (24)
We begin to fasten the head to the trunk. Using the needle, thread the threads of the head to the points shown in the figure.
Inside, we put a button on the thread, we tighten the threads, we tie them to the knot (we make three knots).
Now attach the upper paws. We specify the places of fastening the legs between 6 and 7 rows. With the help of a needle, we thread the threads of the legs in the trunk to the intended points, (the main thing is that the feet are symmetrical). Inside, we put a button on the thread, we tighten the threads, we tie them to the knot (we make three knots).
We continue knitting.
10 row. 24 сбн
11 ряд . (3 sbn, pr) × 6 times (30)
12 row. 30 сбн
13 ряд . (4 sb, pr) × 6 times (36)
14 row. 36 sb.
15 row. (5 sbn, pr) × 6 times (42)
16 row. 42 sb
17 - 19 series. 42 sb
20 series. (5 sb, ub) × 6 times (36)
21 rows. 36 сбн
22 ряд . (4 sb, ub) × 6 times (30)
23 row. 30 сбн
24 ряд . (3 sb, ub) × 6 times (24)
Now attach the legs. We plan to attach the legs between 22 and 23 rows. With the help of a needle, thread the legs in the trunk to the intended points (the main thing is that the legs are symmetrical). Inside, we put a button on the thread, we tighten the threads, we tie them to the knot (we make three knots).
We fill the trunk with filler.
25 row. (2 сбн, уб) × 6 times (18)
26 row. (1 сбн, уб) × 6 times (12) The
27th row. 6 ub
Hole pull, the end of the thread to hide inside details
Leaflets
Knit a chain of 10 ch.
1 row. from the second loop 1 sb, 2 ssn, 3 s2n, 2 cms, 2 sbn in 1n, continue to knit on the other side 2 ssn, 3 s2n, 2 ssn, 1 sbn.
The thread is carefully fixed and cut.
We knit 2 such leaves.
Now we are typing a chain of 30 cents. We attach to our chain the first leaf, tying up the sb, and the second leaf, also tying sb, then again we type 30 in. The ends are fixed and cut.
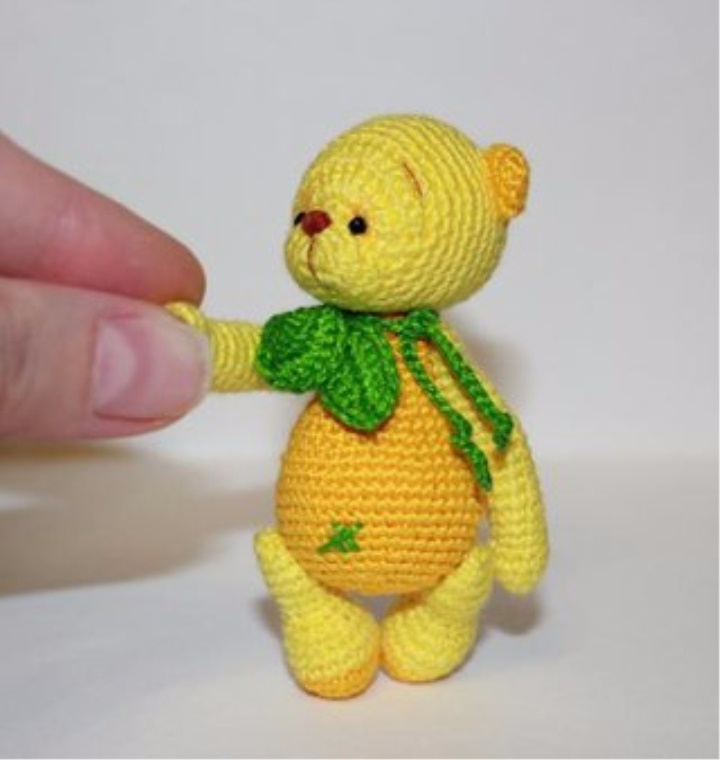
So our Limonchik is ready))) To all pleasant knitting!