Click For Crochet Abbreviations List
The material was published in the supplement to the magazine Rabotnitsa No. 6 for 1985 (all photos in the article are clicked on by click)
Hand knitwear is very elastic: it can be easily fitted, perfectly suited, getting the right shape, if necessary it can be stretched. Therefore, patterns for jersey are much simpler than those for which they sew. We offer drawings of patterns for women's, men's and women's clothing. The first is accompanied by a detailed description of the construction. Drawings of patterns for men and children's clothes are given without explanatory text, since they are constructed similarly.
Pattern-base is like a shell of that particular figure (from the base of the neck to the line of the thighs) for which it is made. On this pattern there is no cut either in front or behind, there are no lines creating a style, the neckline cuts along the base of the neck. If you link the model to a pattern-based, it will fit the shape without wrinkles and creases.
When making clothes of a certain style, first build a pattern-base (it is done on half of the figure), then on it draw lines, outline the clasp, pockets, cuffs, and then it is called a workpiece - it produces a specific model. For the working pattern it is necessary to draw a fully back and sleeve. If a thing is to be worn over the head, then before too it is necessary to draw completely.
When constructing a pattern-base, allowance is made for the freedom required to fit around. The size of it is not the same and depends on the cut of clothing, the thickness and structure of the knitted fabric, and also on the quality of the yarn. For example, a product bound from a mohair thread is too stretched in width, so for it it is necessary to give an allowance of less than 1-2 cm, by the way, as well as for clothes made with loose or openwork patterns.
Allowance for freedom of fit for women's, men's and children's knitwear (the size of the allowance is given for half the figure):
- summer thin blouses, T-shirts: 2 cm
- dresses, jackets, pullovers with vtachnymi sleeves: 4 cm
- jackets, jackets with vtachnymi sleeves: 4 cm
- clothes with sleeves "raglan": 4 cm
- sportswear, coats: 5 cm
Drawing of a drawing of a pattern-basis with vtachnymi sleeves for the female figure of 48th size.
We use the following measurements for building (you also put your own - the measurements are taken in the same way as when sewing):
1. Circumference of the neck - Osh - 18 cm (half of the measure)
2. Circumference of the chest - Og - 48 cm (half of the measure)
3. Roundness of hips - About - 50 cm (half of measure)
4.The length of the back to the waist - Dc - 40 cm
5.The length of the product - Di - 60 cm
6. Length of the shoulder - Dp - 13 cm
7.The length of the hand - Dr - 53 cm
8. Circumference of the wrist - Oz - 8 cm (half of the measure)
The size of the chest tuck solution is 4 cm (in knitted clothes this value corresponds approximately to the bra number).
Before you start drawing a pattern, see the table. It will help you quickly make the calculations needed to build.
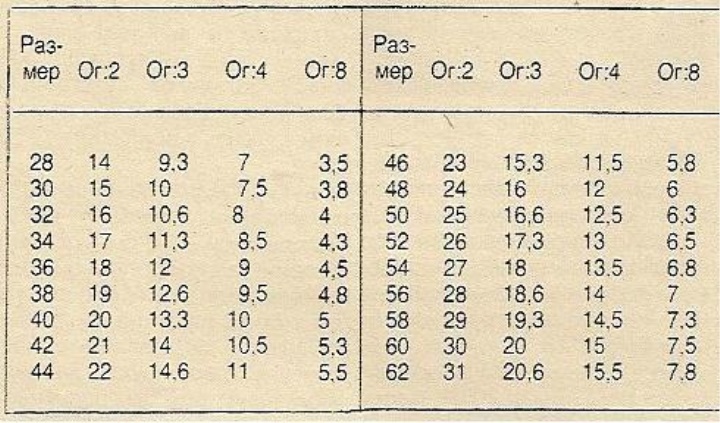
In the first column of the table, the dimensions of the model (that is, the measurement of the circumference of the breast - Og) are given, beginning from the 28th and ending with the 62nd size. For each of the following columns, the results of calculations performed, which can be found in the drawing, are given. Let's say your size is 48th. Find the figure 48, then the figures 24, 16, 12 and 6. Next, if you need to use the calculation of Og: 3 for the drawing, then you will see the finished result in the column under this calculation - this is 16 cm.
The grid (Figure 1).
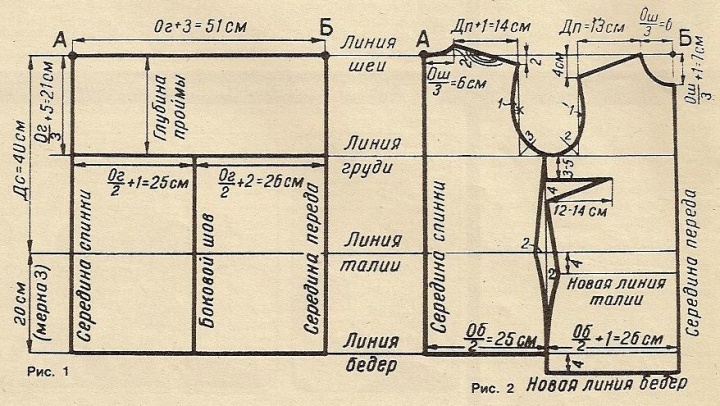
Mark the point A in the upper left corner, set 51 cm = Og + 3 cm horizontally to it to the right and put a B. B. 3 cm - allowance for freedom of fit. The segment AB is the line of the neck. From point A downwards vertically, set A = 40 cm (by measurement) and on the extension - the distance from the waist line to the hip line is 20 cm (by measurement), only 60 cm. This vertical line is the midline of the back. Now complete the rectangle with sides 51 and 60 cm. The vertical line, located opposite the middle of the back, is the midline line, the bottom line of the rectangle is the thigh line.
A point of 40 cm on the middle of the back connect the horizontal line with the middle of the transmission - this is the waist line. On the line of the middle of the backrest downward from point A measure 21 cm - the depth of the armhole. Find this value according to the following calculation: (Og: 3) + 5 cm = 21 cm. Connect the 21 centimeter point with the horizontal line to the middle of the transmission - the breast line. On it from the middle of the back, put 25 cm = (O2: 2) + 1 cm or from the middle of the transmission 26 cm (O2: 2) + 2 cm and downwards from this point, lower the perpendicular to the line of the hips - the line of the lateral seam.
Note.
For figures of more than 54th size, you can not determine the depth of the armhole according to the calculation (Og: 3) + 5 cm, because the armhole is too deep. Do it in such cases no more than 22-23 cm (with too full hands to 24 cm).
Backrest (Figure 2)
From the neckline from point A measure the width of the neck of the back, equal to Osh: 3 = 6 cm. Up from the point 6 cm, set aside 2 cm - the height of the neck. Connect the new point with a concave line to point A (the line of the nape).
Note.
For figures with fat deposits on the neck from the back, make the width and height of the neck of the back more than 1 cm.
From the neck line to the right of the point 6 cm, postpone the shoulder length + 1 cm (1 cm - on the shoulder) = 13 cm + 1 cm = 14 cm From this point down measure 2 cm and connect the new line with the height of the neck - the shoulder line . From the end of the shoulder down, lower the perpendicular to the intersection with the breast line, divide it by the poplar (in Figure 2 this point is marked with a cross) and draw a line of armhole back.
On the line of the thighs from the middle of the back, set aside 25 cm = Ob: 2. In this example, the point found hit the side seam line, and therefore the lateral seam of the model of the direct silhouette coincided with the lateral seam of the grid. But this may not work if the measure of the thigh size is smaller or, conversely, more standard, then the point obtained as a result of the calculation will be close to the line of the lateral seam. Connect it to the end of the armhole arm, and the new line will be the line of the lateral seam (Fig. 3) - dotted for figures with narrow hips, thick line - with wide.

For form-fitting model, measure the waist line on the left side seam 2 cm (not more than 3 cm), connect the new point by a straight line with the end of the backrest and slightly curved armhole - 25 cm from the point on the hips. The construction of the line of the lateral seam of the fitted model for figures with narrow and wide hips is shown in Fig. 4 and 5.
Before.
For a figure with wide hips, it is more convenient to draw a pattern from the backrest, for a normal figure it can be made on the same drawing. To do this, from point B down the middle of the transfer, measure the depth of the neck 7 cm (Osh: 3) + 1 cm. Left along the neckline, set the neck width to 6 cm = Osh: 3. From the point 6 cm, measure the length of the shoulder 13 cm (by measurement) and from this point downwards - 4 cm - the bevel of the shoulder. Draw a line of the shoulder seam. From the end of the shoulder, lower the perpendicular to the breast line and split it in half. Draw the transmission arm line as shown in Fig. 2.
Lateral suture is transferred.
Make new waistlines and hips: they should be located lower than the previous ones by the size of the tuck groove, in this example by 4 cm. From the middle pass over the new thigh line, postpone 26 cm (Ob: 2) + 1 cm. Connect the resulting point to the end of the armhole transfer is the line of the side seam of the model of the direct silhouette, for the standard figure it coincides with the line of the side seam of the grid. The construction of the line of the lateral seam of the model of a direct silhouette for figures with narrow and wide hips is shown in Fig. 6.
If the clothes are fitted with a silhouette, then measure the new waist line from the side seam 2-3 cm (as on the back) and connect this point to the end of the armhole and a slightly convex line with a point of 26 cm on the new hip line. The construction of the line of the lateral seam of the fitted model for figures with narrow and wide hips is shown in Fig. 7 and 8.
Breast Tuck.
Measure from the end of the armhole along the lateral seam 3-5 cm (this value depends on whether the bust is low or high) and through the found point draw a horizontal line of 12-14 cm long - the upper side of the dart. On the side seam from the point 3-5 cm, set the depth of the outflow (4 cm) and connect the new point with a point of 12-14 cm - the bottom side of the dart with a point of 2 cm on the new waistline.
The long sleeve (Figure 9)
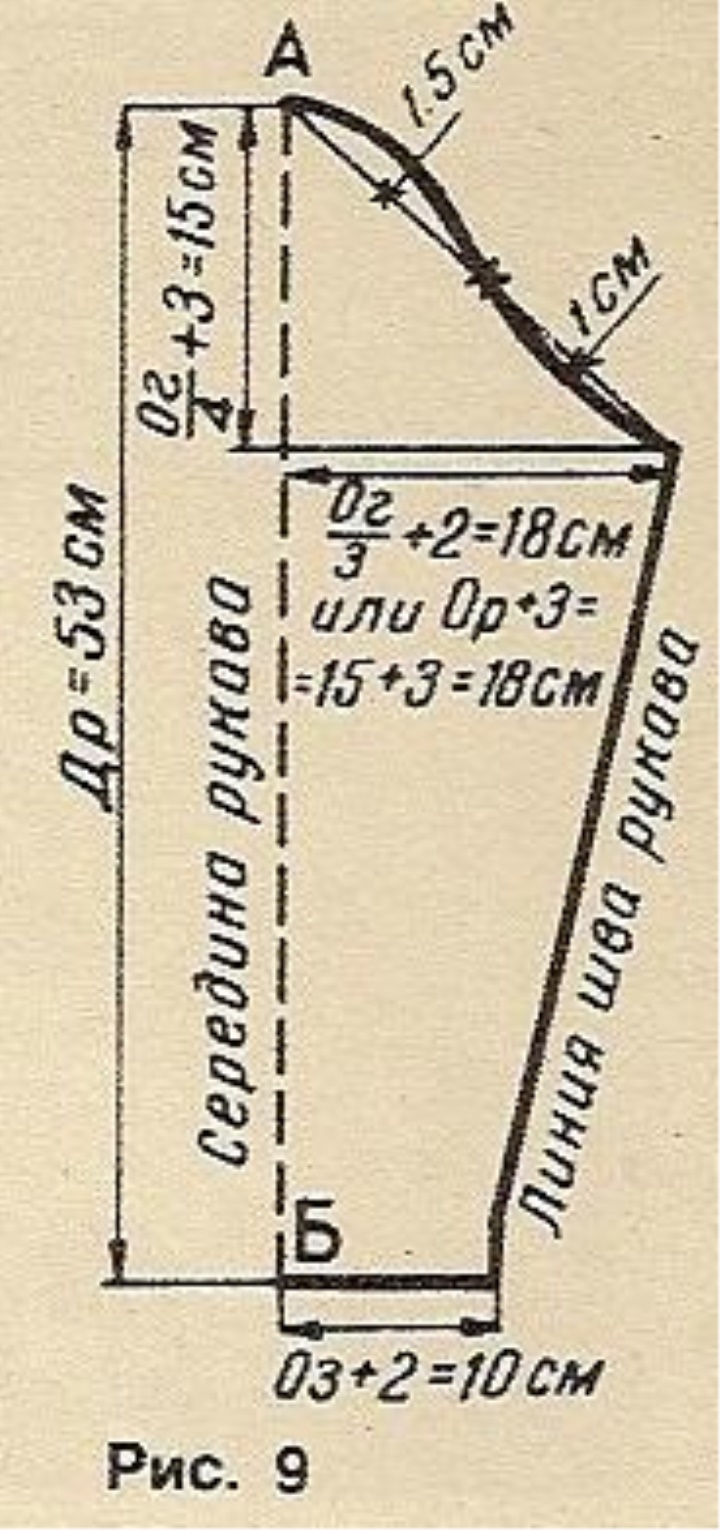
Draw a vertical line AB, equal to the measurement of the length of the hand (53 cm) - the middle of the sleeve. From the point A downwards along the vertical, set aside 15 cm = (Og: 4) + 3 cm - the height of the pellet of the sleeve (for dimensions over 54th, determine this value without calculation, it is 16 - 16.5 cm). From the point 15 cm to the right, measure 18 cm = (Og: 3) + 2 cm (or half the circumference of the arm at the shoulder Or + 3 cm = 15 cm + 3 cm = 18 cm) - the width of the sleeve. Connect the found point of the straight line to point A, divide the segment into 4 equal parts and draw the line of the tubular oat, as shown in the drawing. From point B to the right measure horizontally 10 cm = Oz + 2 cm and connect this point by a straight line with the width of the sleeve (with a point of 18 cm) - the line of the seam is a rukva.
Short sleeve (Figure 10)
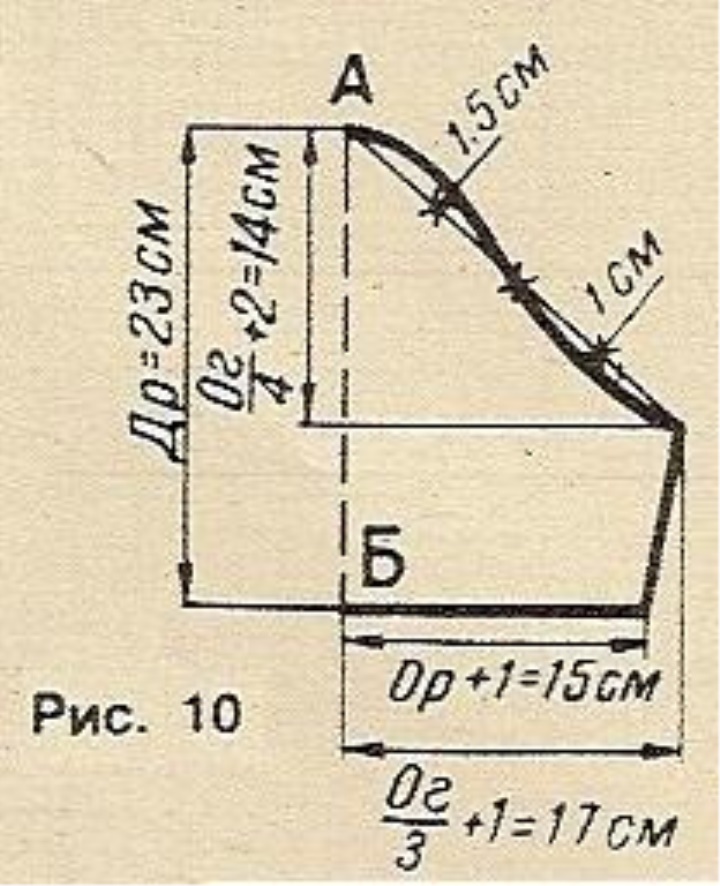
It should be narrower. Its widest part is determined by the formula (Og: 3) + 1 cm = 17 cm (or Or + 2 cm = 17 cm), the height of the pellet is (Og: 4) + 2 cm = 14 cm. Removing the length of the sleeve (for example , 23 cm), measure at this level the circumference of the hand (for example, 14 cm is half the measure). The principle of drawing the drawing is the same as the long one.
Pattern-base with vtachnymi sleeves for a male figure of 50th size (Figure 11)
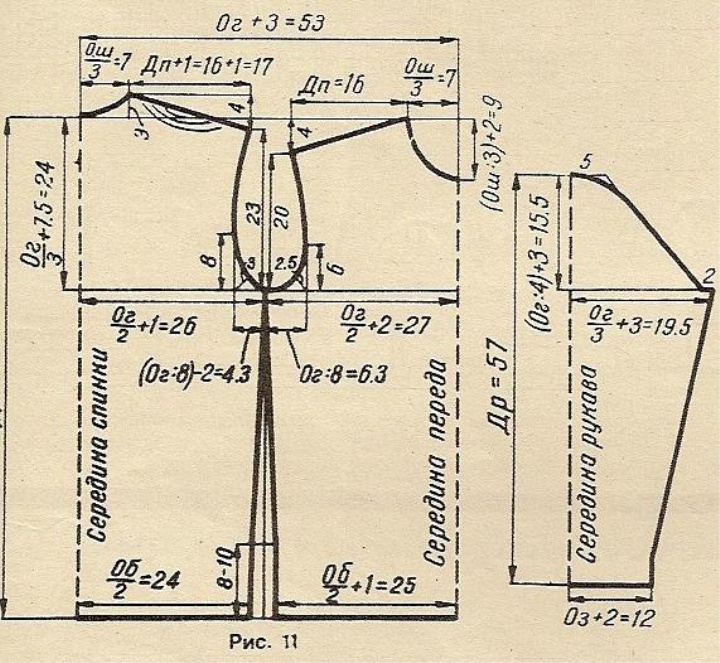
Built to measure, see below
(the circumference measurements are given in half the size in cm):
1. Circumference of the neck = 21
2. Circulation of the chest = 50
3. Circumference at hip = 48
4.The length of the shoulder = 16
5.The length of the hand = 57
6.Circle of repetition = 10
7. Product length = 70
Pattern-base with vtachnymi sleeves for children's figure of 30th size.
The pattern (Fig. 12) is constructed according to the following measures (the circumference measurements are given in half the size in cm):
1. Circumference of the neck = 14
2. Circulation of the chest = 30
3.The length of the hand = 34
4. Circumference at the wrist - 7
5.The length of the article - 39