Click For Crochet Abbreviations List
Detailed description and the scheme of knitting of monkey amigurumi
Legend:
bn - air loop
cc - connecting column
sb - column without crochet
(....) - N times - repeat from bracket to bracket specified number of times HEAD and BODY: Begin knitting from the top of the head, end at the end of the trunk. 1 row: 6 sb in the ring amigurumi (6) 2nd row: increase in each loop (12) 3rd row: (1 sb, increase) - 6 times (18) 4th row: (2 sb, increase) - 6 times (24 ) 5 series: (5 sbn, increase) - 4 times (28) 6-9 row: 28 sb 10 row: (6 sb, increase) - 4 times (32) 11-12 row: 32 sb 13 row: (6 sbn, reduction) - 4 times (28) 14th row: (5 scales, decrease) - 4 times (24)
15 row: (2 sb, decrease) - 4 times (18)
16 row: (1 sb, decrease) - 6 times (12) Fill the head, give it the necessary shape.
17 row: 12 sb
18 row: increase in each loop (24)
19-21 row: 24 sb
22 row: (3 sb, increase) - 6 times (30)
23-24 series: 30 sb
25 row: (3 sbn , decrease) - 6 times (24)
26 row: (2 sb, decrease) - 6 times (18)
27 row: (1 sb, decrease) - 6 times (12) Fill the body, give it the necessary shape.
28 row: (1 sb, decrease) - 4 times (8)
29 row: (1 sb, decrease) - 4 times (4) Pull the hole, hide the end of the thread inside the trunk.
MIRROR:
We knit the yarn lighter in tone:
1st row: 8th
row 2nd row: from the second loop from the hook: 7sb, turn 7bottom (14)
3rd row: increase, 5db, 2precision, 5db, increase (18)
4 series: 18 sb
5 series: 3 sb, ss. Fasten the thread, leave a long tail for sewing. Before you sew the muzzle to the head, embroider on her mouth and nostrils, tightly nabeyte.
AREA AROUND THE EYES (2 pcs.):
We knit yarns lighter in tone:
1 row: 6 sb in the ring amigurumi (6)
2nd row: 3 sb in one loop, 3 sb, 3 sb in one loop, 1 sb (10) ss . Fasten the thread, leave the tail for sewing.
Ears (option - small ears) (
4 pieces ): 1 row: 6 sb in the ring amigurumi (6)
2 ranks: 1 in the rise, expand: (1 sb, increase) - 2 times, 1 sb, 1 sb (8) . Sew the two pieces together with the wrong side inward, tying their edges behind the hinges. You do not need to stuff it.
Ears (option - large ears)
External ear (2 pieces):
We knit the yarn of the color of the head and trunk:
1 row: 6 sb in the ring amigurumi (6)
2 rd: 2 sb in each loop (12)
3 rd: (1 sbn , increase) - 6 times (18)
4 row: 18 sb, cs
Fix the thread, leave the tail for sewing.
Inner ear (2 pcs.):
We knit a light yarn:
1 row: 6 sb in an amigurumi ring (6)
2 ranks: 2 sb in each loop (12)
3 row: (3bn, increase) - 3 times (15), cc
Secure thread, leave the tail for sewing.
HANDS (2 pcs.):
We knit yarns lighter in tone:
1 row: 6 sb in the ring amigurumi (6)
2 row: 6 increase (12)
3-4 row: 12 sb
5 row: (2 sb, reduction) - 3 times (9)
6 rows: decrease, 6 sb, 1 sb (change the light yarn to the yarn of the color of the trunk) (8)
7 row: ss, 7 sb (8) Fill the hand.
8-12 series: 8 sb, ss. Fasten the thread, leave the tail for sewing.
LEGS (2 pcs.):
We knit yarns lighter in tone:
1 row: 6 sb in the ring amigurumi (6)
2 row: 6 increase (12)
3 ranks: (1 sb, increase) - 6 times (18)
4- 6 row: 18 sb
7 row: (decrease, 1 sbn) - 4 times, 6 sbn (14)
8 row: (decrease, 1 sb) - 3 times, 4 sb, 1 sb (change the light yarn to the yarn of the color of the trunk ) (11)
9 row: decrease, 9 sb (10) We fill the part, we give it a shape.
10-14 series: 10 sb, ss. We fill the leg to the end, we leave the thread for sewing.
TAIL:
We knit the yarn lighter in tone:
1 row: 6 sbn in the ring amigurumi (6)
2nd row: (1 sb, increase) - 3 times (9)
3 rd: increase, 8 sb (10)
4 row: (3 sb, reduction) -2 times (8)
Change of color to the color of the trunk:
5 row: ss, 7 sb (8)
6-18 row: 8 sb, ss. In order for the tail to hold the form, wire can be inserted into it.
ASSEMBLY:
1) Sew the handles, they are attached to the sides of the body directly under the head.
2) Sew the legs. The place of sewing the legs depends on the position in which you want to see your monkey amigurumi. If you want it to stand, then you need to sew directly to the bottom of the torso, at a distance from each other, so that the knitted toy becomes stable. 3) Sew a tail.
4) Sew a muzzle. The tip of the muzzle should be located about 10 or 11 rows.
5) Sew the eyes to the area around the eyes, then sew this part to the muzzle.
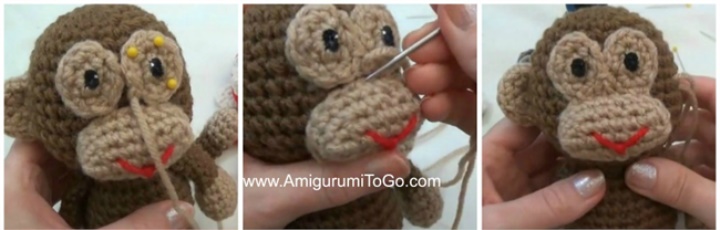
(between the 8th and 12th rows). Before you sew, pin them with pins to see how exactly they have sat down.