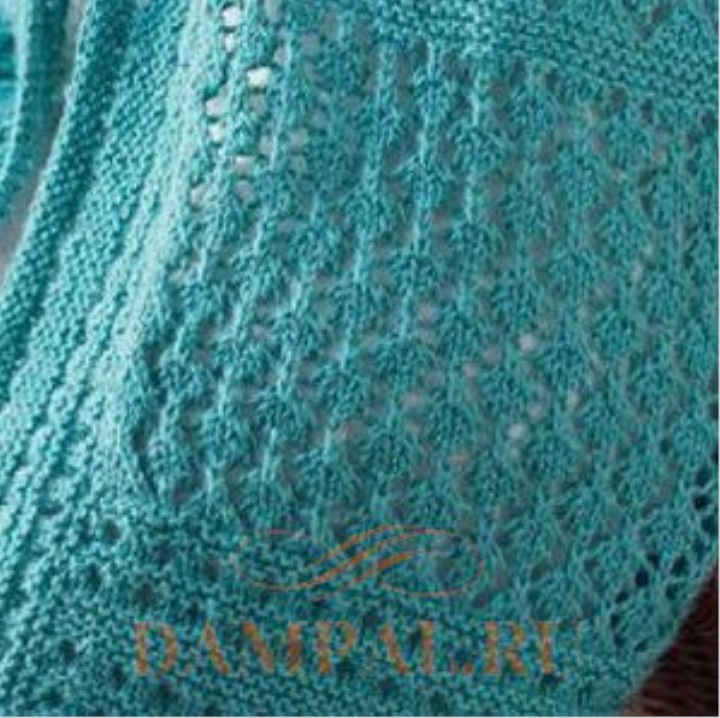
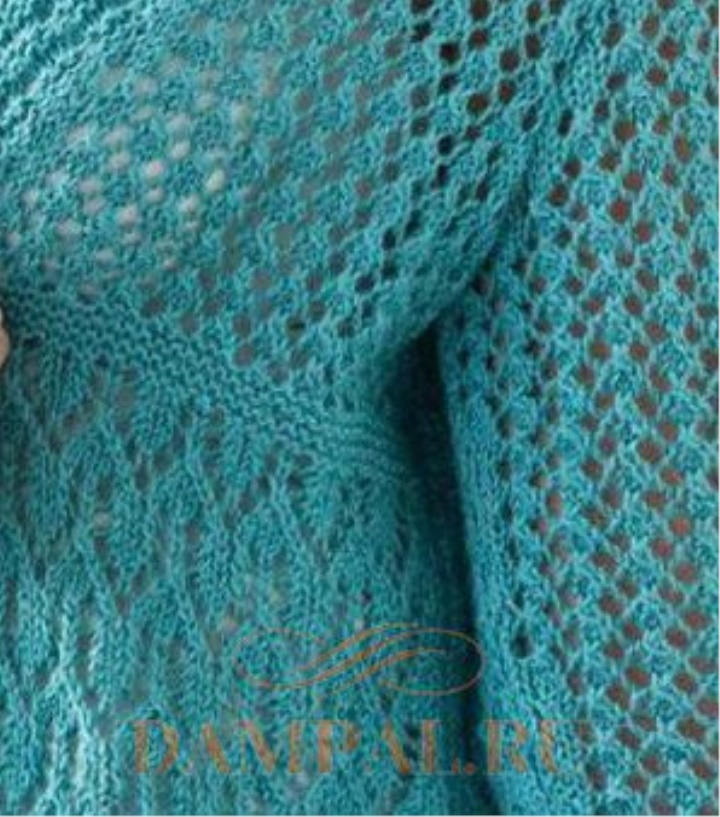
Long openwork cardigan is connected by three different patterns. Binding of the edge is made separately.
The description of knitting a cardigan from designer Deborah Newton is translated from the magazine “Vogue Knitting”.
Classic Elite Yarns (35% wool, 35% linen, 30% alpaca; 125 m / 50 grams in a hank) - 9 (10, 11, 12, 13) hanks.
Knitting needles number 4, circular needles number 4 with a length of 90 cm, loop markers.
1st row (purl): 2 purl loops (edge), place a marker, purl loops to the last 2 loops, place a marker, 2 purl loops (edge).
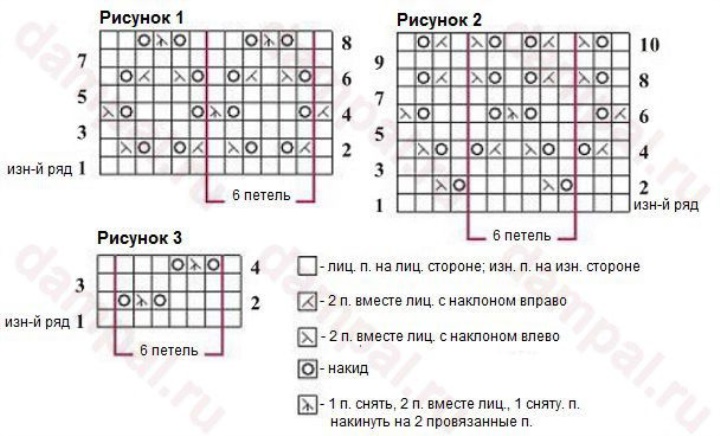
2nd row (front): 2 front loops (edge), tie the first loop before the 2nd row repeat of the pattern shown in Figure 1, repeat 12 (13, 14, 15, 16) times 6 loops of repeating repeat, link the last 6 loops after rapport, 2 face loops (edge).
Continue to knit Figure 1 in the prescribed manner until 6 repeats of the repeat of 8 loops (a total of 48 rows) are connected.
Tie 7 rows with face loops.
Start knitting pattern 2:
Start knitting from the 2nd row of repeat pattern 2.
2nd row (front): 2 front loops (edge), tie the first 3 loops before repeating the 2nd row as shown in Figure 2, repeat 12 (13, 14, 15, 16) times 6 loops of repeating repeat, link the last 4 loops after rapport, 2 front loops (edge).
Continue to knit in the prescribed manner, Figure 2, until 5 repeats of the repeat of 10 loops (50 rows total) are connected.
Tie 7 rows with face loops, adding 1 loop in the center of the last purl row - on the needles 84 (90, 96, 102, 108) loops.
Start knitting pattern 3:
Start knitting from the 2nd row of repeat pattern 3.
2nd row (front): 2 front loops (edge), tie the first loop before the second row repeat according to the scheme of Figure 3, repeat 12 (13, 14, 15, 16) times 6 loops of repeating repeat, link the last loop after rapport, 2 front loops (edge).
Continue to knit in the prescribed manner Figure 2, until the 18 rows of Figure 3 are knitted. The height of the knitting should be about 43 cm.
Armhole formation:
Note: when forming the armhole, do not knit 2 edge loops, extra loops (not enough to include them in the knitting pattern), knit with the front satin stitch.
Close by 5 loops at the beginning of the next 2 rows.
A number of reductions (front): knit 2 loops together with the front one with an inclination to the left, knit according to the pattern up to the last 2 loops, 2 loops to knit together the front one with an inclination to the right.
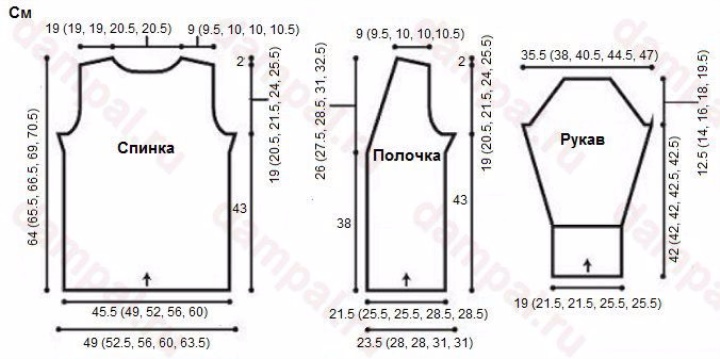
Repeat these reductions in each 2nd row another 5 (7, 9, 11, 13) times - on the needles 62 (64, 66, 68, 70) loops. The height of the armhole is 19 (20.5, 21.5, 24, 25.5) cm.
In the last purl row, mark the central 12 (12, 12, 14, 14) loops with markers.
Formation of the neckline and shoulder bevel:
Next row (front): close 5 (6, 5, 5, 6) loops, tie up the loops marked with markers, attach the thread from the 2nd coil and close the central 12 (12, 12, 14, 14) loops, tie the loops to end of row.
Continue to form the bevel of the shoulder, closing 5 (6, 5, 5, 6) loops at the beginning of the next purl row, then close 5 loops (5, 6, 6, 6) from the edge of each shoulder 2 more times, and close 5 loops simultaneously from each edge of the neckline 2 times.
Left shelf:
Close the 41 (47, 47, 53, 53) loop.
Start knitting pattern 1:
1st row (purl): 2 purl loops (edge), place a marker, purl loops to the last 2 loops, place a marker, 2 purl loops (edge).
2nd row (front): 2 face loops (edge), tie the first loop before the 2nd row repeat of the pattern shown in Figure 1, repeat 5 (6, 6, 7, 7) 6 loops of repeating repeat, link the last 6 loops after rapport, 2 face loops (edge).
Continue to knit Figure 1 in the prescribed manner until 6 repeats of the repeat of 8 loops (a total of 48 rows) are connected.
Tie 7 rows with face loops.
Start knitting pattern 2:
Start knitting from the 2nd row of repeat pattern 2.
2nd row (front): 2 front loops (edge), tie the first 3 loops before repeating the 2nd row as shown in Figure 2, repeat 5 (6, 6, 7, 7) 6 loops of repeating repeat, link the last 4 loops after rapport, 2 front loops (edge).
Continue to knit in the prescribed manner, Figure 2, until 5 repeats of the repeat of 10 loops (50 rows total) are connected.
Tie 7 rows with face loops, adding 1 loop in the center of the last purl row - on the needles 42 (48, 48, 54, 54) loops.
Start knitting pattern 3:
Start knitting from the 2nd row of repeat pattern 3.
2nd row (front): 2 front loops (edge), tie the first loop before the second row repeat according to the diagram in Figure 3, repeat 6 (7, 7, 8, 8) times 6 loops of repeating repeat, link the last loop after rapport, 2 front loops (edge).
Continue to knit in the prescribed manner, Figure 2, until the height of the knitting reaches 38 cm.
Formation of neckline:
Row of reductions (face): knit up to the last 2 loops, knit 2 loops together face up with a tilt to the right. Place a marker at the beginning of the neckline in this row.
Repeat these reductions in each 4th row another 15 (16, 15, 14, 14) times, then in each 2nd row another 0 (2, 0, 5, 2) times, at the same time, when the height of knitting reaches the height of knitting back to armhole, start to perform armhole:
Armhole formation:
Next row (front): close 5 loops, knit to the end of the row.
Continue to form a neckline, diminishing 1 loop by tying 2 loops together with the front one with a tilt to the left at the beginning of each facial row, a total of 6 (8, 10, 12, 14) times.
After all formations are completed, knit on the remaining 15 (16, 17, 17, 18) loops, until the height of the armhole reaches 19 (20.5, 21.5, 24, 25.5) cm.
Shoulder bevel formation:
Close 5 (6, 5, 5, 6) loops on the side of the armhole, then 2 times 5 (5, 6, 6, 6) loops.
Right shelf:
Knit as a left shelf, only in a mirror image.
openwork cardigan knitting needles
Sleeves:
Dial on the needles 35 (41, 41, 47, 47) loops.
Start knitting pattern 2:
1st row (purl): 2 purl loops (edge), place a marker, purl loops to the last 2 loops, place a marker, 2 purl loops (edge).
2nd row (front): 2 face loops, tie the first 3 loops before repeating the 2nd row as shown in Figure 2, repeat 4 (5, 5, 6, 6) 6 loops of repeating repeat, link the last 4 loops after rapport , 2 front loops (edge).
Continue to knit in the prescribed manner, Figure 2, until 4 repetitions of the repeat of 10 loops (40 rows total) are connected.
Tie 7 rows with face loops.
The following row (front): front loops, uniformly adding 7 loops - on the needles 42 (48, 48, 54, 54) loops.
Start knitting pattern 3:
1st row (purl): 2 purl loops (edge), place a marker, purl loops to the last 2 loops, place a marker, 2 purl loops (edge).
2nd row (front): 2 front loops (edge), tie the first loop before the second row repeat according to the diagram in Figure 3, repeat 6 (7, 7, 8, 8) times 6 loops of repeating repeat, link the last loop after rapport, 2 front loops (edge).
Tie 3 more rows in the prescribed manner.
A series of additions (front): 2 face loops, a marker, 1 loop to add from a broach, knit to the next marker, 1 loop to add from a broach, a marker, 2 face loops.
Repeat these additions in each 8th row another 6 (6, 0, 0, 0) times, then in each 6th row 3 (2, 10, 10, 12) times - on the needles 62 (66, 70, 76 , 80) loops.
Next, knit right until the height of the knitting reaches 42 (42, 42, 42.5, 42.5) cm.
Sleeve back:
Note: when forming the neck, do not knit 2 edge loops, extra loops (not enough to include them in the knitting pattern), knit with the front satin stitch.
Close by 5 loops at the beginning of the next 2 rows.
A number of reductions (front): knit 2 loops together with the front one with a tilt to the left, knit with a pattern to the last 2 loops, 2 loops to knit together the front one with a tilt to the right.
Repeat these reductions in each 2nd row another 15 (17, 19, 22) times - on the spokes 15 loops. Close all loops.
Sleeve cuff:
On the front side, dial and fasten with the front 35 (41, 41, 47, 47) loops along the dial-up row of the sleeve.
Tie 3 rows with face loops.
Row with holes (front): 1 front loop, * 1 nakid, 2 loops knit together the front, 1 front loop; repeat from *, at the end of row 1, the front loop.
Tie 1 row of purl loops. Tie 4 rows with face loops. Close all loops.
Completion:
Lightly steam the parts on the wrong side. Run shoulder seams. Sew sleeves in armholes Run the seams of the sleeves and side seams.
Bottom trim:
Use circular knitting needles and knit facial 158 (176, 182, 200, 206) loops along the lower edge of the left shelf, backrest and right shelf (1 loop for each loop of the dial).
1-3 rows: face loops.
Row with holes (front): 1 front loop, * 1 nakid, 2 loops knit together the front, 1 front loop; repeat from *, at the end of row 1, the front loop.
5th row: purl loops.
Tie 4 rows with face loops.
Repeat the 4th and 5th rows.
Tie 8 rows with face loops.
[Repeat the 4th and 5th rows. Tie 4 rows with face loops] - 2 times.
Binding shelves:
With circular knitting needles and on the front side, dial and knit with 95 loops at the front to the beginning of the neckline marker, place the marker, dial and knit with the facial 50 (52, 55, 59, 62) loops to the shoulder seam, 42 (41, 41, 45, 45) loops along the neckline of the back, 50 (52, 55, 59, 62) loops to the marker of the neckline on the other shelf, place the marker, 95 loops to the bottom of the shelf - only 332 (335, 341, 353, 359) loops.
Piping as for the bottom edge, only in all the front rows of garter knitting (including the row with holes) add 1 loop from the broach after the first marker and before the 2nd marker. Close all loops.
Openwork cardigan does not have a fastener. If you wish, you can sew buttons and use holes in the strapping of the shelf as loops.