Click For Crochet Abbreviations List
Monochrome sweater, connected in the technique of enterlak, emphasize your taste and skill.
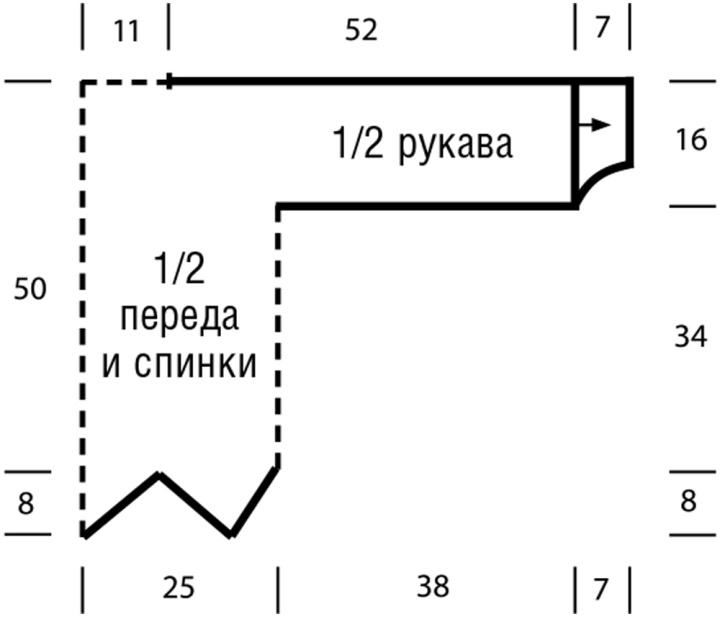
DIMENSIONS
38/40
YOU WILL BE NEEDED
Yarn (46% cotton, 22% polyamide, 18% baby Alpaca wool, 14% wool; 115 m / 50 g) - 500 g beige; 1 set of stocking needles No. 4, 5; extra stocking needles for left loops.
ELASTIC
The number of loops is a multiple of 4 + 2 + 2 edging.
Facial rows: edge, * 2 face, 2 purl, from * constantly repeat, finish 2 face, edge.
Purl rows: knit loops on the picture.
BASE RECTANGLE
Type 20 loops on the knitting needles with a cross set and tie 40 rows with an elastic band. Then leave the loop.
RECTANGLE LEFT
Dial needles 20 loops acc. instructions and to connect 1 purl row with pattern 1, while between the edge ones start and finish with 2 purl. This seamy series refers to a set of loops and is not taken into account in the subsequent designations of the series.
Continue with a rubber band and connect the rectangle along the left edge with the adjacent (base) rectangle. To do this, knit an edge loop and 1 left loop of an adjacent (base) rectangle together with a purl in each of the following front rows 20 times.
After 40 rows from the set of loops, all left loops are used up. Leave the 20 loops of the rectangle.
RECTANGLE RIGHT
Knit like a rectangle to the left, but connect the rectangle along the right edge with the adjacent (base) rectangle. To do this, in each front row 20 times knit 1 left loop of the adjacent (base) rectangle with the edge together purl.
After 40 rows from the set of loops, all the loops left are consumed. Leave the 20 loops of the rectangle.
HALF RECTANGLE HALF
Type on the spokes 3 loops and knit with a rubber band, while starting with edge, 1 face, edge. Starting from the 3rd row, add the front or back crossed according to each front row at the beginning of the row after the edge 17 x 1. a pattern of a transverse thread and include it in pattern 1.
After 36 rows from the initial row, the number of loops will reach 20. Link 2 more rows and after 38 rows from the initial row leave the loops.
CLOSED ANGLE
Dial needles 20 loops acc. instructions and tie 1 purl row with an elastic band, while between the edge-start and finish 2 purl.
To continue work with an elastic band, while knitting the last 2 loops together with the purl 19 times in each of the following front rows. Cut the thread and stretch through the last loop.
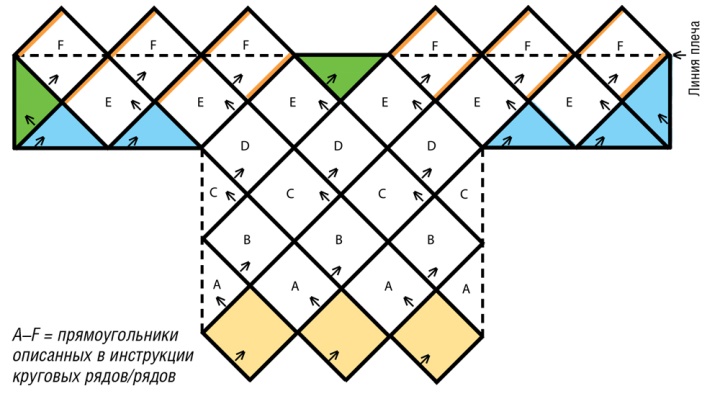
ENTRELAC TECHNOLOGY
Run the rectangles in rows in the forward and backward directions and simultaneously connect them to each other according to to the scheme, for this, knit the loops of the previous rectangle together with the loops of the rectangle in operation, as described above.
Start from the separately linked base rectangles (= in the diagram highlighted in yellow). Then, for the lower part of the back and before to knit in circular rows without side seams, rectangles to the left and to the right; arrows on the pattern = knitting direction.
On straight edges, make half of the rectangles (= in the diagram are highlighted in blue) and closing corners (= in the diagram are highlighted in green).
Attention!
Attention: for technical reasons, the rectangles on the diagram are shown as square.
Rectangles that are half out of the sideline or shoulder line are marked with a fold line.
On a jumper, the squares of the pattern, including the pattern, look like curved rectangles that are intertwined with each other.
20 p. X 25 p. = 10 x 10 cm, connected by a rubber band.
The width of the rectangle is approx. 10 cm, height - 16 cm, but the rectangles are deformed because of the pattern. Therefore, the pattern shows the dimensions obtained by measuring the model.
Pattern
COMPLETING OF THE WORK
LOWER PART AND BACK
Knit with an entrelac technique. To do this, first run 6 separate base rectangles (= yellow) and acc. In the further processing, turn them to the right.
Circular row A
Run 6 rectangles to the left, to do this, use the knitting needles on the left side edge of the base rectangles with 20 loops each and when knitting, connect the rectangles with the left loops of the adjacent basic rectangle to the left.
Circular row B
Run 6 rectangles to the right, to do this, on the spokes along the right side edge of the rectangles of the circular row A, 20 loops each and when knitting, connect the rectangles with the left loops of the rectangles adjoining to the right.
Circular row C
Run 6 rectangles to the left, to do this, on the spokes along the left side edge of the rectangles of the circular row B, 20 loops each and when knitting, connect the rectangles with the left loops of the adjacent rectangles B.
Circular row D
Run 6 rectangles to the right, to do this, use the knitting needles on the right side edge of the rectangles of the circular row C with 20 loops and when knitting, connect the rectangles with the left loops of the adjacent rectangles to the right C.
Upper part of the front with the front parts
At first, continue work only on the first 3 rectangles of the circular row D. For the lower edges of the sleeves, perform 4 separate halves of the rectangles (= blue).
Row E
Run 6 rectangles to the left, to do this, use the spokes on the left side edge of the first 2 halves of the rectangles, the next 3 rectangles of the circular row D and one more half of the rectangle with 20 loops and when knitting to connect the rectangles with the left loops of the rectangles to the left / half of the rectangles.
For the edge of the left sleeve, perform another half of the rectangle, but already in the 1st row knit the edge with 1 left loop of the adjacent half of the rectangle together with the wrong side, respectively.
For the edge of the right sleeve, type on the spokes on the left edge of the outer half of the rectangle 20 loops and complete the closing angle.
For the neckline, type 20 loops on the spokes on the right edge of the 4th rectangle E (counting on the right) and complete the closing angle (= green), while connecting it along the right edge with the adjacent rectangle E, i.e. in the front row at the beginning of the row, knit the edge band with the loop left together, purl, respectively, and additionally, at the end of the row, knit 19 times the last 2 loops together with the purl, respectively.
Then cut the thread and stretch through the last loop.
TOP OF THE BACK WITH BACK POSTER HANDS
On the last 3 rectangles D knit similarly.
ASSEMBLY
For the connecting row, F in front is located in front: in front and in the backrest, connect with row F, while alternately running from 6 to 6 rectangles from left to right. on the front row and in the front row connect them on both sides with the adjacent pending loops of the front and rear rectangles E; the edges of the connection are marked in red in the diagram. For all rectangles F, close the 40 loops through the 40 rows from the set of loops!
Run the seams around the closed edges. At the lower edges of the sleeves, type 40 loops on the spokes and tie a 7 cm rubber band for the slat, starting with 1 purl row. Then close the loop on the picture. Run the seams of the sleeves.
Photo: magazine "Sabrina" №9 / 2016