STRIP SEQUENCE
4 (8) 8 (12) p. sand,
2 p. pink,
8 p. gray,
2 p. blue,
12 p. sand,
4 p. pink,
14 p. gray,
8 p. blue,
6 p. sandy.
Further from the beginning of the armhole:
12 p. pink,
4 p. gray,
4 p. blue,
12 p. sand,
6 p. pink;
then knit with gray thread until the end.
KNITTING DENSITY
27 p. X 20 p. = 10 x 10 cm, connected by the main crochet pattern №3.
COMPLETING OF THE WORK
BACK
Sand thread to perform the initial chain of 91 (100) 110 (119) vp
For sizes S and M: rotate using 1 vp lifting and knitting 1st p. under the scheme: 4 tbsp. b / n in the first 4 i.p. * Link 5 ce, skip 2 ce and execute 7 tbsp. b / n in the next 7 vp * Repeat from * to *, finish a row: 5 vp, skip 2 vp and perform 4 tbsp. b / n in 4 last ce
For sizes L and XL: turn with 3 inches lifting, 2 V. p. Knit, starting
from the 8th century. from the hook: * 7 tbsp. b / n, 5 VP, skip 2 VP * Repeat from * to *, finish a row: 7 tbsp. b / n, 2 vp, skip 1 vp and perform 1 tbsp. s / n in the last loop of the series.
Continue knitting with the main pattern according to the pattern, alternating the colors of the threads in the specified sequence.
Linking 60 (64) 64 (68) p. (finish with sand-colored thread), reduce the loop on both sides to form armholes, at the same time divide the work in the middle for a cut on the back and finish both sides separately.
Right side of the back
Attach the pink thread to 4 (10) 4 (10th) section from the edge and knit 55 (55) 67 (67) paragraph with the main pattern. Link 2 ce and 1 tbsp. b / n in the middle loop. Rotate with 1 vp lifting and knit 57 (57) 69 (69) p. in the opposite direction = 3 (9) 3 (9) + 1 p. decrease from the armhole. From the side of the cut, knit straight.
For sizes S and M, reduce 1, 1, 3, 1, 1, 1, 3, 1, 1, 1 section 1 in each row from the side of the armhole.
For sizes L and XL, subtract another 3, 1, 1, 1 p. Like this: at the beginning of the row, those loops that need to be subtracted should be tied with a rope. Art. At the end of the row, leave the specified number of loops untied and turn.
After removing all 18 (24) 24 (30) p., On the remaining 43 (43) 49 (49) p. Continue knitting straight with the main pattern to 2 (2) 6 (6) p. gray thread (= last bar).
Neck
In the next row (front side) knit the main pattern on the first 28 (28) 34 (34) p. Then do 1 tbsp. b / n in each of the last 15 p. series.
Right side
To tear off a thread and, having attached, to execute 1 Art. b / n in the 16th paragraph (from the side of the cut). Knit main pattern to the end of the row.
In the next row at the end of row 1 p. Leave untied, turn and connect to the first loop. Art., knit the main pattern to the end of the row.
Then on all 26 (26) 32 (32) p. Perform 1 p. Art. b / n = shoulder edge.
Left side of the backrest
Start as the right side, but in the middle loop to perform on 1 tbsp. b / n more.
Knit 57 (57) 69 (69) p. Main pattern (= 3 (9) 3 (9) p. Subtract from armhole). Rotate with 1 vp lift and execute a subtraction, as on the right side, but in a mirror image.
BEFORE
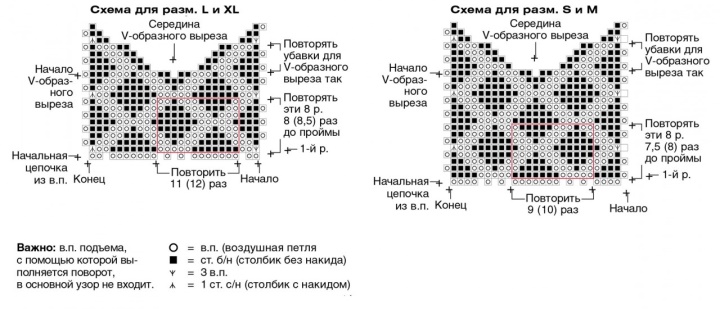
Knit like a back (with cuts for armholes), finish 10 p. pink thread from the beginning of the armhole and begin to form a V-shaped cut-out, for this, both sides finish separately. The middle loop of the front is marked with a marker. Run 1 p. The main pattern on all the hinges and from the seamy side to start decreasing.
Right side before
Turn and knit up to the marker.
Rotate in front of the middle loop and close in the direction towards the inner edge 3, 1, 1, 1, 3, 1, 1, 1, 3, 1 p. (Perform the cuts, as shown in the diagram).
Left side of the front
Attach the thread and start from the 1st point after the middle loop marked with a marker, perform the increments, as on the right side, but in a mirror image and as shown in the diagram.
After completing all the reductions, knit straight on the remaining hinges until the length of the front is equal to the length of the back.
ASSEMBLY
Run shoulder seams (the edges can be crocheted) and side seams.
Tie the bottom edge with a gray thread in a circle 2 p. Art. b / n
The edges of the armhole tied with sand thread in a circle 2 p. Art. b / n (the edge should not be stretched or, conversely, too tight).
Bake
Tie the neckline with a string of sand 2 p. Art. b / n: start and finish at the edges of the cut on the back, perform 1 tbsp. b / n in each loop and 3 tbsp. b / n in the areas of curvatures on the back. On the front of the harness to perform evenly, so that the edges are not stretched or, conversely, too tight. Thread to break.
Ribbon Collar
Knit with blue thread art. b / n turning the work with 1 vp lifting, 1st st. b / n to perform in the 1st paragraph.
Attach the thread at the edge of the cut and knit st. b / n on the loops of the neck of the back and down from the second shoulder seam 8 p. forehand.
Then tie a chain of 50 ce. (for connecting ribbon) and knit art. b / n 8 st. b / n anteriorly up to the shoulder seam and on the hinges of the neck of the back to the edge of the cut.
Next, knit on all loops 8 p. Art. b / n, finish by doing 2 hinged buttonholes from vp Sew buttons.