Click For Crochet Abbreviations List
This description is designed for knitters with experience in knitting jacquard patterns. So, they tied up))
Yarn:
Candy from Vita (100 gr 178 meters) of brown, beige and white colors, about 80 grams of each color (this is per set hat + slippers).
Tools:
1. Hook №2.
2. Knitting stockings number 2.5.
3. Description. Slippers on the sole on the leg 15 cm.
Step number 1. Sole.
Tools: hook number 2.
1 row. Brown thread dial 23 air loops (vp) + 2 lifting loops (pp).
2 row. In the 3rd loop, perform 2 columns without nakida (Art. B / n). This is a round heel. Next 10 tbsp. b / n in every loop. 1 semi-column with double crochet (pst. S / n), 10 double crochet columns (st s / n), in the last loop 6 st s / n (rounding of the toe part). Because of these increases, the work is rounded off, we continue to knit in a circle, introducing the hook into the loops of the first row. 10 st s / n, 1 pst with / n, 10 st b / n, finish the row with a connecting loop.
3 row. 3 air loops (lift loops). 1 st s / n, 2 st s / n in 1 loop - 2 times, 21 st s / n, 2 st s / n in one loop - 6 times, 21 st s / n, finish the row with a connecting loop.
4 row. 3 pp , * 1 st s / n, 2 st s / n in one loop ** - repeat from * to ** 3 times, 21 st s / n, * 2 st s / n in one loop, 1 st s / n * * - from * to ** 6 times, 21 st s / n, finish the row with a connecting loop.
5 row. 2 pp * 2 st b / n in each loop, 2 st b / n in one loop ** - repeat from * to ** 3 times, 22 st b / n, * 2 st b / n in one loop, 2 st b / n in each loop ** - repeat from * to ** 6 times, st b / n until the end of the row, finish with a connecting loop, cut the thread. Make 2 details.
Step number 2. Main part.
Tools: stocking needles number 2.5.
Determine which side of the sole will come into contact with the floor and which one will be attached to the foot.
1 row. Take a thread of white. Start knitting from the place where you finished the sole. Tie out 79 stitches from the upper part of the sole loop (the upper one that is in contact with the leg), distribute them evenly over the spokes.
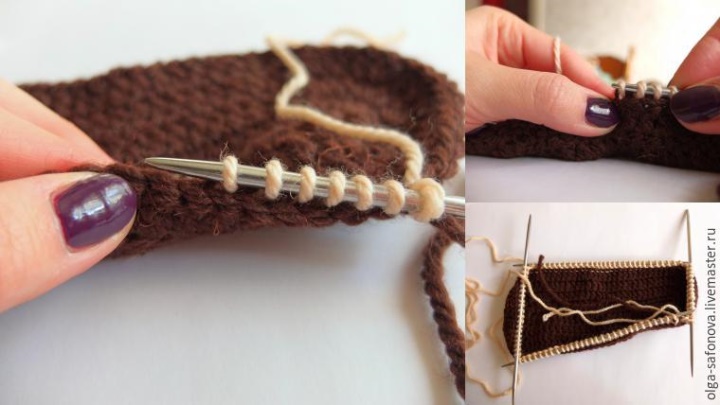
2 row. 79 front loops in white.
3 row. Change the thread to beige, knit 79 facial loops.
4-5 row. Change thread to white, knit 79 facial loops.
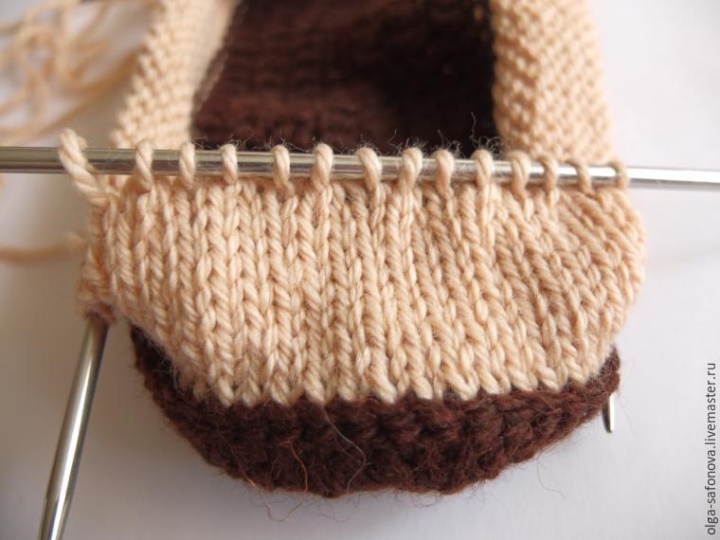
Step number 3. Toe .
6 row. Change the thread to beige. Find the central loop of the toe (sock). Put 10 loops from it in both directions and mark these loops with a marker or in some other way. A total of 21 loops is the central part of the sock or toe. Knit facial loops to the marked loop. * 2 loops together, 1 front ** - repeat 6 times. A total of 7 increments should be obtained. We finish a row with facial loops.
7 row. Change the thread to white. Knit a circle without changes.
8 row. Knit in a circle before the first toes of the nose part. To knit these loops 2 together 7 times (it turns out 7 toe loops). Finish the row.
9 row. Knit facial loops in a circle. Stop knitting for 1 loop to 7 toe loops and knit like that - 2 loops together front, 5 loops front, 2 together. Expand work.
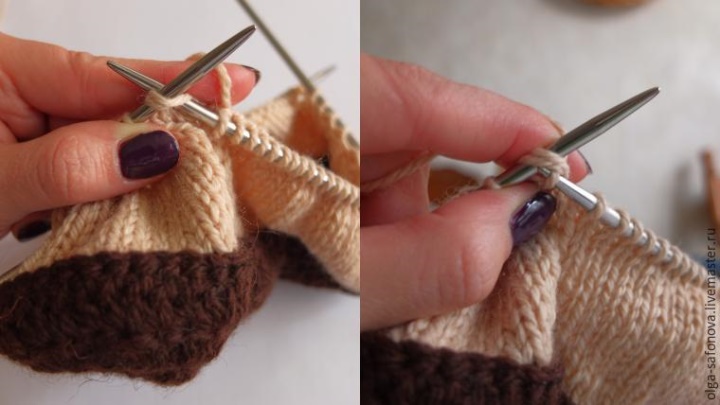
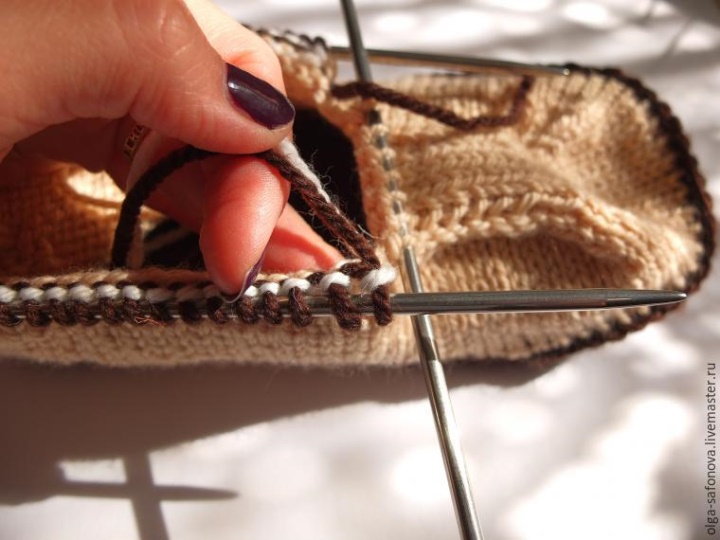
10 row. Tying the toe. We remove 1 loop, 5 loops with purl loops, we knit the last loop of the toe and the basics together with the purl (photo 5). Work deploy.
11 row. We remove 1 loop without knitting, 5 loops on the front, 1 knit the toe loop together with 1 loop of the main part. Work deploy.
12-19 row. Repeat as 10 and 11 row. Cape ready. The thread is not cut.

Step number 4. Uvula.
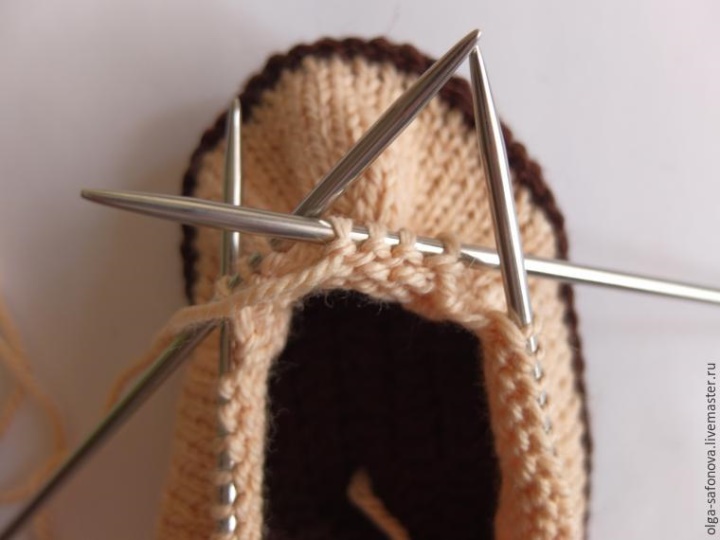
Knit on 7 loops toe. In the 1st and 3rd rows along the edges we add 1 loop
each , it should turn out to be 11. We knit in the following way. 1 loop is removed, 1 loop face, 1 loop loop - alternate until the end, the last loop must be knit inside out in any case. Next, we expand the work, remove the first loop, where there was a seamy knit facial, where the facial - seamy. We knit like 40 rows. Thread trimmed.
Step number 5. The top.
There are 52 loops on three needles. Only 4 snowflakes. (scheme)
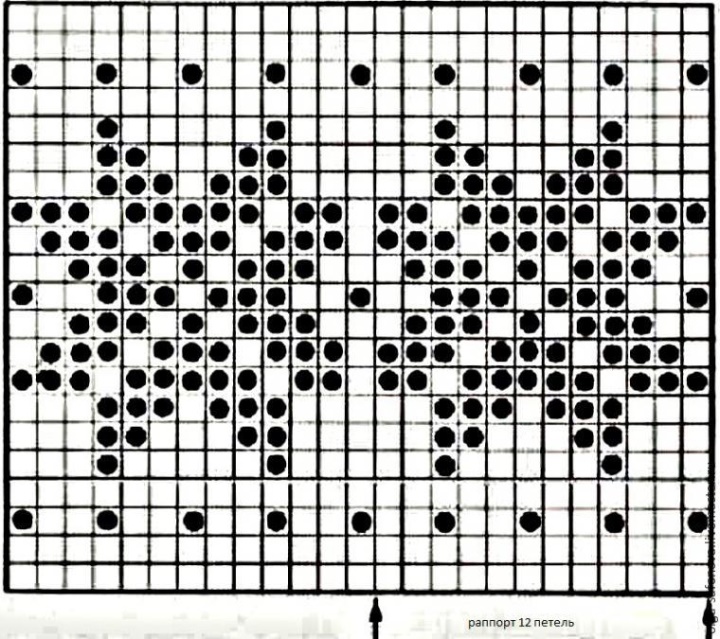
Rapport 12 loops. 2 edge loops on each side. Further, the odd rows are knitted with facial ones, and the even ones are knitted with purses.
1 row. We introduce a white thread into the work and knit it with facial loops. Work deploy.
2 row. Knit with purl loops.
3 row. Change the thread to brown. Knit facial loops.
4. row. Change the thread to beige. Knit purl loops.
5 row. Like 3rd.
6-8 rows. Knit white thread. Thread cut off.
9 row. Introduce beige and brown threads. Knit according to the scheme. The scheme is read from right to left with odd (front) rows and from left to right with even (back) rows. The first 2 loops are always knitted with a beige thread. We remove the first loop, knit another 1-edge with a beige thread, then follow the scheme - 3 beige, 1 brown, 5 beige, 1 brown, etc. to the end of the row. Work deploy.
10 row. Seamy 1 loop is removed, 1 loop out. (edge loops), hereinafter in the figure, we read the scheme from left to right. 3 beige, 2 brown, 3 beige 2 brown, 5 beige, etc. until the end of the row, work deploy.
11-21 row. Knit pattern according to the scheme. The threads do not cut.
22-24 row. Enter the white thread. Knit in rotating rows.
25 row. Change the thread to brown. Knit until the end, the work deploy.
26 row. Change the thread to beige. Knit until the end, the work deploy.
27 row. Change the thread to brown. Knit until the end, the work deploy.
28-29 row. Change the thread to white. Knit 2 rows. Close the loops in the usual way (knit the first loop with 2 together, knit the resulting loop together with the third loop, etc.).
Step number 6. Binding.
Tie the tongue tied with brown thread crocheted with crochet stitches. Thread cut off.
To tie up the shaft with white thread with single crochet columns around the perimeter.
Step number 7. Final one .
Hide all the strings. We erase, dry, lightly iron (according to the recommendations of the yarn manufacturer), insert the laces.