My name is Alena, I knit toys for kids, mostly rattle toys and create master classes. Of course, they would be much bigger and a lot different, but I have only two hands:) And today I want to share with you a description of a simple and cute dog. How much time it takes, I do not remember, wrote approximately that 2 days:)
This master class is designed for needlewomen who are able to knit crochet, know how to knit columns without a scale, half-poles with a scale, a ring of Amaguumi, having experience with a fancy yarn (if not, it will be the first experience, learn), able To connect the details of toys with a thread fastening, capable to knit in a circle. In general, the initial skills of crochet will suffice. If all of the above does not scare, then you can safely start knitting!
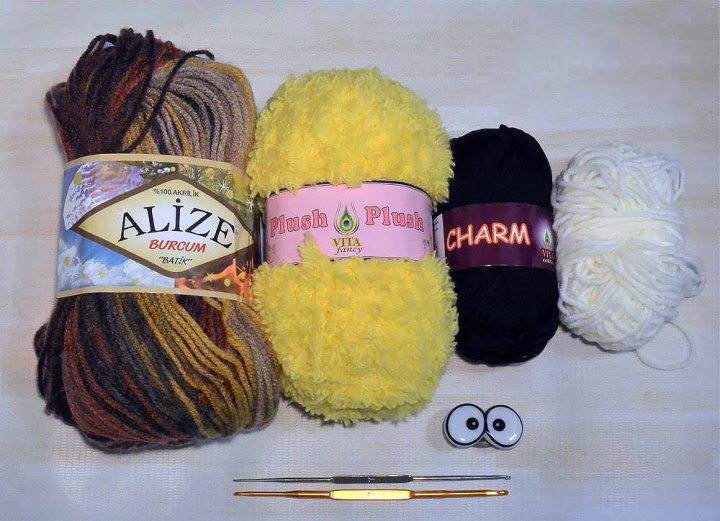
Materials:
Yarn for body, legs: Alize burcum Batik 100% Acrylic, 210 m/100 g, Color 3379. For knitting of the second dog (bright multicolored, with green, violet, etc. stripes) I used Alize burcum Cizgi 210 m/100 g, Color 2986;
Yarn for muzzle: Alize burcum klasik 100% Acrylic, 210 m/100 g, color 55 white;
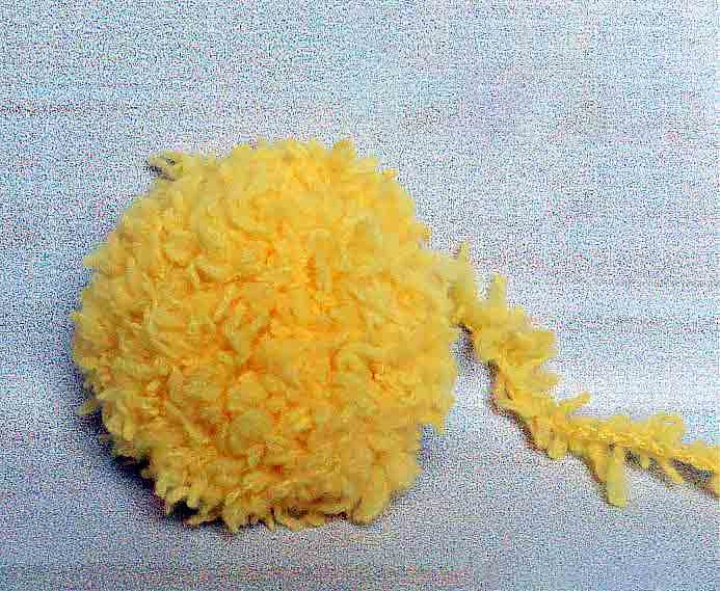
Yarn for ears and tail: Plush Vita Fancy 100% Polyester, 100 m/50 g, color 5315 yellow;
Yarn for spout: Vita Cotton Charm 100% cotton, 106 m/50 g, color 4152 black;
Filler for toys. I use hollofayber balls;
Eyes on a safe fastening (on a foot). Size: 4 * 2.2 cm. You can use any other at your discretion;
Hooks № 3.5 and 2.5;
Blunt needle for stitching parts;
Glue "moment of crystal".
Legend:
-No-scale column
PSN-half-column to scale
(1, d) * 6 — Repeat 6 times what is written in parentheses, if * 2 — Repeat 2 times, * 3 — 3 times, etc.
D-Increase, in one loop 2 column without a scale
UB-Ubava, touch 2 loops together with a column without a scale
UB * 4 – Make 4 kills in a row (UB * 2-2 ubcaps, etc.)
Now let's begin knitting. Knit will crochet № 3.5 is tight enough.
Head-Body:
1.6 in the ring of Amaguumi
2. D * 6 = 12
3. (1 SBN, d) * 6 = 18
4. (2 SBN, d) * 6 = 24
5. (3 SBN, D) * 6 = 30
6. (2 SBN, D, 2 sbn) * 6 = 36
7. (5 SBN, D) * 6 = 42
8. (3 SBN, D, 3 sbn) * 6 = 48
9-18 48 (10 rows)
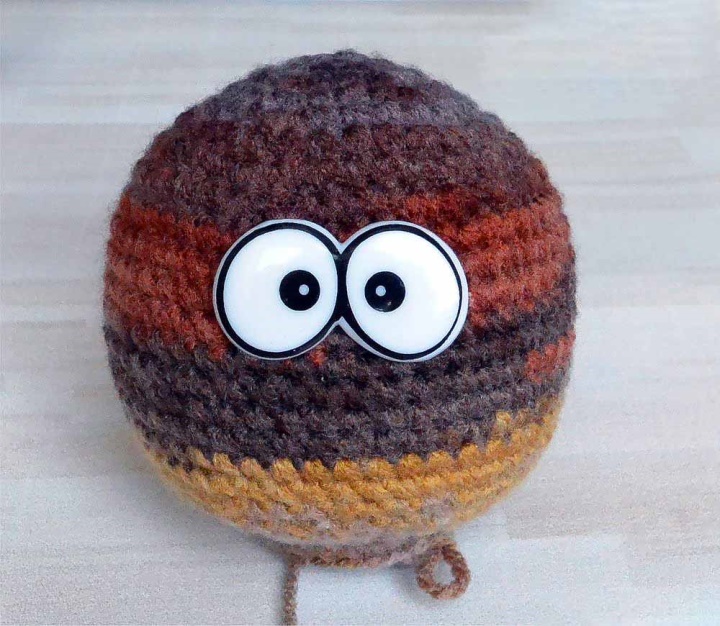
We insert eyes between 10 and 11 rows. Slowly stuffing the detail of the toy in the process of knitting.
* If you use the same eyes as mine, then, in addition to the main fastening, in addition to the back of the eye should apply glue and glue them directly to the head (do not apply glue close to the edges, so that it does not emerged beyond the eyes), then they will be tightly and will not move.
19. (3 SBN, UB, 3 SBN) * 6 = 42
20. (5 SBN, UB) * 6 = 36
21. (2 SBN, UB, 2 SBN) * 6 = 30
22. (3 SBN, UB) * 6 = 24
23. (2 SBN, UB) * 6 = 18
24-25.18 SBN (2 rows)
26. (2 SBN, d) * 6 = 24
27.24 SBN
28. (3 SBN, D) * 6 = 30
29.30 SBN
30. (2 SBN, D, 2 sbn) * 6 = 36
31-33 36 (3 rows)
34 (11 SBN, D) * 3 = 39
35. (6 SBN, D, 6 sbn) * 3 = 42
36-42 42 (7 rows)
43 (5 SBN, UB) * 6 = 36
44. (2 SBN, UB, 2 SBN) * 6 = 30
45 (3 SBN, UB) * 6 = 24
46 (2 SBN, UB) * 6 = 18
47 (1 SBN, UB) * 6 = 12
48. UB * 6 = 6 SBN, cut the thread, leaving a small tip, sell it in each second, pull the hole, fasten the thread.
Top Legs (2 items):
1.6 in the ring of Amaguumi
2. D * 6 = 12 SBN
3. (1 SBN, d) * 6 = 18
4. (2 SBN, d) * 6 = 24
5-8.24 SBN (4 rows)
9. (4 SBN, UB) * 4 = 20
10. (8 SBN, UB) * 2 = 18
11-14.18 SBN (4 rows)
15. (7 SBN, UB) * 2 = 16
16-17 16 SBN (2 rows)
18. (6 SBN, UB) * 2 = 14
19-23 14 SBN (5 rows)
24. (5 SBN, UB) * 2 = 12
25.12 Sat
Fill with filler on 2/3, in the top of the legs filler should not be.
26. UB * 6 = 6 SBN, cut the thread, leaving a small tip, sell it in each second, pull the hole, fasten the thread.
Linking the second foot, leave the thread to attach the two legs to the torso.

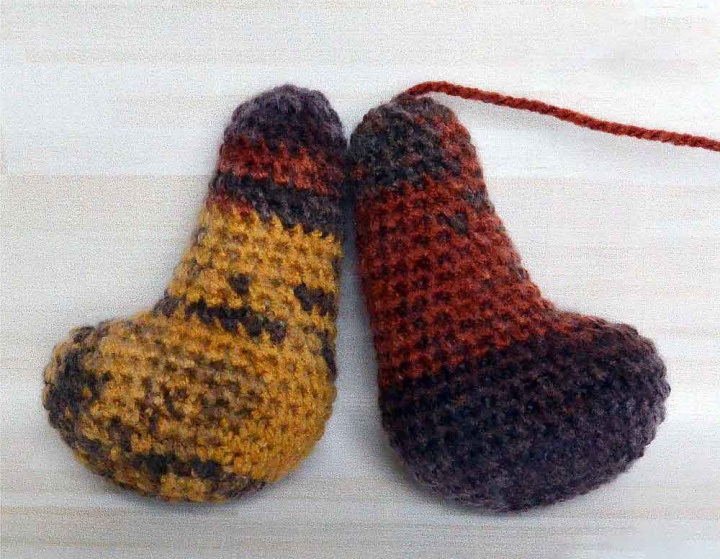
Lower legs (2 parts):
We dial 5 air loops and start knitting in 2 loop from a hook (on a scheme it is a loop under the digit 4).
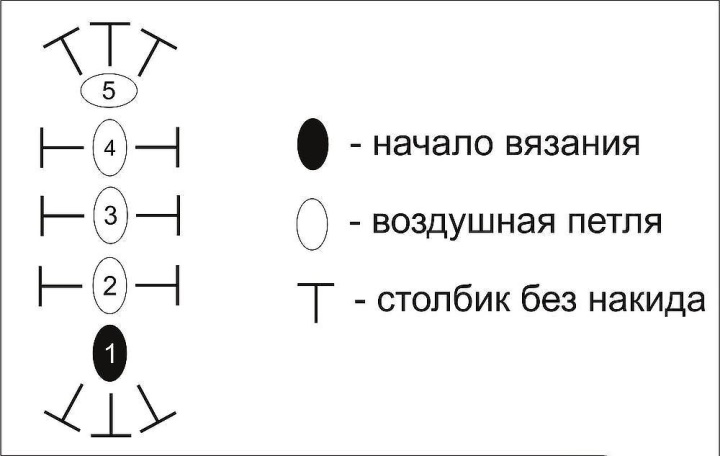
1. (3 SBN, 3 in one loop) * 2 = 12
The second increase of 3 loops do in 5 loop, in its back wall, Orient on a scheme, this buttonhole will be from a side and tugovata, it is possible to take a hook smaller for convenience.
* Mark the beginning of the series with a marker or thread of another color, so as not to be confused. Knit tightly.
2. (3 SBN, D, 1 SBN, d) * 2 = 16
3. (3 SBN, D, 3 SBN, D) * 2 = 20
4. (3 SBN, D, 5SBN, d) * 2 = 24
5. (3 SBN, D, 3 SBN, D, 3 SBN, D) * 2 = 30
6. (3 SBN, D, 3 SBN, D, 2 SBN, D, 3, etc.) * 2 = 38
7-9 38 pm
* In the next 3 rows, use a smaller hook, such as 2.5. Try to knit the ubutki tightly, so that then when you fill the filler, there were no visible large holes in places decreases. If it is not possible to tie neatly, then when the part is connected, you can additionally flash these holes of the same yarn.
10.5 SBN, UB * 7, 19 SBN = 31
11.4 SBN, UB * 4, 10 SBN, UB * 2, 5 SBN = 25
12.4 SBN, all 4 of the previous rank to reduce together 1 kill, 17 SBH = 22
13-14.22 SBN (2 rows)
15.1 SBN, UB, 4 SBN, UB, 13 SBN = 20
16-17.20 SBN
18.4 SBN, UB, 8 SBN, UB, 4 SBH = 18
19-23.18 SBN (5 rows)
24. (1 SBN, UB) * 6 = 12
25. UB * 6 = 6, trim the thread, leaving a small tip, sell it in each second, pull the hole, fasten the thread.
Linking the second leg, leave the thread for the stitching of both legs to the torso.
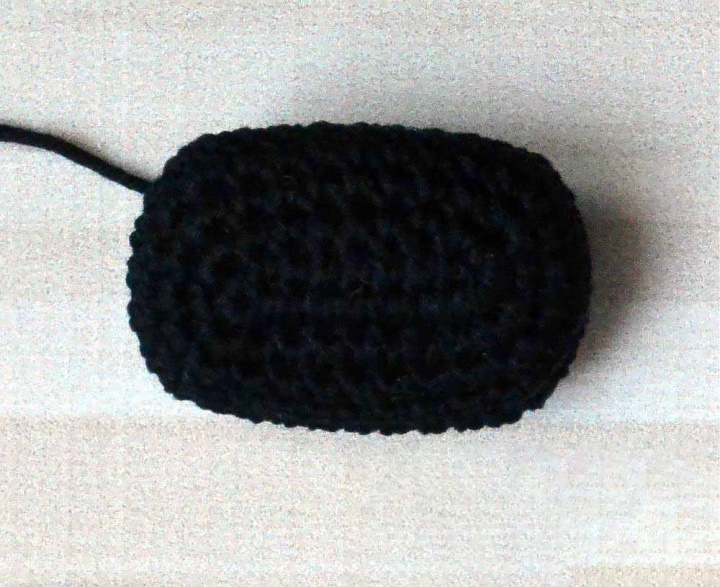
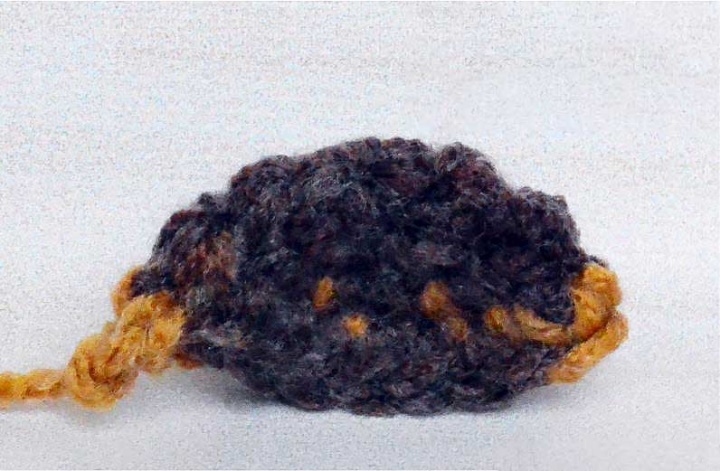
Spout:
Take the hook № 2.5. We use the yarn of black color Vita Cotton Charm. The beginning of knitting is similar to bottom paws. We collect 9 air loops and start knitting in 2 loops from a hook. Knit tight, not to have holes.
1. (7 SBN, 3 SBN in one loop) * 2 = 20
The second increase of 3 loops do in 7 loop, in its back wall, Orient on a scheme, this buttonhole will be from a side and tugovata, it is possible to take a hook smaller for convenience.
2. (7 SBN, D, 1 SBN, d) * 2 = 24
3. (7 SBN, D, 3 SBN, D) * 2 = 28
4. (7 SBN, D, 5, D) * 2 = 32
5.12 SBN, 16 psn, 4 Сн = 32
6. (7 SBN, UB, 5 SBN, UB) * 2 = 28
7. (7 SBN, UB, 3 SBN, UB) * 2 = 24
8. (7 SBN, UB, 1 SBN, UB) * 2 = 20
9. (7 SBN, reduce 3 loops with one ubtab) * 2 = 16
Cut the thread, leaving so much that enough to sew the hole details, sew the spout to the muzzle, make a point on the muzzle and make 2 obvitya around it. Approximately 50 cm. It is better to take with stock and sew all one thread, rather than a few pieces. Sew the hole of the spout, fill the detail with filler.
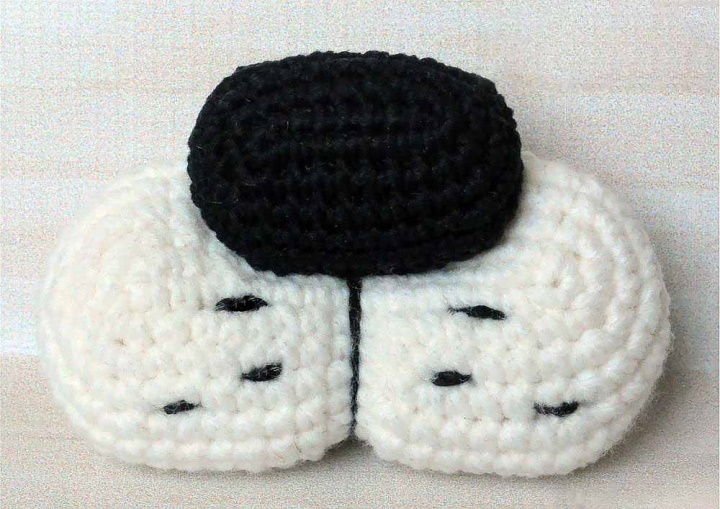
Muzzle:
We use the yarn of white color. The beginning of knitting is similar to bottom paws and a spout.
We collect 16 air loops and start knitting in 2 loops from a hook. Knit tight, not to have holes.
1. (14 SBN, 3 SBN in one loop) * 2 = 34
The second increase from 3 loops do in 14 a loop, in its back wall, Orient on the scheme which was higher, this loop will be from a side and tugovata, it is possible to take a hook smaller for convenience.
2. (14 SBN, D, 1 SBN, d) * 2 = 38
3. (14 SBN, D, 3 SBN, D) * 2 = 42
4. (14 SBN, D, 2 SBN, D, 2 SBN, d) * 2 = 48
5. (14 SBN, D, 8 SBN, d) * 2 = 52
6-7 52 PM
8. (14 SBN, UB, 8 SBN, UB) * 2 = 48
9. (14 SBN, UB, 2 SBN, UB, 2 SBN, UB) * 2 = 42
10. (14 SBN, UB, 3 SBN, UB) * 2 = 38
11. (14 SBN, UB, 1, UB) * 2 = 34
12. (14 SBN, reduce 3 loops with one lower) * 2 = 30
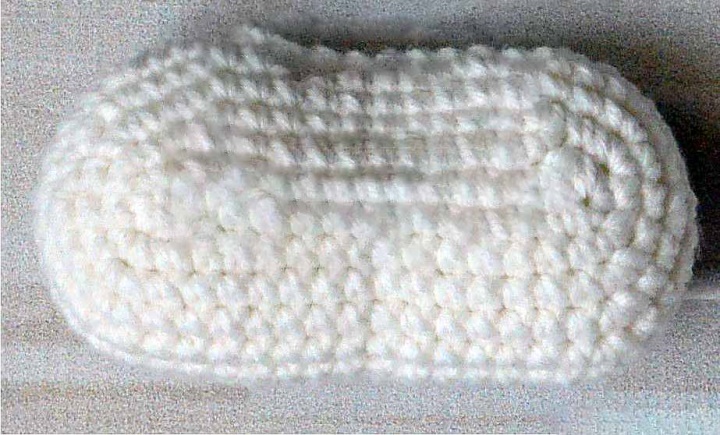
The thread is trimmed, leaving so much to sew the hole and sew the face to the head. When half the hole is sewn, begin to fill the part with filler. We look at the photo, which shows what place the muzzle does not need to fill, leave it empty, carefully distributing the filler at the edges of the part. On this empty place we will have a spout. Sew the hole to the end.
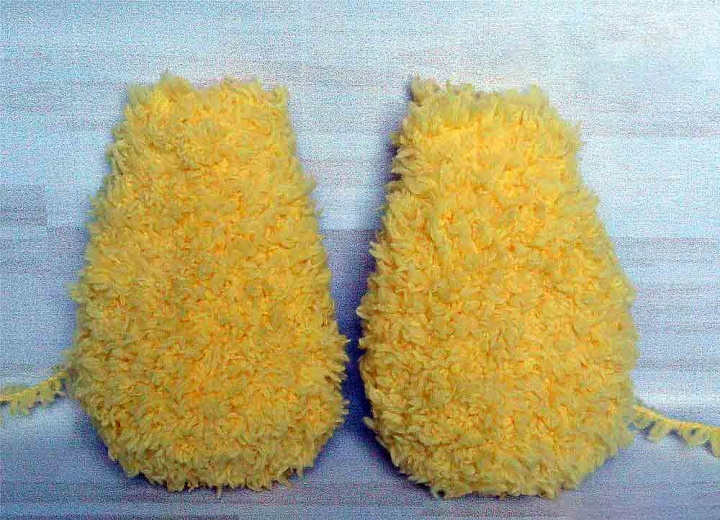
Ears:
For the ears we use the yellow fantasy yarn Vita soft Plush. Hook № 3.5, knit freely, shaggy yarn, you can tight loops do not. When knitting from this yarn loops are almost invisible, be sure to use a marker or a piece of yarn of another color to mark the beginning of the series.
* You can use 2 markers: one for the beginning of the series, the other for the middle of the series, so exactly errors in the number of loops will not be. For example, we need to handle 30 loops, we knit from the beginning to the marker, which is in the middle, 15 loops, from it to the end of the series, where the second marker, another 15 loops. It's easier to navigate. This is for those who have difficulty in knitting from this yarn. If something is connected not so, dissolve knitting on one loop, poddevat its top a hook.
* This yarn in the related part looks good from the wrong side, so we will use the wrong face as the front.
* If you can not tighten the ring Amaguumi of this yarn, instead of the ring can knit 2 air loops and start knitting in the first loop.
1.6 in the ring of Amaguumi
2. D * 6 = 12
3. (1 SBN, d) * 6 = 18
4. (2 SBN, d) * 6 = 24
5. (3 SBN, D) * 6 = 30
6-14 30 SBN (9 rows)
15. (3 SBN, UB) * 6 = 24
16-17.24 SBN (2 rows)
Unscrew the detail of the inside out, now it will be in front of us, and continue knitting already from the inside (counterclockwise).
18. (2 SBN, UB) * 6 = 18
19-22.18 SBN (4 rows)
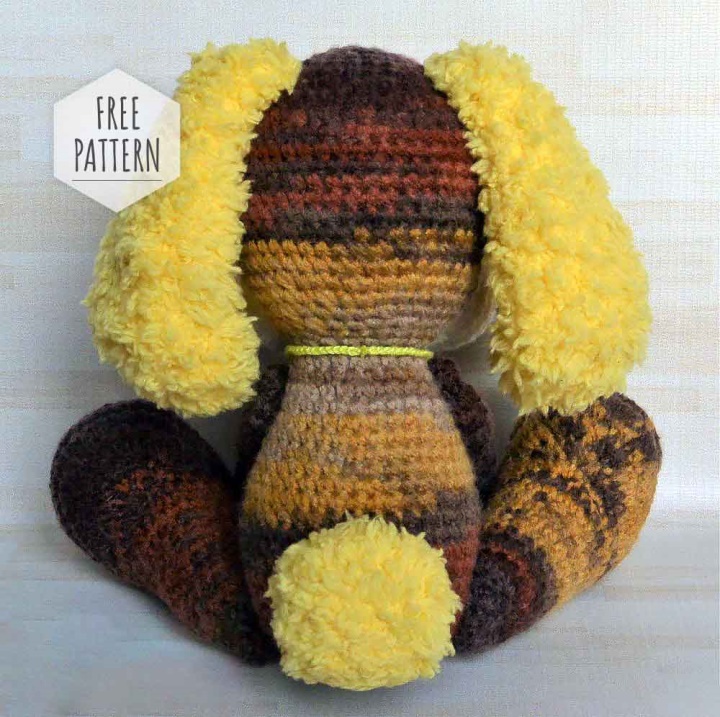
Fold the detail in half and pull the 8 down, leave the tail for the ear to the head. Ears are not stuffed with filler.
Tail:
For a tail we use the same yarn as for ears, Vita soft Plush.
1.6 in the ring of Amaguumi
2. D * 6 = 12
3. (1 SBN, d) * 6 = 18
4-6.18 SBN (3 rows)
7. (4 SBN, UB) * 3 = 15
Cut the thread, leave a small tail to attach the tail to the body.
Mouth:
Use the yarn, which is knitted body, Alize burcum Batik.
1.6 in the Amaguumi ring.
2. D * 6 = 12
3. (1 SBN, d) * 6 = 18
4.18 SBN
Cut the thread, leave a small tail to hold the mouth to the head. The detail is folded in half, it is not necessary to fill it, we will just stick the mouth under the white muzzle.
Now let's do the design of the muzzle.
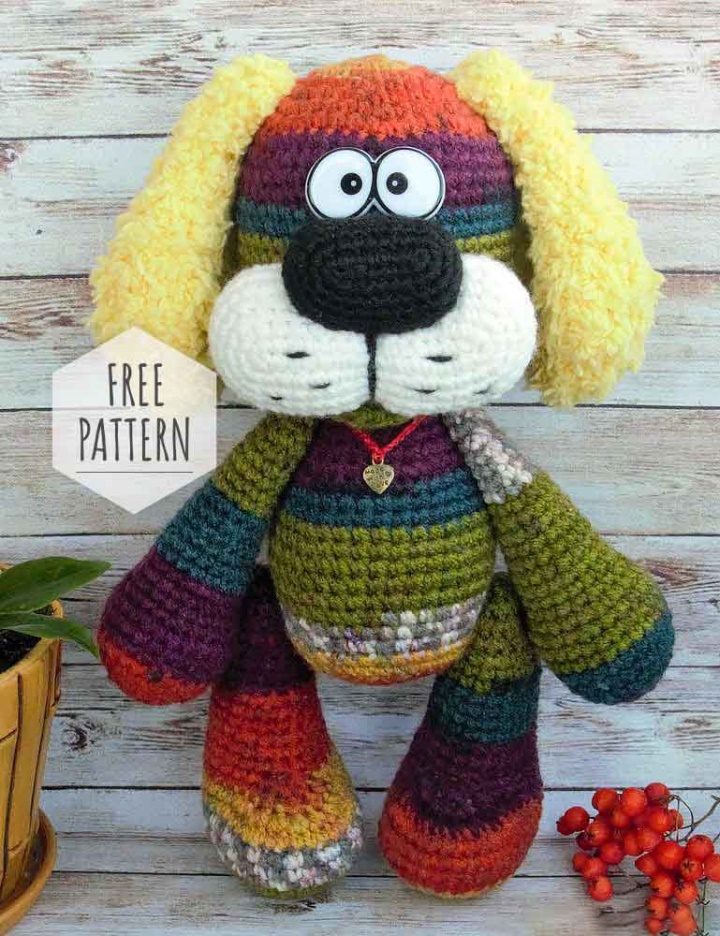
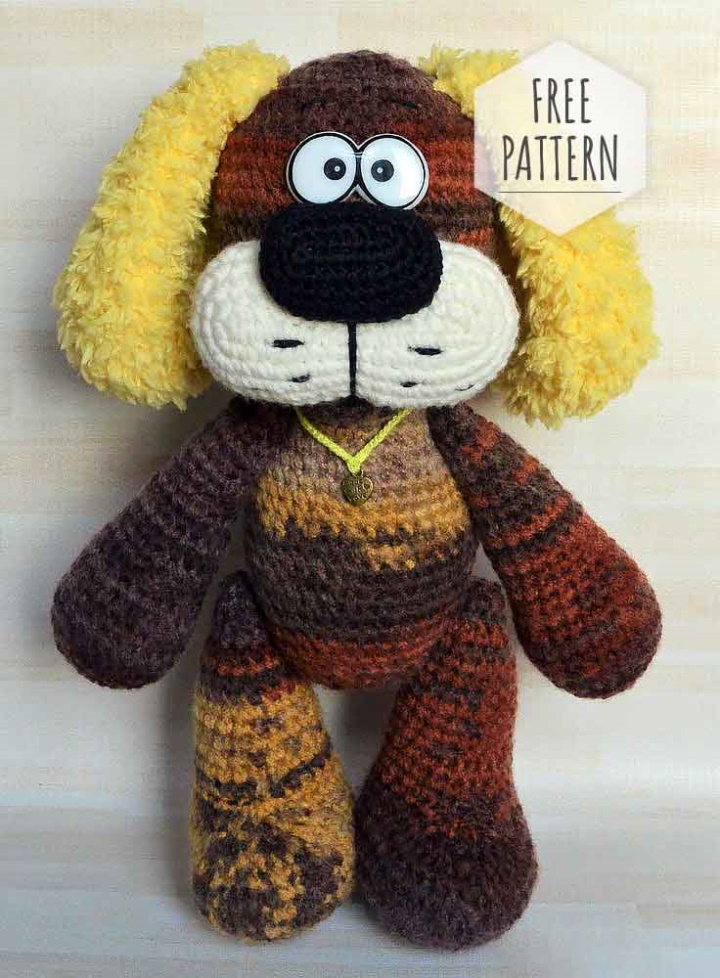
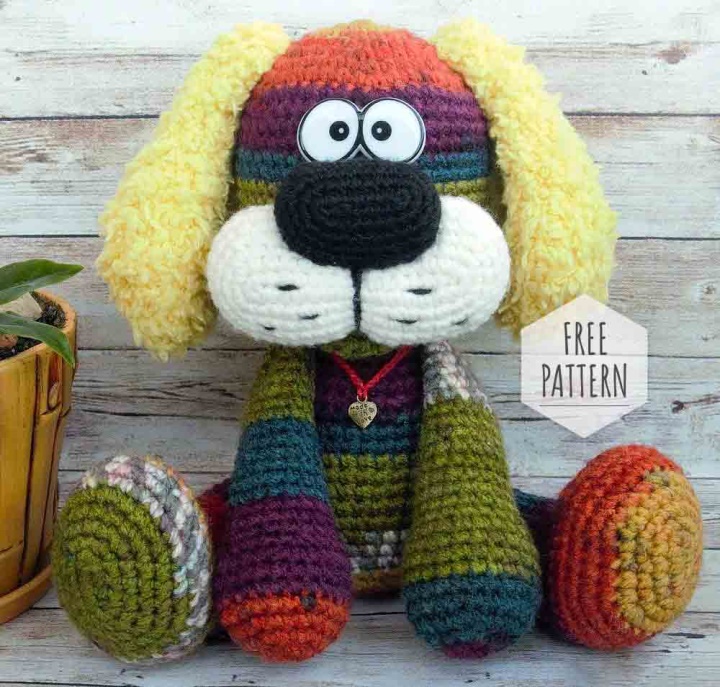
Take the spout (the side, where we went half-poles with the scale, will have to be near the eye), now the thread from the nose departs from the edge, we move it a little bit: using a needle or hook to bring the thread from behind from the middle of the spout.
Then put a nose to a muzzle, in that place where there was no filler, we make in the middle of a white muzzle a couple of obvity, forming a muzzle, as in a photo.
Then sew a nose to a muzzle, piercing it through, in this place, under a nose, it should be maximally flat. Embroider black dots. Ready.
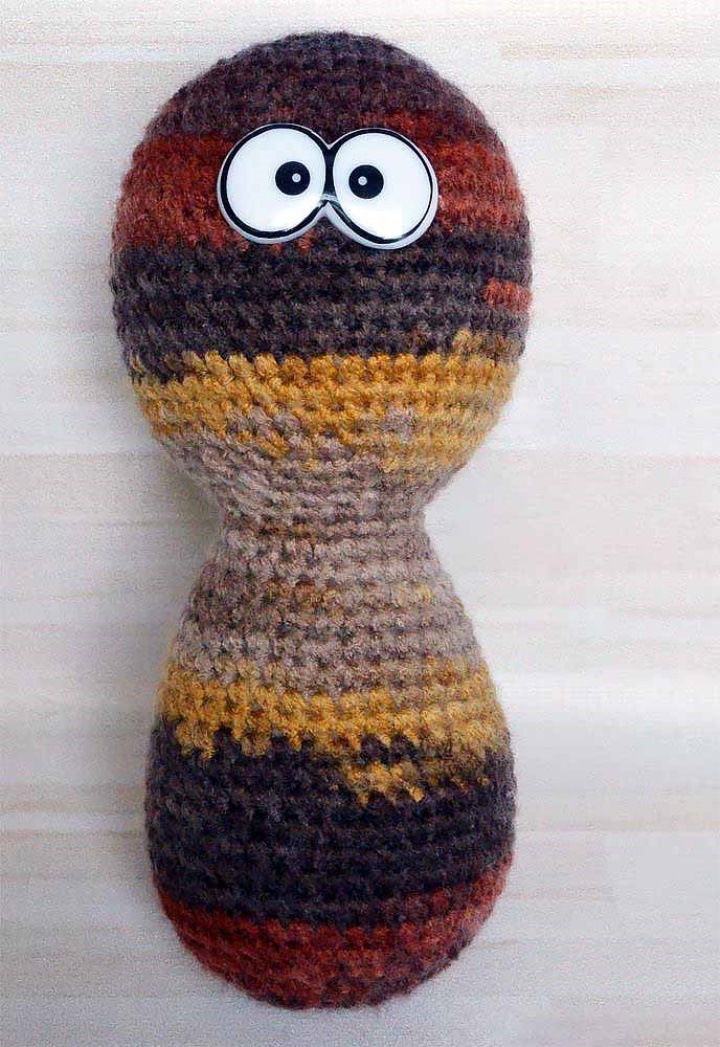
That's how all the details of the toy together (plus the mouth) look:
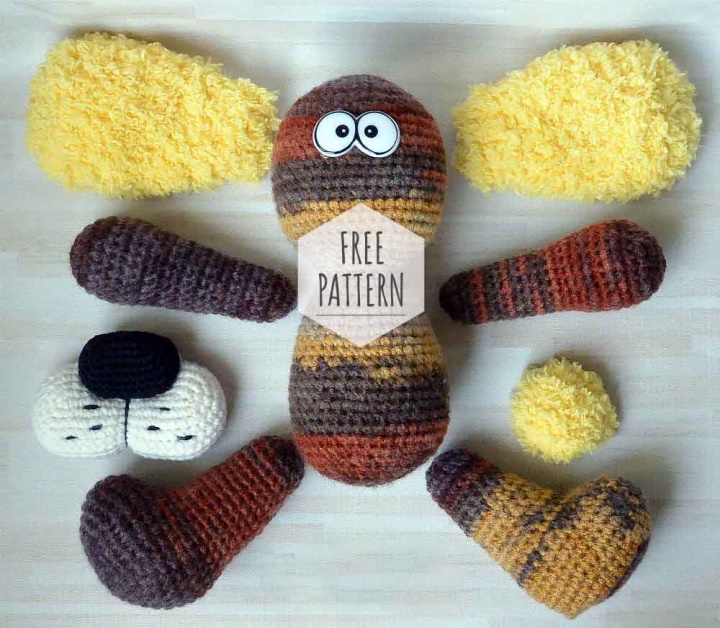
Now the muzzle and the back side of the nose to the head are pressed. The white muzzle should be at a distance of two rows from the eyes, the nose is located right under the eyes, butt-on. From below we have a mouth, and we stick it to the head and to the muzzle. Ears are pressed between 5 and 6 rows. The tail is fastened to the butt, a little stuffed with its filler.
Legs connect with the body by means of a thread fastening, it is possible to make a button fastening, or simply to sew, that the toy was static, did not move paws. With a place of fastening of Paws Orient on a photo.
Decorate the dog as you wish. I tied a chain of air loops and hung a small kulonchik on it.
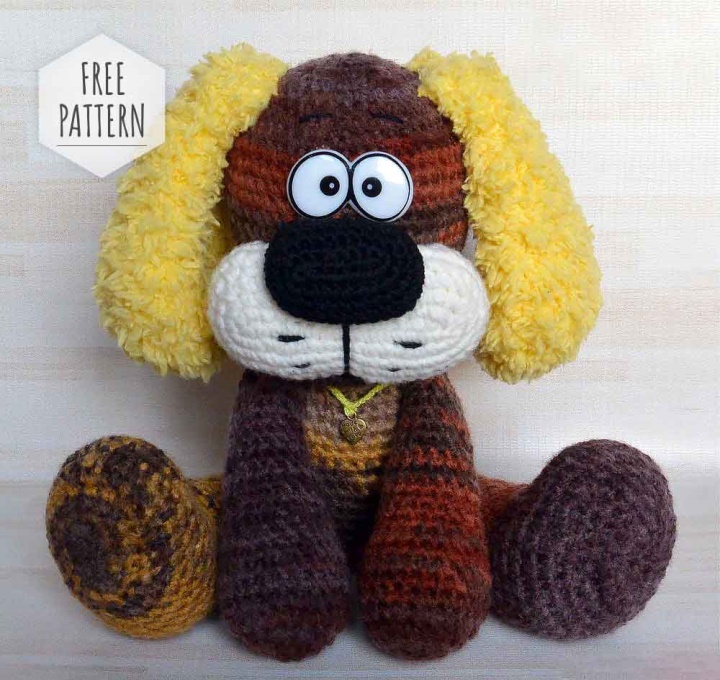
That's it. Our toy is ready! Please accept my congratulations:) Dimensions of the finished toy when using the same yarn: sitting 20 cm, standing 28 cm.
Source : https://www.livemaster.ru/topic/2989341-podrobnyj-master-klass-sozdaem-vyazanuyu-igrushku-sobaka-bar....
Dog Media Gallery :