Click For Crochet Abbreviations List
Material: "Olga" yarn. But the prettier will be and backcomb not have to use the yarn "lotus stretch Grass". Filler: Actually, the special is used. The filler for toys, but also usual yarn will suit. I had a "Vita elegant" of the right color at my fingertips. It is soft and not falls, it holds the form well. Also need a button and beads (nose and eyes, respectively).
Symbol:
Raise = 2 art. b/N in one loop of the previous row;
Decrease = skip 1 art. b/N of the previous row, to bind 1st. b/N;
Head:
1 row: Dial 2 VP and Close in the ring. To bind 6 art. b/N. [= 6 art. b/n]. Then knit in a circle.
2 row: * Raise *. Repeat * 6 times [= 12 St. b/n].
3 row: * Raise, 1 art. b/n *. Repeat * 6 times [= 18 art. b/n].
4 row: * Raise, 2 art. b/n *. Repeat * 6 times [= 24 St. b/n].
5 row: * Raise, 3 art. b/n *. Repeat * 6 times [= 30 St. b/n].
6 row: * Raise, 4 art. b/n *. Repeat * 6 times [= 36 art. b/n].
7 row: * Raise, 5 art. b/n *. Repeat * 6 times [= 42 art. b/n].
8 row: * Raise, 6 art. b/n *. Repeat * 6 times [= 48 art. b/n].
9-10 series: Unchanged [= 48 art. b/n].
11 Row: * 6 art. b/N, decrease *. Repeat * 6 times [= 42 art. b/n].
12 Row: * 4 art. b/N, decrease *. Repeat * 6 times [= 36 art. b/n].
13 Row: * 3 art. b/N, decrease *. Repeat * 6 times [= 30 St. b/n]. Fill.
14 Row: * 2 art. b/N, decrease *. Repeat * 6 times [= 24 St. b/n].
15 Row: * 1 art. b/N, decrease *. Repeat * 6 times [= 18 art. b/n].
16 Row: * Decrease *. Repeat * until the hole closes completely.
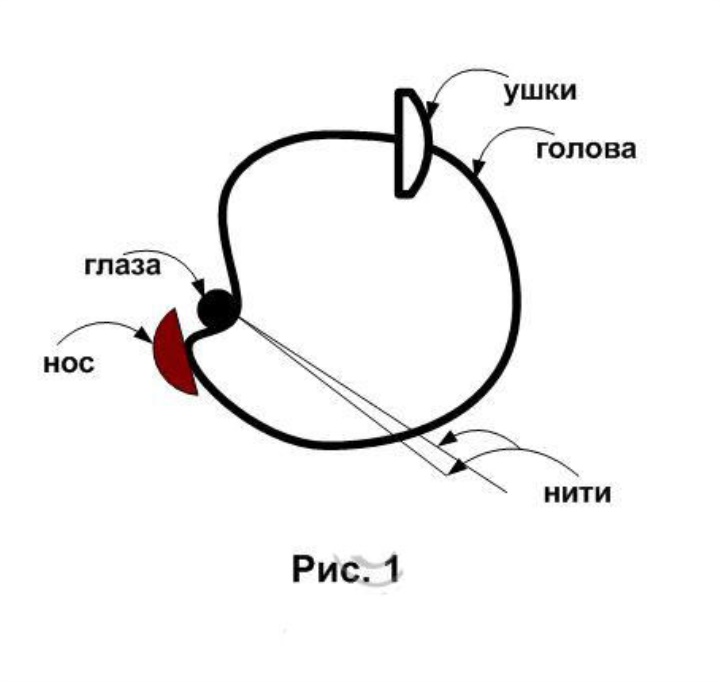
It is best if you sew all the parts (nose and eyes) to the assembly. And at first it is better to sew a spout, and already then eyes. The eyes are sewn as shown in Fig. 1. Threads are displayed in one point, then pulleded and fixed.
Torso:
1 row: Dial 2 VP and Close in the ring. To bind 6 art. b/N. [= 6 art. b/n]. Then knit in a circle.
2 row: * Raise *. Repeat * 6 times [= 12 St. b/n].
3 row: * Raise, 1 art. b/n *. Repeat * 6 times [= 18 art. b/n].
4 row: * Raise, 2 art. b/n *. Repeat * 6 times [= 24 St. b/n].
5-7 series: Unchanged [= 24 art. b/n].
8 row: 6 decreases, * 1 art. b/N, decrease *. Repeat * 4 times [= 14 St. b/n].
9-11 series: Unchanged [= 14 art. b/n]. Fill.
12 row: * Decrease, 1 art. b/n *. Repeat * 6 times [= 8 St. b/n].
13 Row: * Decrease *. Repeat * until the hole closes completely.
Ear (2 parts):
1 row: Dial 3 VP and Close in the ring. To bind 6 art. b/N, then to knit in a circle.
2 row: * Raise *. Repeat * 6 times [= 12 St. b/n].
3 row: To Knit 10 St. b/n + decrease [= 11 St. b/n].
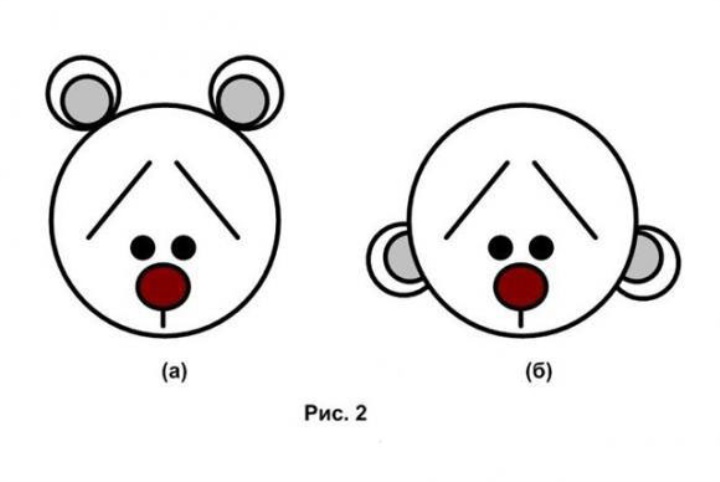
Actually the ear is ready. Fasten and sew to the head. They can be pinned in different ways (see Figure 2).
Lower foot (2 parts):
1 row: Dial 8 vp and Knit Art. b/N. Second from Hook Loop, 4 St. b/N, 3 art. b/N in one loop, turn knitting clockwise, 5 St B/n, 2 tbsp. b/N in the first loop [= 15 St. b/n].
2 row: Raise, 4 St. b/N, 3 raises, 7 St. b/N, 1 VP + 1 Increase [= 19 art. b/n].
3 row: 5 St B/N, 3 decreases, 7 St. b/N, juice. b/N. + 1 v. p [= 17 art.]
4 row: 8 St B/N, 2 decreases, 5 St. b/N [= 15 art.]
5 – 6 row: no changes [= 15 art. b/n].
7 row: * decrease, 2 tbsp. b/n *. Repeat * 5 times [= 12 St. b/n]
8 row:: Unchanged [= 12 art. b/n]...
9 Row: * Decrease, 1 art. b/n *. Repeat * 5 times [= 9 St. b/n] Fill with filling
11 Row: * Decrease *. Repeat * until the hole closes completely.
Upper foot (2 parts):
1 row: Dial 2 VP and Close in the ring. To bind 6 art. b/N. [= 6 art. b/n]. Then knit in a circle.
2 row: * Raise *. Repeat * 6 times [= 12 St. b/n].
3-8 rows: unchanged [= 12 art. b/n].
9 Row: * 1 art. b/N, decrease *. Repeat * 6 times [= 9 St. b/n] fill with filling.
10 Row: * Decrease *. Repeat * until the hole closes completely.
Assembly:
1. If you want your bear to stand, then after you have tied four rows attach a rigid base (cardboard, for example).
In this case, the head is better not to beat too tightly, and the rest of the bear (paws and torso) better to beat more densely. Before assembling, pin the lower feet first with pins and find the position at which it will stand. Then make a movable nitjanoe fastening of the paws. Slide the strands of the fastening and check the stability of the toy standing and sitting. Do not lazy to remake if the toy is not worth it.