Click For Crochet Abbreviations List
Hello!
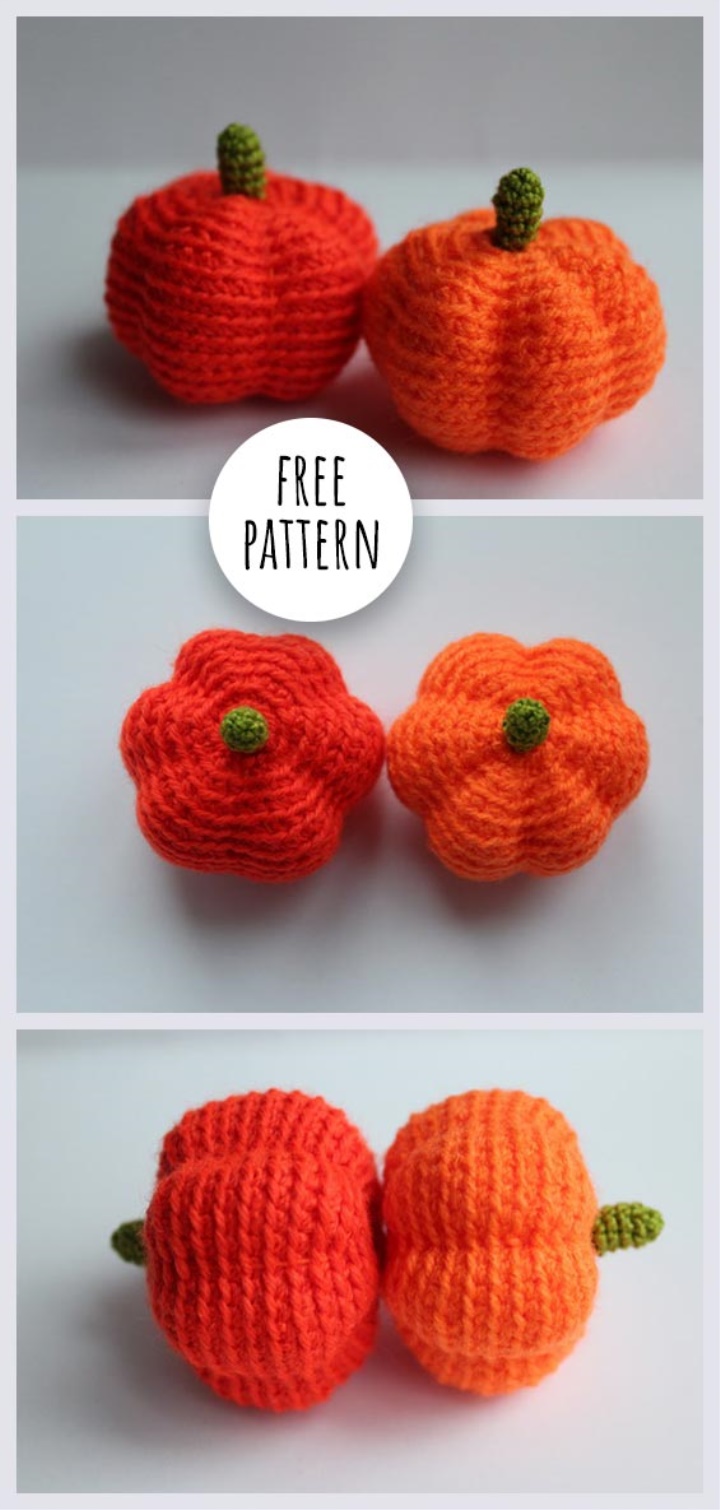
I propose to prepare quickly for the celebration of Halloween-to connect a small pumpkin. This toy can be used in different ways-as a décor, for playing with children or as a miniature igolnicu.
The process of knitting is very fast, I have 2 pumpkins with the Assembly took just over an hour.
I used:
1. Yarn orange color Acrylic 100%
2. Green Cotton iris yarn
3. Polyester Fiber Filler
4. Glass Bead
5. Tweezers, scissors, hook, needle
Pumpkin:
Knit behind the back wall loops all the pumpkin!
1st row: Amigurumi Ring 6 loops (6)
2nd row: Raise in Each loop (12)
3rd row: (1 PRS, 1p) * 6 times (18)
4th row: (2 PRS, 1p) * 6 times (24)
5th row: (3 PRS, 1p) * 6 times (30)
6th row: (4 PRS, 1p) * 6 times (36)
7-th row: (5 prs, 1p) * 6 times (42)
8-th row: (6 prs, 1p) * 6 times (48)
9th-13th series: (48 prs) (48)
14th row: (6 prs, 1u) * 6 times (42)
15-th row: (5 prs, 1u) * 6 times (36)
16-th row: (4 PRS, 1u) * 6 times (30)
17th row: (3 PRS, 1u) * 6 times (24)
18th row: (2 prs, 1u) * 6 times (18)
We put on a bottom of the received pumpkin a little filler, then a glass ball-weighting, and on top some more filler.
Continue pull Otverskie and add the filler to make the pumpkin dense.
19-th row: (1 prs, 1u) * 6 times (12)
20-th row: (1u) * 6 times (6)
With the help of tweezers hammer the pumpkin finally and sew the hole. Leave the long end of the thread to give the pumpkin the right shape. Depending on how much "lobules" you will divide the pumpkins, leave the end of the thread of such length that the pumpkin can wrap them 3-4 times (and plus to fasten the thread) And then we do left thread tie, skipping it under the front parts of loops. So the thread practically will not be visible. My pumpkins are divided into 6 lobules each, that is I have stretched the thread around the pumpkin 3 times. After every turn, I made a fixing knot to make the pumpkin evenly utjanuta into its "corset"
Tail:
Knit Green yarn iris as usual, through both wall loops.
1st row: Amigurumi Ring 6 loops (6)
2-nd row: (2 PRS, 1p) * 2 times (8)
3rd-5th row: (8 PRS) (8)
Leave a long thread.
Sew a tail to a place of fastening of threads utjazhki a pumpkin, all knots will be reliably hidden. Then the rest of the thread extend on the opposite side of the pumpkin and embroider us "butt". It remains only to hide the thread inside the pumpkin and everything is ready!
Source :
http://amigurumik.com/vjazanye-tykvy-shema-vjazanija/