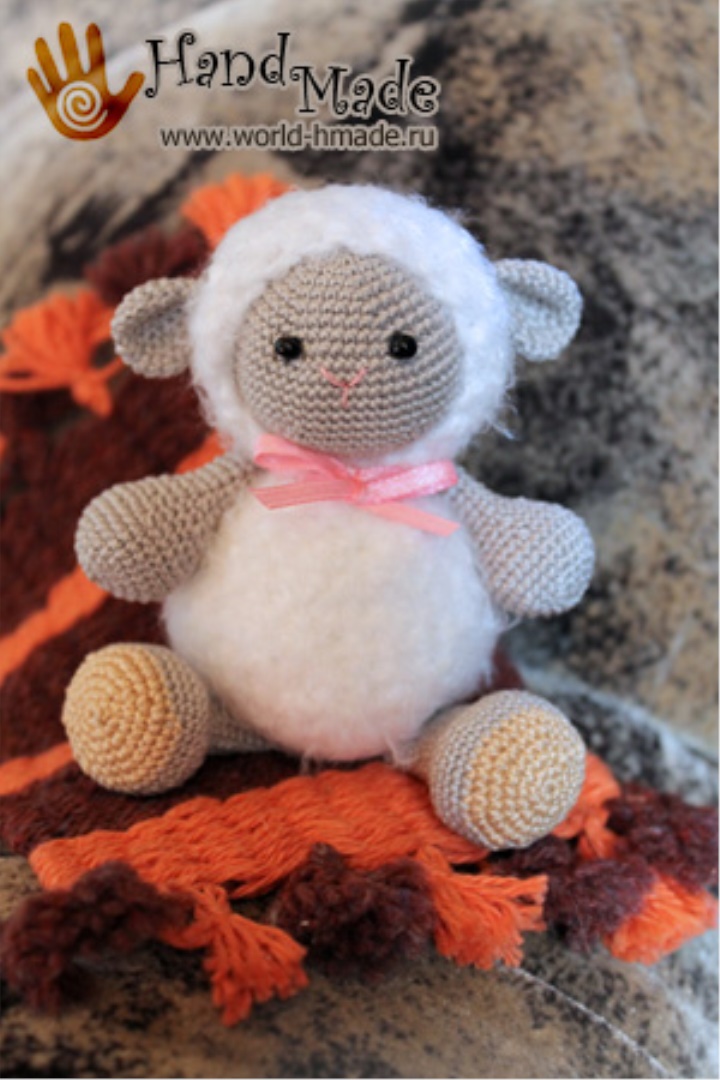
Knitted toys can be used for different purposes . There are people who collect the entire collection of amigurumi and decorate their own dom.No I cq itayu that their main purpose - is to be gifts, especially when in front prazdnikov.Esli much you do not know what to give your loved ones - with vyazhit is, this sweet lamb Such toys will leave no one indifferent, both adults and children.
This master class tells you how to crochet a lamb. We will knit from two types of yarn: "Iris" gray and beige flowers and some furry yarn for knitting the torso of a lamb and a hood on the head. For this purpose, you can use leftovers, since such yarns need very little. I knitted from yarn "Lotus Travka Stretch", if you do not have such a yarn, then you can use any other, for example, mohair. Just pay attention to the fact that the yarn chosen by you will differ in thickness from the one I knitted, so the number of loops may not match. But do not worry about this, because in this master class I'll tell you how to knit the details of the toy so that they fit each other in size.
from here
Tools and materials for knitting lamb:
Yarn. I already talked about it above.
Two hooks for knitting : №1.15 - for "Iris" and №3 - for "Lotus Travka Stretch".
Filler. It can be sintepon, sintepuh, finely chopped foam rubber or cotton wool.
Weighting agent.
Scissors.
For the convenience of knitting, I would advise you to use a series counter.
Knitting the head of a lamb.
We begin to knit yarn "Iris" in gray. The head of a lamb, like a trunk, is a crocheted ball. When you learn to knit a bead crochet, then your opportunities in the knitting field will increase. You will be able to bind and slingo-beads, and all kinds of balls, and, of course, toys. Convinced that being able to knit a ball is very important? Then let's begin! Try to understand the principle of knitting the ball, then you will not have problems with knitting the torso.
1 row: 6 loops are enclosed in an amigurumi ring.
2nd row: * Increment in each loop * - repeat 6 times (12 loops).
3 row: * 1 column without crochet, increase * - repeat 6 times (18 loops).
4th row: * 2 columns without crochet, increase * - repeat 6 times (24 loops).
5 row: * 3 columns without crochet, increase * - repeat 6 times (30 loops).
6 row: * 4 columns without crochet, increase * - repeat 6 times (36 loops).
7 row: * 5 columns without crochet, increase * - repeat 6 times (42 loops).
8 row: * 6 columns without crochet, increase * - repeat 6 times (48 loops).
9 row: * 7 columns without crochet, increase * - repeat 6 times (54 loops).
10 row: * 8 columns without crochet, increase * - repeat 6 times (60 loops).
I think you realized that the base of the ball is a hexagon, to each side of which, when knitting a new row, we added one column without a crochet. When the diameter of the circle (or more precisely - the hexagon) will suit you, you can tie several rows without changing the number of loops, and then start to decrease.
11 row: 60 bars without crochet, that is, we knit on a column without a crochet in each loop of the previous row.
From the next row, we begin to reduce the diameter of the circle, that is, instead of increments in each side of the hexagon we knit a decrease.
12th row: * 8 columns without crochet, decrease * - repeat 6 times (54 loops).
13 row: * 7 columns without crochet, decrease * - repeat 6 times (48 loops).
14 row: * 6 columns without crochet, decrease * - repeat 6 times (42 loops).
15 row: * 5 columns without a crochet, decrease * - repeat 6 times (36 loops).
16 row: * 4 columns without crochet, decrease * - repeat 6 times (30 loops).
17 row: * 3 columns without a crochet, decrease * - repeat 6 times (24 loops).
We fill the synthepone with the associated part. Usually, the discounts for knitting a ball are more difficult to make than the increments, and if you fill the bound part, it becomes easier to do.
18 row: * 2 columns without a crochet, decrease * - repeat 6 times (18 loops).
Fill your head tighter, otherwise it will look more like an onion, not a ball.
19 row: * 1 column without crochet, decrease * - repeat 6 times (12 loops).
Next, we knit the allowances until the hole is completely closed.
We knit ears for a lamb:
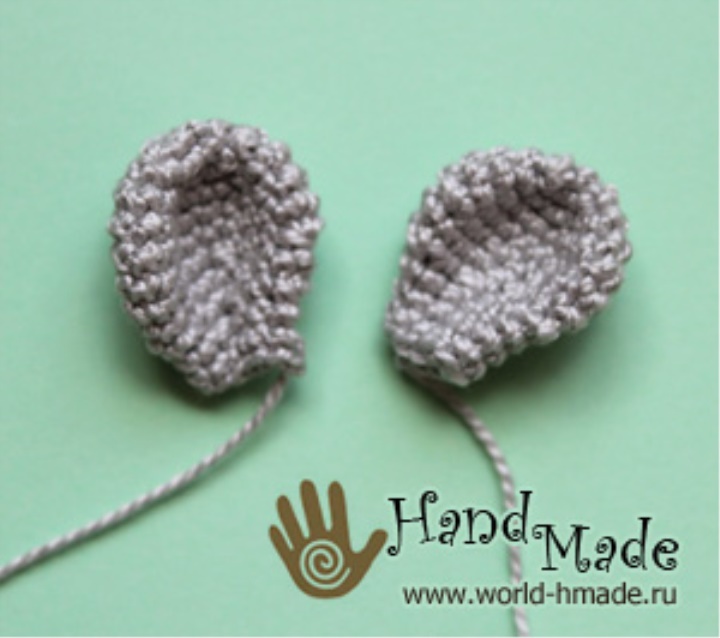
1 row: 6 loops are enclosed in an amigurumi ring.
2nd row: * Increment in each loop * - repeat 6 times (12 loops).
3 row: * 1 column without crochet, increase * - repeat 6 times (18 loops).
4th row: * 2 columns without crochet, increase * - repeat 6 times (24 loops).
5-6 rows: 24 columns without a crochet.
7 row: * 2 columns without crochet, decrease * - repeat 6 times (18 loops).
8 row: 18 columns without a crochet.
9 row: * 1 column without crochet, decrease * - repeat 6 times (12 loops).
10-11 rows: 12 columns without a crochet.
Ears do not need to be stuffed. Let's leave a long "tail" of yarn, with the help of which later we sew the ears to the head of the sheep.
Tip: To make the edges of the ears flat, it's best to finish knitting the part with a connecting post.
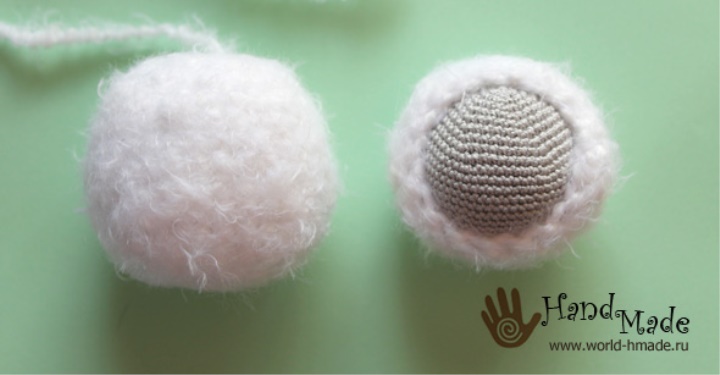
We knit a hood:
We knit from the fluffy yarn. This stage is like tying a bead. In this case, the bead is the head-ball, which we linked earlier.
As I already said, I will knit a hood and a body of lamb from the "Grass Stretch" yarn of white color.
In comparison with the usual "Grass" with long hair, knitting from the selected yarn is much easier, since the loops of the previous row are visible.
We take the hook number 3 and start knitting.
1 row: 6 loops are enclosed in an amigurumi ring.
2nd row: * Increment in each loop * - repeat 6 times (12 loops).
3 row: * 1 column without crochet, increase * - repeat 6 times (18 loops).
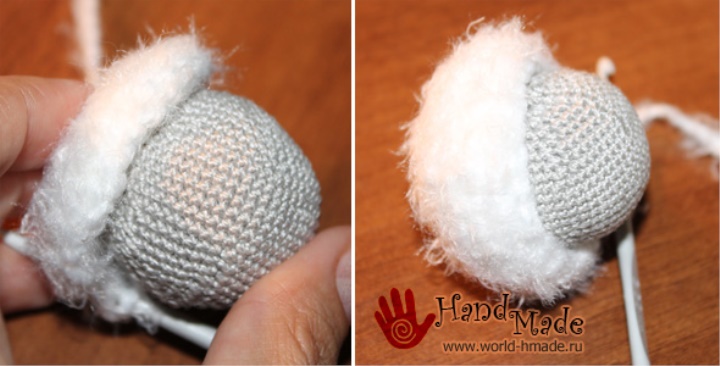
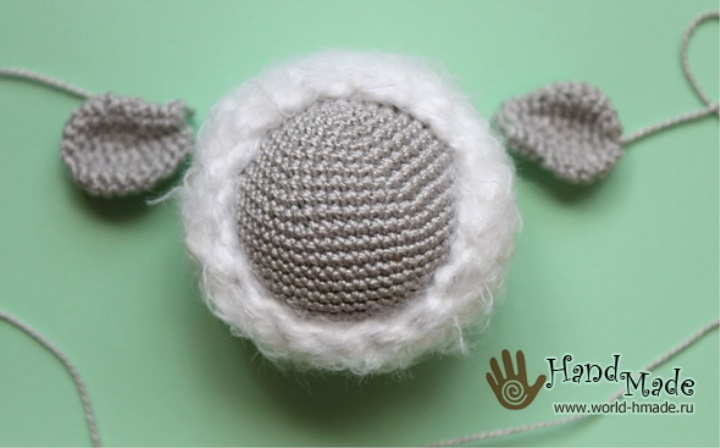
You already guessed that we are starting to knit a ball again. We knit until the circle is not reaching a diameter slightly larger than the head of a lamb. After that, you need to link several rows to a constant number of loops.
Periodically try the hood on the head.
4-7 rows: 18 posts without a crochet.
Now you can leave the lamb's head inside the hood. We continue to knit, but now we make adjustments.
8 row: we knit the columns without the crochet, after every 4 bars we pass the loop. If you are knitting out of a mohair, it is better not just to skip a loop, but to do a reduction. This will be less noticeable.
9 row: We continue to make the cuts "by eye". We finish knitting, we hide a tail of a yarn under a hood.
Knitting the torso:
The trunk is better to start knitting after the hood is already tied over the head. Then it will be easier to calculate the size of the trunk. We knit on the same principle as the head, i.e. we need to tie the ball. True, when we knit our head, we only had one row with a constant number of loops (row 11). Here we will make a little more of these series. I will repeat once again: if you are knitting with mohair or some other yarn, you yourself will have to calculate the number of loops for a ball of the required diameter.
1 row: 6 loops are enclosed in an amigurumi ring.
2nd row: * Increment in each loop * - repeat 6 times (12 loops).
3 row: * 1 column without crochet, increase * - repeat 6 times (18 loops).
4th row: * 2 columns without crochet, increase * - repeat 6 times (24 loops).
5 row: * 3 columns without crochet, increase * - repeat 6 times (30 loops).
6-10 rows: 30 columns without a crochet.
11 row: * 3 columns without crochet, decrease * - repeat 6 times (24 loops).
12 row: * 2 columns without a crochet, decrease * - repeat 6 times (18 loops).
13 row: * 1 column without crochet, decrease * - repeat 6 times (12 loops).
14 row: 12 columns without a crochet.
We leave a long "tail", that sew the trunk of the sheep to the head.
We stuff the body through the hole left. In the ass of a lamb it is better to put a weighting agent, since the head is heavy (it is two-layered) and will outweigh.
the photo shows the size of the body relative to the head:
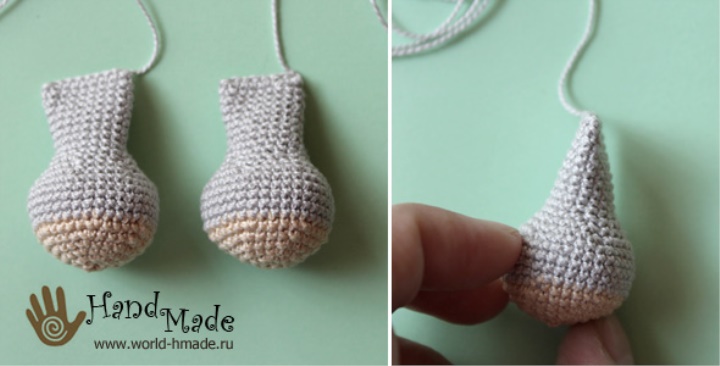
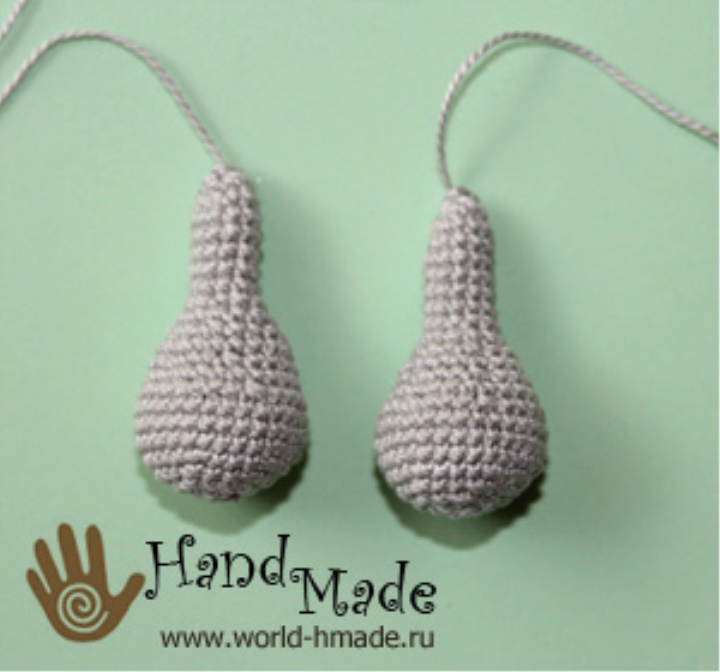
We knit the legs for the lamb (2 parts):
We begin to knit yarn "Iris" beige.
1 row: 6 loops are enclosed in an amigurumi ring.
2nd row: * Increment in each loop * - repeat 6 times (12 loops).
3 row: * 1 column without crochet, increase * - repeat 6 times (18 loops).
4th row: * 2 columns without crochet, increase * - repeat 6 times (24 loops).
5 row: * 3 columns without crochet, increase * - repeat 6 times (30 loops).
6 row: * 4 columns without crochet, increase * - repeat 6 times (36 loops).
7-11 Rows: We begin to knit with gray yarn. 36 columns without a crochet.
12 row: * 4 columns without a crochet, decrease * - repeat 6 times (30 loops).
13 row: * 3 columns without crochet, decrease * - repeat 6 times (24 loops).
14 row: * 2 columns without crochet, decrease * - repeat 6 times (18 loops).
The thick part of the leg is better to fill after 14 rows, so it will be easier to knit further.
15-24 rows: 18 posts without a crochet.
Bars without a cap cover the hole.
We knit handles for lamb:
Handles knit yarn "Iris" gray.
1 row: 6 loops are enclosed in an amigurumi ring.
2nd row: * Increment in each loop * - repeat 6 times (12 loops).
3 row: * 1 column without crochet, increase * - repeat 6 times (18 loops).
4th row: * 2 columns without crochet, increase * - repeat 6 times (24 loops).
5 row: * 3 columns without crochet, increase * - repeat 6 times (30 loops).
6-8 rows: 30 posts without a crochet.
9 row: * Decrease, 3 columns without a crochet * - 6 times (24 loops).
10th row: 24 columns without crochet.
11 row: * Decrease, 2 columns without a crochet * - 6 times (18 loops).
12th row: 18 posts without crochet.
13th row: * Decrease, 1 column without crochet * - 6 times (12 loops).
We fill the lower part of the foot.
14-20 rows: 12 posts without a crochet.
The top of the handle is better not to be stuffed, so that the paws do not protrude, when you sew them to the trunk.
Build the toy.

Now it remains to assemble the toy, that is, sew the paws and head to the trunk.
But first you need to decorate the muzzle of the lamb, that is, sew the eyes and embroider the nose. For the peephole, you can use a large black bead. The nose is embroidered with a pink mulina.
If you plan to give a toy to a child who is less than three or four years old, then it is better not to use small details (beads) in the design of the face. In this case, the eyes are also better to embroider a black mulberry. Thread with which eyes are sewn on and a spout is sewn, hide under the hood.
After you decorate the face, you can start sewing the ears.
The final stage of the creation of the toy is the attachment of handles and legs. Sew the legs as shown in the photo below: