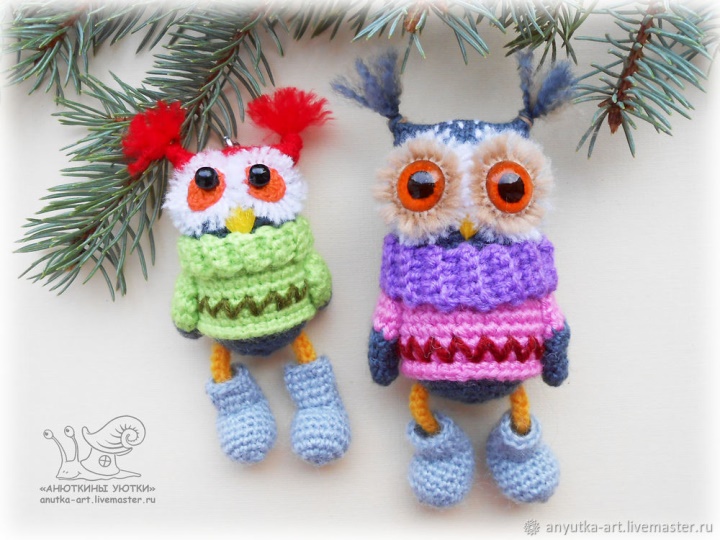
Next year is the year of the dog, but I'm here for you with the owls :) The thing is that my tribe is a great lover of owls. So the idea came to link her as a gift for the New Year, a keychain for a backpack in the form of a winter cat. Well, at the same time the master class to prepare.
The owl simply knits (however, basic crochet skills are required) and fairly quickly. The keychain is small, and the rest of the yarn is suitable for its manufacture. By the same description, but changing the design, you can associate a variety of different sheep. I hope you will like the master class and you will connect both yourself and the gift of these lovely birds.
Main color yarn for head and wings. It is better to take fine yarns (wool, half-wool or acrylic) "natural" shades - gray, brown, beige. I knitted from Pecherk yarn Beaded gray. Also suitable for children's novelty , children's whim , or other yarn of similar thickness.
Color yarn for the body-sweaters, hats, design. There are also no strict requirements. But try not to make the yarn for the sweater body much different in thickness from the yarn for the head. I knitted a sweater, also from Peskorka beaded .
Gray (or white, beige, black) yarn for boots. It is better to take fluffy yarn. I used A lize real 40 Angora .
Yellow yarn for feet. I have Alize fine .
White (or light gray, beige, etc.) yarn for the edge of the eyes. I have a Piebork bead .
Fine yarn for the iris of the eyes is yellow or orange. I knitted from yarn Iris.
Muline yellow embroidery beak.
Two beads (or polusbushiny, pugovki) for pupils. You can take ready eyes.
Monofilament or thin thread in the tone of yarn for sewing details.
Hollofiber or other filler.
"Velcro" (Velcro-tape, part with hooks) for nachesyvaniya.
All the details that are knitted round, knit in a spiral (without lifting loops). We knit the columns without the crochet unless otherwise specified.
Knitting begins, as someone is more familiar: on the amigurumi ring, or knit two airy loops and the first row of stitches are sewn into the second from the hook loop.
© https://www.livemaster.ru/topic/2625333-vyazhem-kryuchkom-zimnyuyu-sovushku-brelok
We knit the head and body in one detail. We fill with filler as we knit.
Head . We knit yarns of gray color .
1 row: 5 sbn
2-6 rows: 5 pr in each row = 30 sb
7-11 series: 30 sbn each
12 row: 5 ub = 25 sb
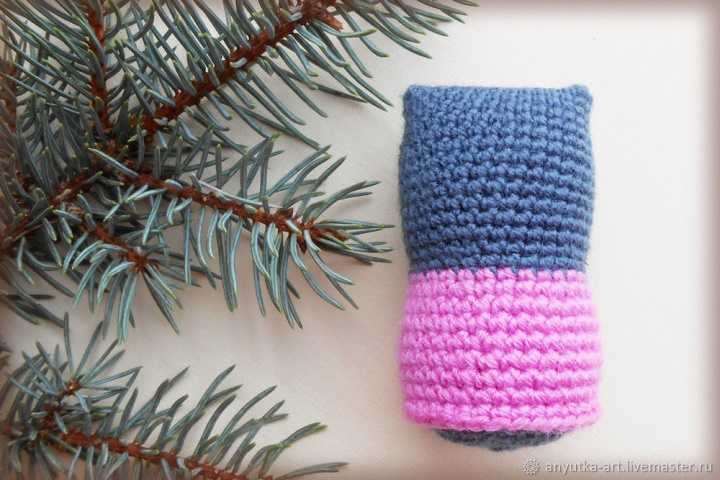
Body. We knit yarn of green color .
13th row: 25th c.
14 row: 5 pr = 30 sb
15-19th series: 30 sbn
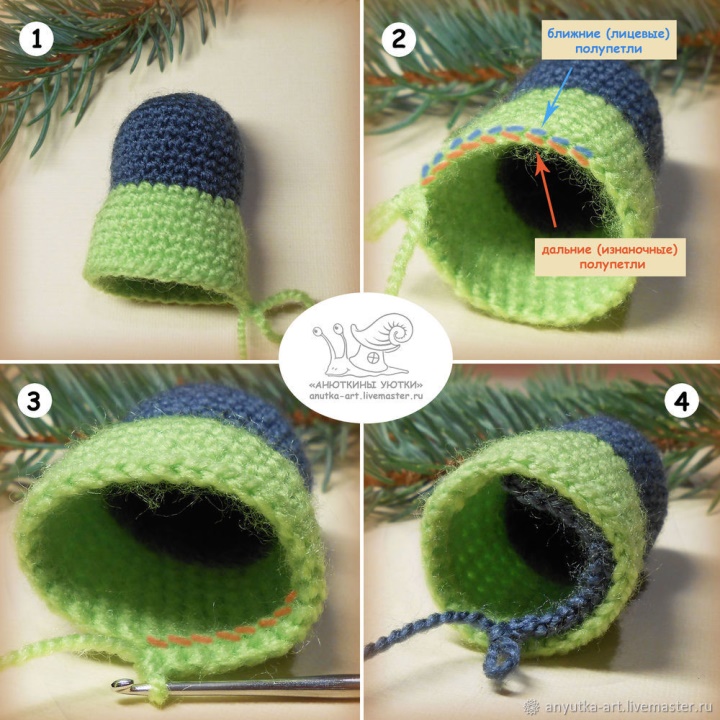
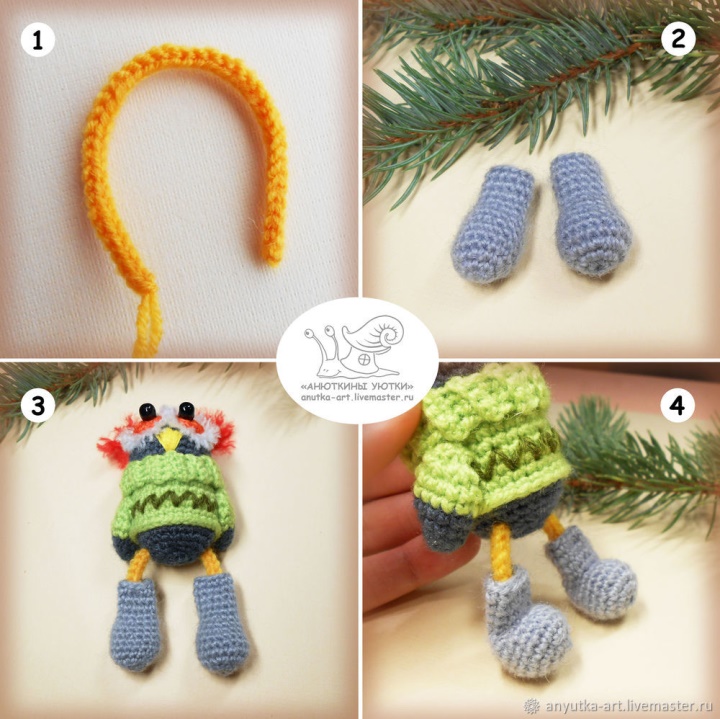
It turns out a blank as in the photo 1 .
20 row: we knit on near half-loops (in blue color 2 ) - 30 sb. We finish knitting and hide the end of the yarn in the thickness of the canvas.
Inside the body, a hem from a non-aligned half-loop is obtained (in photo 3 they are marked in red). We join the yarn of gray color and we knit one row on these distant half loops loops - 30 sb
21-24 rows: 5 ub in each row = 10 sb
25 series: we make two or three more cuts and close the hole.
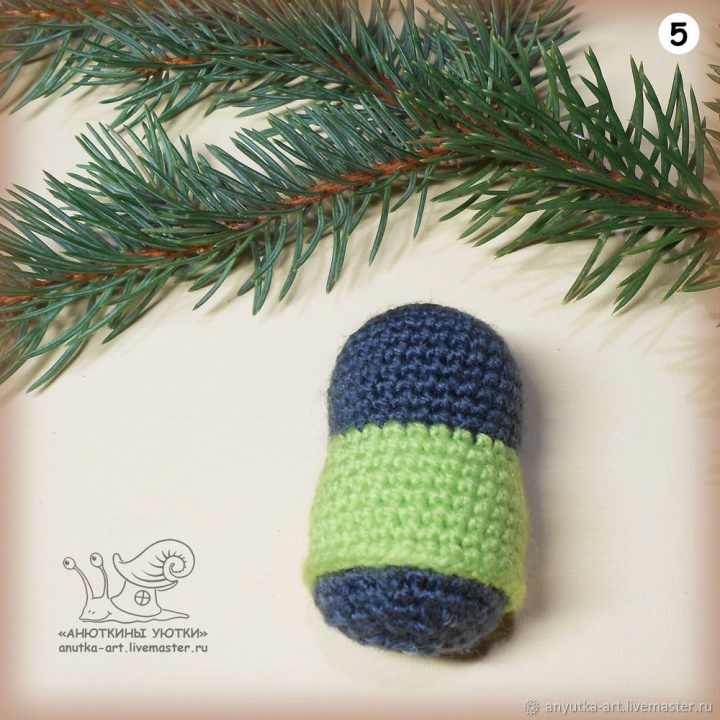
It turns out a blank as in photo 5 . With a dense knitting from Piechorka beaded, the height of the workpiece is 5.5 cm .
We knit wings

We knit gray yarn in a circle
1 row: 6 sbn
2-4 rows: 2 pr in each row = 12 sbn
We finish knitting ( photo 1 ).
We connect the yarn of green color.
5-6 rows: 12 slips
7 row: 6 уб = 6 сбн
Close the hole ( photo 2 ).
We prick the wings with maces to the body and sew on the perimeter of the sleeves ( photo 3 ). Done ( photo 4, 5 ).
We bind the eyes
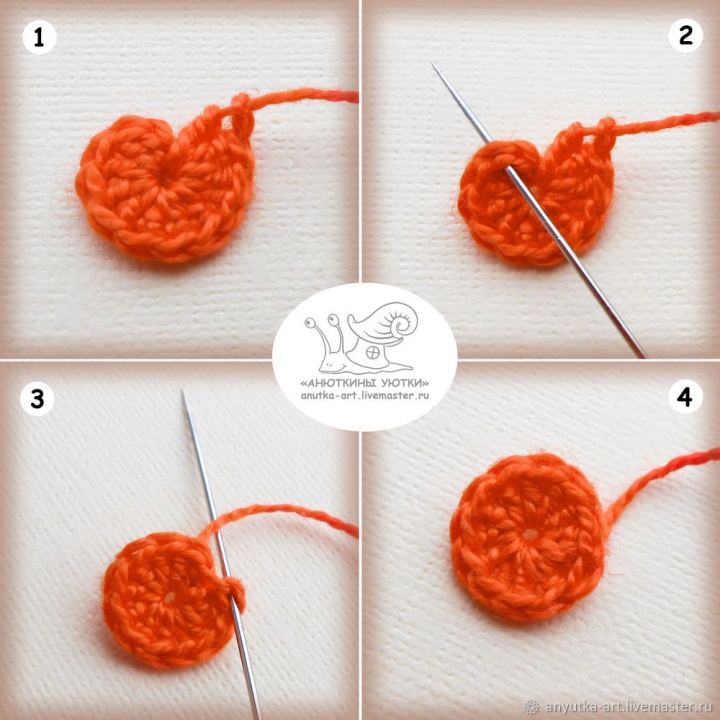
We knit the iris from yellow or orange yarn.
We knit three air loops. In the third from the hook loop, we sew 11 cn ( photo 1 ).
In order for the edge of the iris to be smooth and the junction point to be inconspicuous, we finish knitting like this: Thread the yarn in the needle. The needle is inserted under the half loops of the first ssn ( photo 2 ).
We pull the thread. The needle is inserted again into the loop of the last ssn ( photo 3 ).
We pull the thread. The perimeter of the circle produces a smooth, continuous pigtail ( photo 4 ).
All the same can be done with a hook. But I'm more comfortable with a needle.
The end of the yarn is hidden on the wrong side.
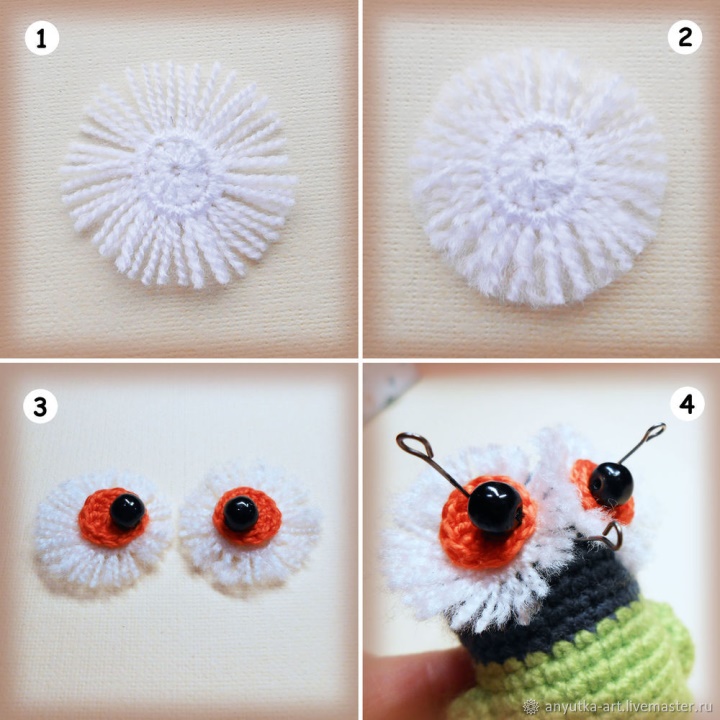
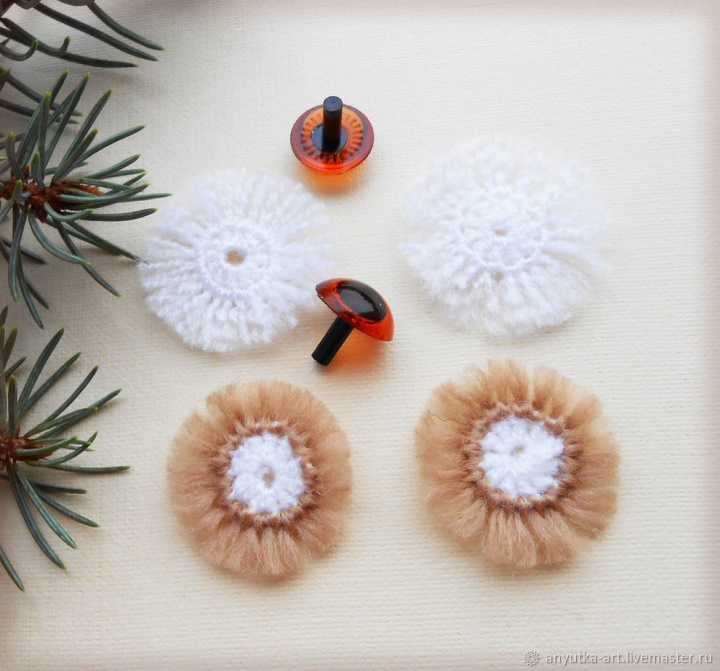
Eye swelling is knit from white or light yarn.
We knit three air loops. In the third from the hook loop, we sew 11 ссн. We fix it the way it was done when knitting an iris.
Cut the pieces of yarn and attach them along the edge of the circle with fringe. To do this, we insert a hook under both half loops and pick up a folded in half a piece of yarn. We draw out a loop that is formed from a segment. Through the loop, stretch the ends of the yarn and tighten.
The density of the fringe is determined experimentally. My yarn is thin, so I fastened two pieces on each loop (not two together, but two next to it).
Cut-shorten the fringe. While only "in black" (photo 1).
With the help of "Velcro" we comb the fringe. Particularly "stubborn" strings, we first spread out with a needle (photo 2).
We put the pieces in pairs and connect them by sewing beads. Trimming the fringe (photo 3).
Half pupils are more suitable for pupils. But I did not have them, so the owl turned out to be a goggles).
Try our eyes. If necessary, trim the fringe again. At the same time, we mark the place for the beak with a pin ( photo 4 ).
Embroider beak
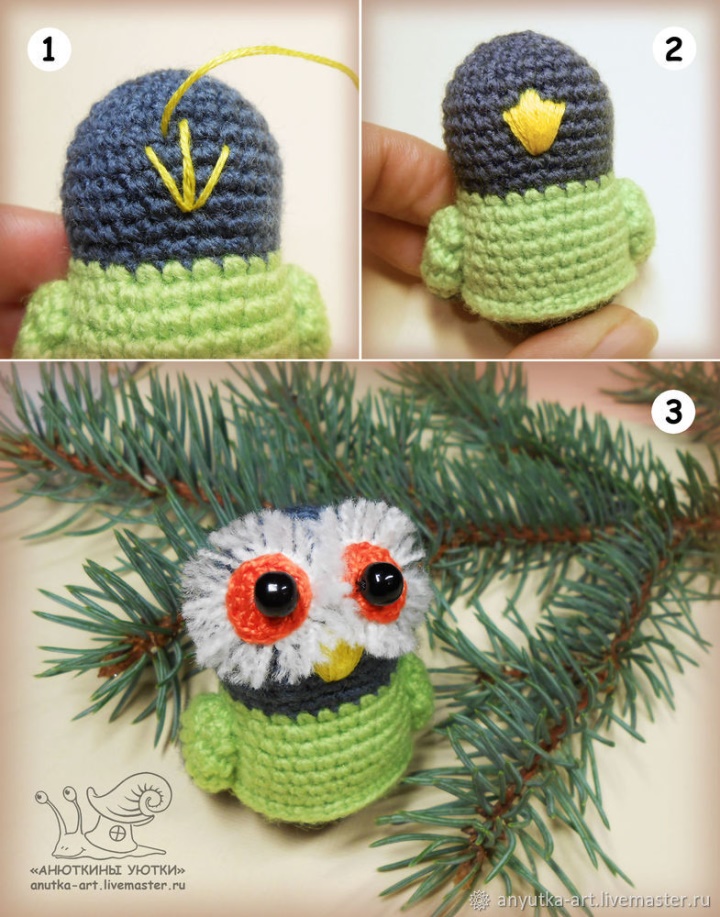
We embroider the beak with thin threads of yellow color. I was embroidering Mulina.
First, we make three support stitches with a common vertex ( photo 1 ).
Fill the gaps between the stitches with shorter stitches. Ready beak ( photo 2 ).
Sewing eyes ( photo 3 ).
Note. When sewing parts, we fix the thread around the neck. This place will then be closed with a sweater collar.
Knit a sweater collar
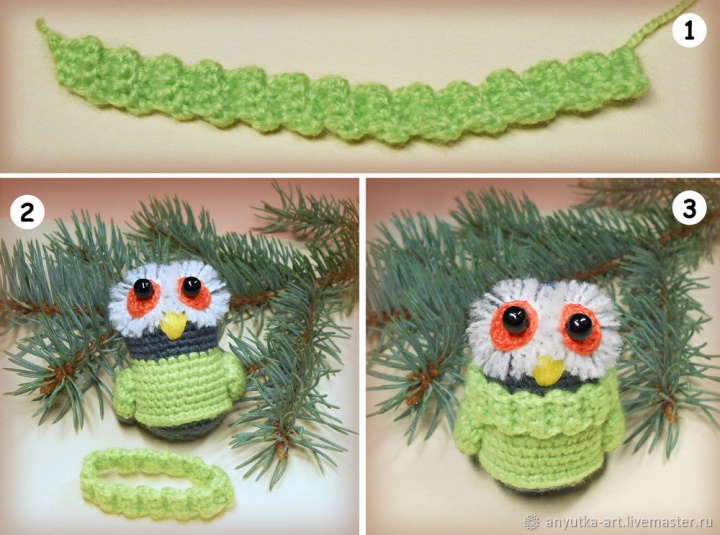
In this case, I got the collar of a sweater. You can take a yarn of a different color and get a snore.
We knit a chain of air loops of the same length as we want to make the width of the collar (plus the lifting loop)
We knit with bars without a crochet strip of the necessary length. In the course of knitting we try on the collar.
We knit only for the long half-loops. The result is an elastic band ( photo 1 ).
Sew the strip into the ring ( photo 2 ).
We put the collar on the owl. If desired, we sew ( photo 3 ).
We knit a hat

I knitted a hat from the Children's novelty .
We knit a chain of Bn of length equal to the width of the head, plus the lifting loop (in photo 1 the width of the head is shown by a horizontal line).
We knit the columns without the crochet on the half loops of the chain ( photo 2 ).
We turn knitting and knit stakes without a crochet on the second half-loops ( photo 3 ).
Next, we knit in a circle to the desired size of the cap. It turns out something like a pioneer cap ( photo 4 ).
We take the cap as shown in photo 5 .
Using the hook, make the brushes on the "ear" of the cap ( photo 6-8 ).
Trim the brushes ( photo 9 ).
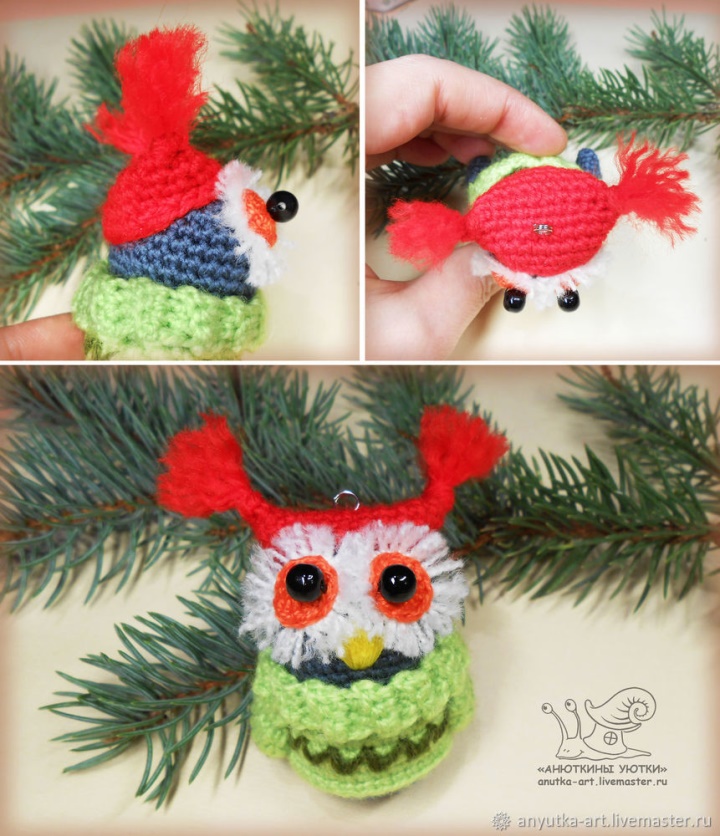
We put on a hat for an owl. We sew the cap to the head along the perimeter and in the center. At the same time, you can sew a ring for a loop with a carbine.
The owl became elegant! But it seemed to me that the sweater of the little girl was boring. And I made on him the easiest embroidery of dark green yarn.
We knit the legs and felt boots
For the legs we knit a yellow thread from a string of the desired length.
We knit one row of connecting posts ( photo 1 ).
Boots in yazhem from the gray yarn .
1 row: 6 sbn
2-3 rows: 6 pr in each row = 18 sbn
4-6 rows: 18 sbn each
7 row: 3 ub = 15 sb
8th row: 15th c.
9 row: 3 ub = 12 sb
10-12 rows of twelve seasons
In the socks of boots put on a lump of filler ( photo 2 ).
With the help of a hook or a needle, stretch the lace-legs through the lower part of the body.
The ends of the lace are pushed into the felt boots and sewed to the bootlegs ( photo 3 ).
We bend the felt boots and sew-fix the crease ( photo 4 ).
We knit a tail
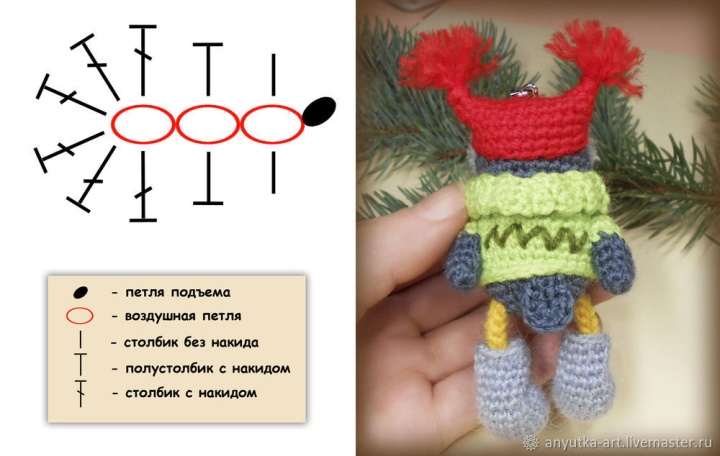
The idea to tie a tail came at the very end of the work. It seemed that something was missing.
We knit the tail according to the scheme of gray yarn and sew to the priest.
We knit an owl with ears
This little girl is a little different and bigger. My workpiece was about 8 cm high .
Head. We knit yarns of gray color . We start knitting the same way as we knitted a hat at the first owl.
We knit a chain of 15 vp, plus the lifting loop.
1 row: We send 15 sb on one side of the chain and 15 sb on the second side of the chain = 30 sb
Next, we knit in a circle (in a spiral)
2-5 rows: 30 seats each
6 series: 4 pr = 34 sbn
7-14 series: 34 seats each
15 series: 5 уб = 29 сбн
16th row: 29th c.
Body. We knit yarn of lilac color (I have a Children's novelty )
17th row: 29th c.
18 series: 5 pr = 34 sbn
19-24 series: 34 seats
25 series: we knit on the nearest half loops - 34 sb. We finish knitting and hide the end of the yarn in the thickness of the canvas.
We join the yarn of gray color and we knit one row on the distant half loops - 34 sb
26-29 series: 6 each in each row = 10 sb
30 series: we make 2-3 more adjustments and tighten-close the hole.
We knit wings
We are knitting gray yarn
1 row: 6 sbn
2-5 rows: 2 pr in each row = 14 sb
We knit a lilac yarn
6th row: 14 sbn
7-8 rows: 3 ub in each row = 9 sbn
Knitting is finished, we sew the hole with the remaining tip of the yarn.
Making the Eyes
For this little girl I decided to take ready eyes. The fringe around the eyes made a double. I think everything is clear from the photo.
The details of the eyes are connected by the glue Moment Crystal .
Boots knit the same pattern as that of the owls in the red cap.
On the ears we make brushes as well as we did on the cap of the first owl. On the head of white yarn we sew specks.
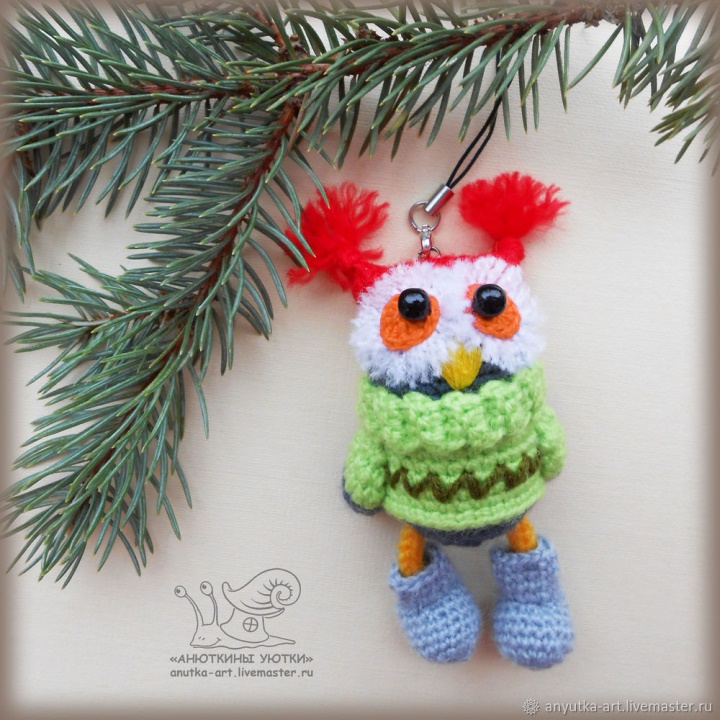
Afterwards, I'll attach a buttonhole with a carabiner so that it can be hung on a backpack or bag.
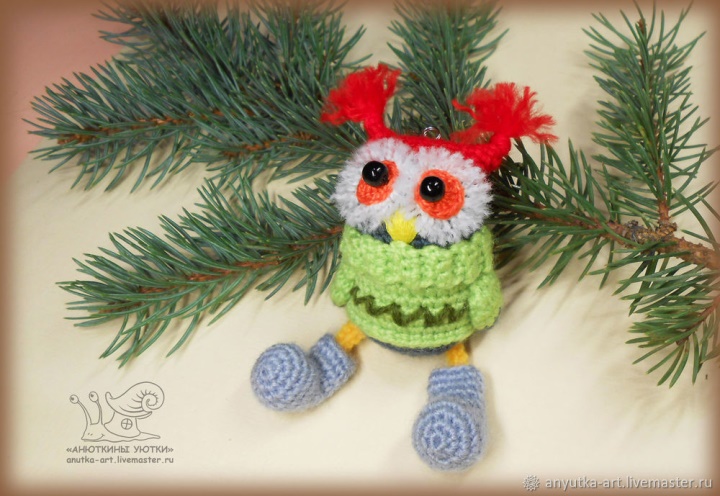
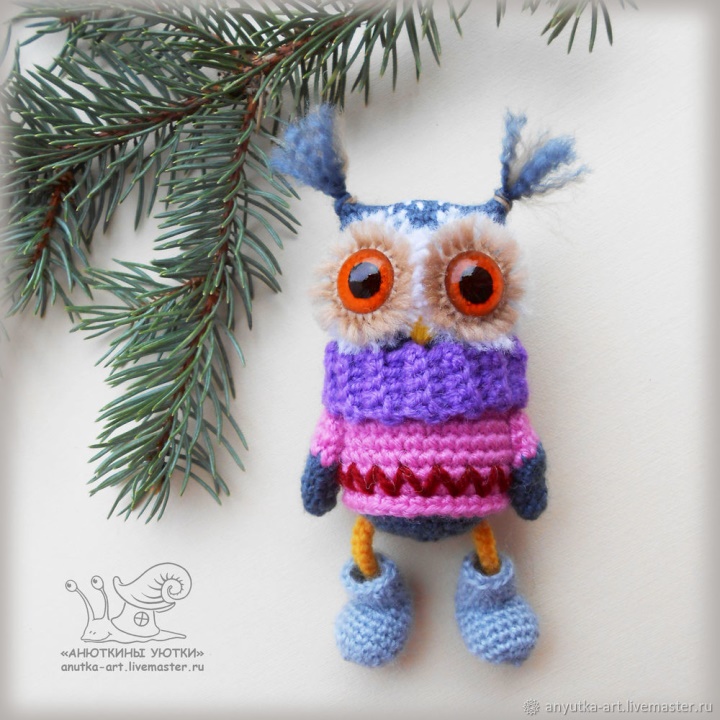
I got such owl-key chains. And in my head are already spinning different ideas on this topic. So the owl population of my tribe will grow.
Using the two descriptions above, you can impose a great variety of different owls by simply changing the colors and thickness of the yarn, and coming up with a different design.
You can make an owl with stiff legs made of chenille wire or wire wrapped in yarn. Get a night owl. She can stand or sit.
Based on these schemes, slightly changing them, you can link children's brooches or magnets to the refrigerator.
So fantasize!
With wishes of every success, your Anya!