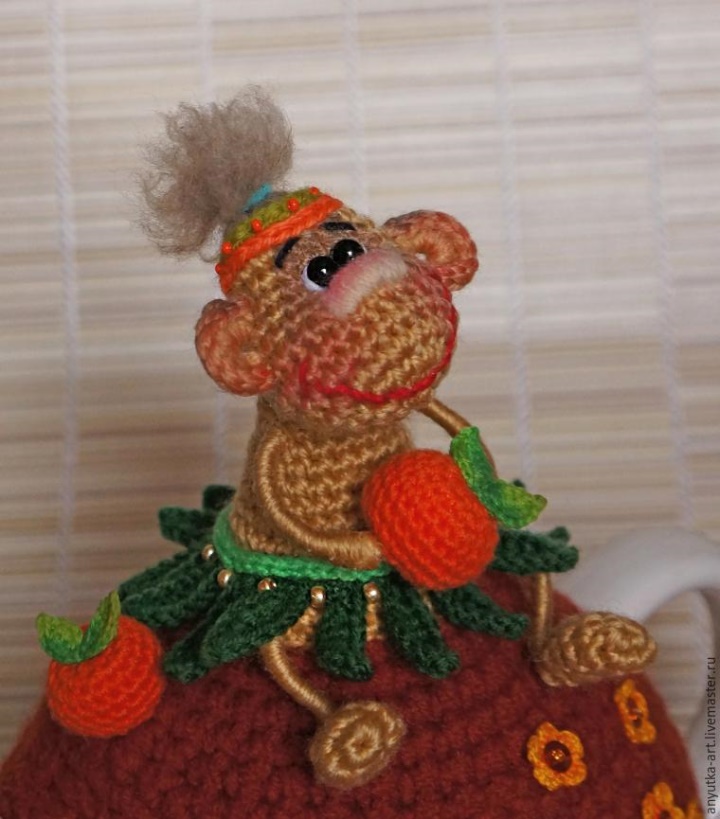
In order to bind a monkey you need to be able to: knit an air loop,
knit in a circle (spirally).
if desired: small buttons, acrylic colors or pastels.
ruler.
lifting). We knit the stitches without the crochet.
half woolen or woolen.
thickness and footage. Therefore, in the master class I will give dimensions
resulting parts. In the process of work you will understand how many rows
you need to knit. Knitting patterns are uncomplicated - no difficulties
arise.
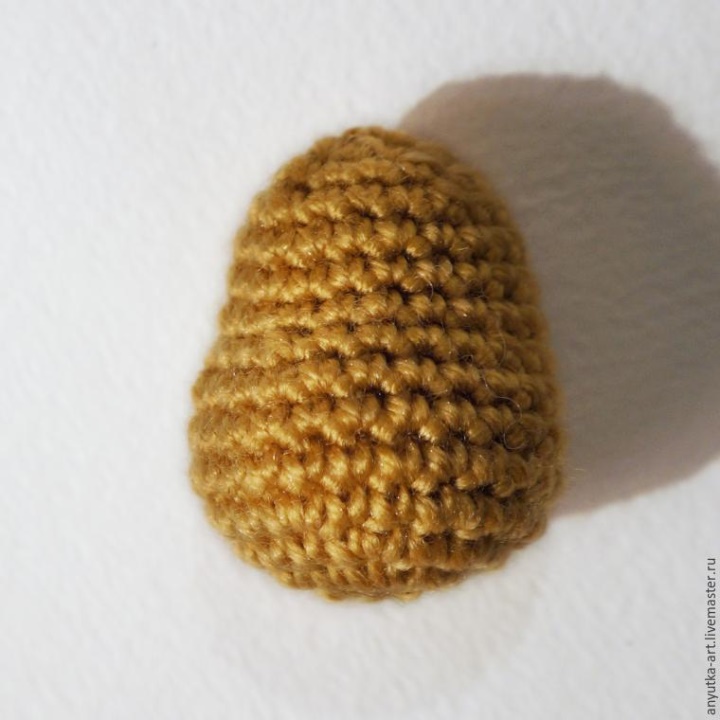
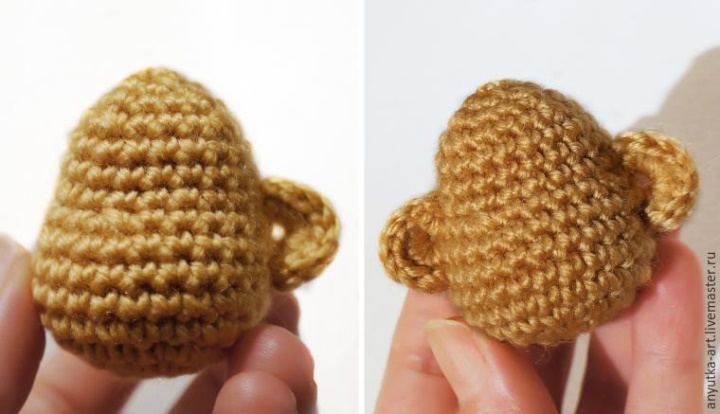
1. In the ring amigurumi we sew 6 posts without a crochet and we knit on
scheme of the circle (that is, in each row we make 6 additions).
Should get a circle about 4 cm in diameter (photo A). For me, for
this, it was necessary to link 4 rows.
2. Then we knit without adding, until you get a cup with the sides,
approximately 1.5-1.8 cm in height (photo B). I tied 3 rows.
3. We send one row, making 5 deductions (photo B). Diameter
the resulting "cup" opening should be about 2-2.5 cm.
If you get a little more or less, do not be scared. Monkeys, they are different
are).
4. Again we knit without any loss, approximately 1.5 cm (photo D).

5. Then we knit, making 5 adjustments in a row. When there is little
hole, we fill the head and we bind with the discounts, close the hole.
Here is a pear obtained:
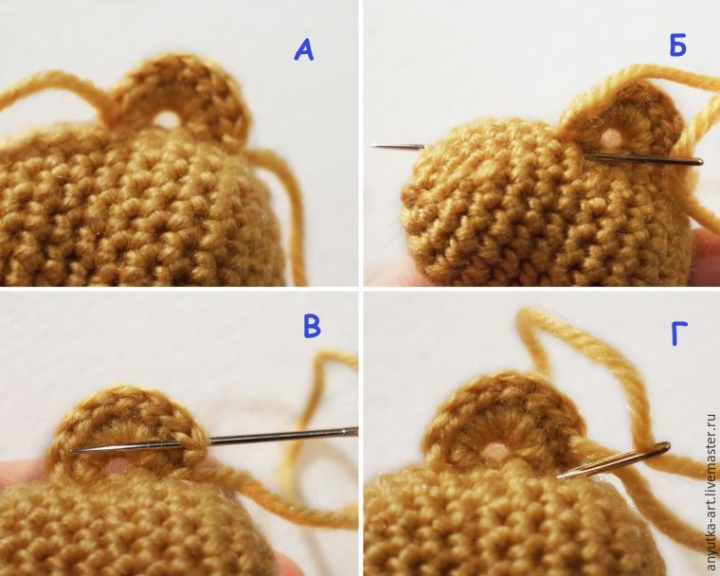
We knit the ears
Before you knit your ears, note something to the writers, where they will be
to be located (2 points per ear). Ears do in the middle of the head or
slightly lower. If you do it above, you will not get a monkey, but
an unidentified animal.
1. Insert the hook under the bar at the first point of the ear. Pick up the thread and
pull out the loop (photo A). "Ponytail" leave a long, it will be
to participate in knitting.
2. Tie a chain of 3-4 air loops. Knit with both threads
(working and "tail") (photo B).
3. Attach the chain with a connecting loop at the second point,
eyelet loop (photo B).
4. Unfold the head and tie the base with the pillars without the crochet. Wherein
knit only with a working thread. "Tail" lay along the loop-base and
tie the base together with it (photo D). I got 6 sc. You,
Depending on the thickness of the yarn, the bars may be larger or
less.
5. Wire the connecting post to the same place from where you started
knitting.
6. Reinstrain the knitting and tie a series of connecting posts.
The last connecting bar is tied to the second starting point
knitting (where a chain of air loops was attached, when forming
basis) (photo A). Cut off the yarn leaving the second "tail" more authentic.
You got an ear with two "tails".
7. Fill the top "tail" in the needle. Insert the needle into the base of the tab, and
output at the back of the head (photo B). Tighten the thread and secure with a knot.
8. Lower the "tail", also tuck into the needle. In order for the eyelet
It turned out more accurate, insert the needle under the first connecting
column of the series (photo B).
9. Insert the needle into the base of the tab, and pull it out at the back of the head (photo D).
Pull and fasten the thread.
10. Symmetrically to the first, connect the second tab
If desired, you can tint the muzzle with acrylic paint. For this
moisten the necessary places with clean water. Dilute the paint to the state
liquid ink and brush on the face. I tinted brown
paint the top of the face. A red paint tinted the cheeks and
ears.
Attention! If you are toning, like me, with acrylic paint, then
do this before you embroider the nose and sew your eyes. If
Toning plan to make a pastel (can be pastel pencils
and even powder), then only after you have embroidered the nose and made the eyes.
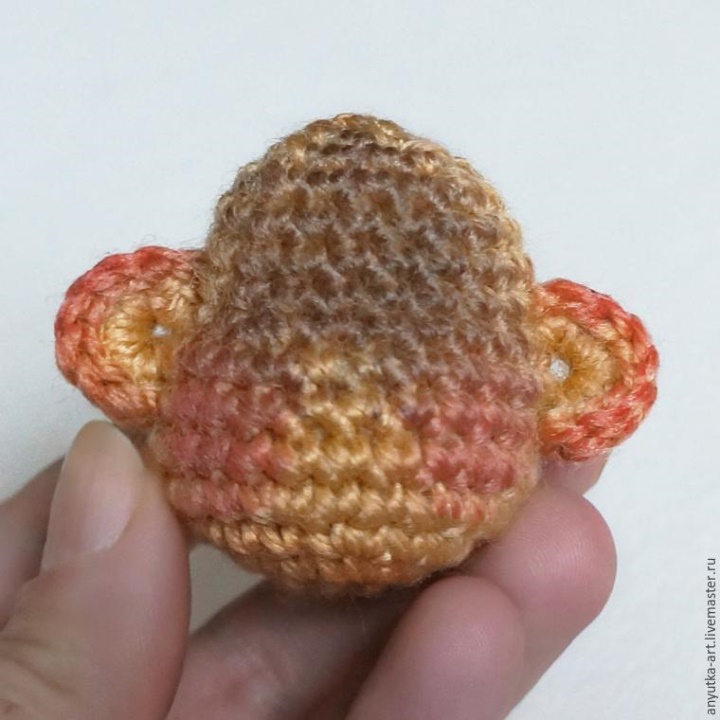
Before further work, mark the places where the nose will be located,
eyes and mouth. Of course, the monkey is stylized. But, in order for it
was recognizable, you need to correctly arrange the details relative to each other
friend.
Recollect, what features do the great apes have? Absence or
complete absence of nose bridge. Often a wide nose. Close to each other
set eyes, powerful lower jaw. Sounds awesome? But exactly
these features need to be emphasized so that the monkey turned out
monkey, and not a little man.
Embroider your nose
For the nose, take the same yarn as for the head or lighter. Not worth it
make a black or brown nose.
1. Fix the yarn and make the flooring from the cross stitches (photo A).
2. Perpendicular to the first layer, make a second layer. Stitches
Place it close to each other, without overlaps and lumens. If
want a nose more convex, then make a couple more layers (photo B). A thread
output to the back of the head and secure.
In the future, the place behind the head, where all the nodules will be, will close
upper part of the trunk - mark this place in advance.
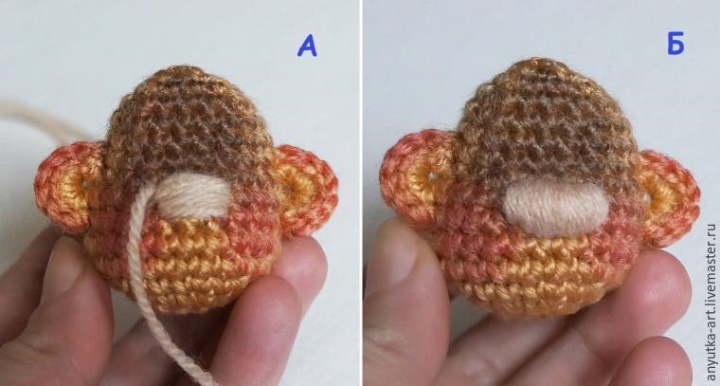
If desired, the nozzle can be tinted.
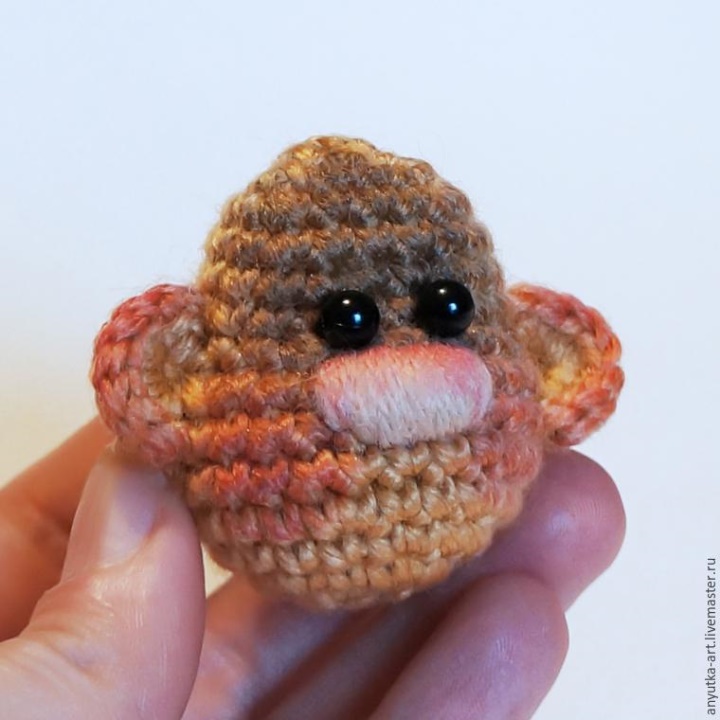
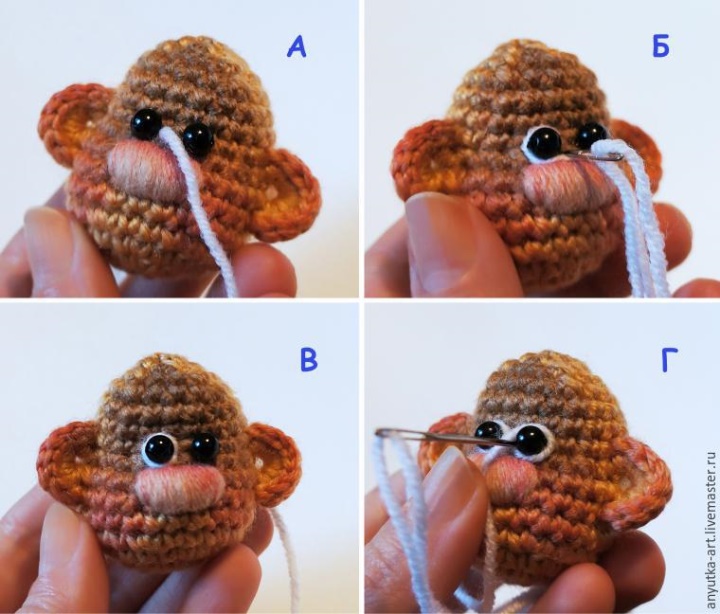
Making the Eyes
1. Sew a black thread with a bead. Arrange them close to each other and
close or close to the nose. The same concerns ready-made eyes,
if you will attach them.
2. At the back of the head, secure the white thread. Bring it out near the bead (photo A).
3. Weave the thread of the eyes. Pin the needle to the start point and output to
nape (photo B).
4. Pull the thread and secure (photo B). The resulting loop should not
slip off the beads. If the protein of the eye seems too thin and
unseen, make a second layer - repeat all the steps again.
5. Bring the needle back to the face, already near the second bead and repeat all
procedure (photo D). Fasten the thread to the back of the head
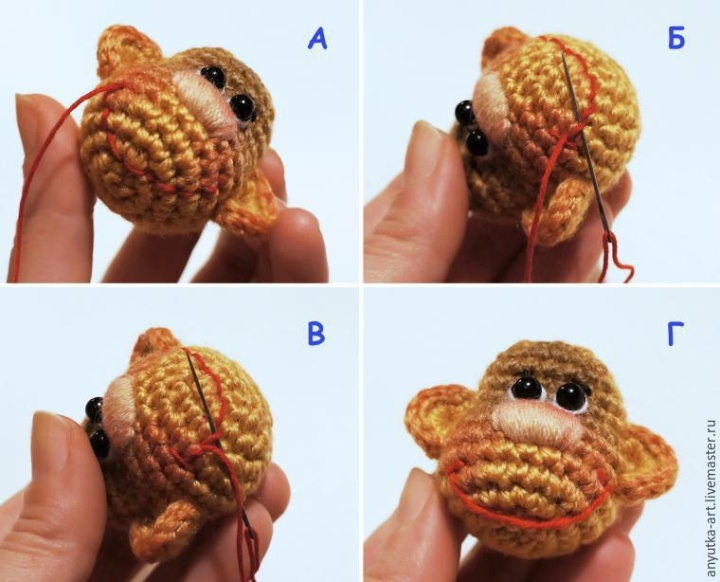
Embroider your mouth
The mouth is wide, almost to the ears. And put it low, away from
nose.
1. Take the red thread (I have a "Baby Novelty") and fasten it to the back of my head.
Bring to the face and embroider the base of the mouth seam "back needle" (photo A).
2. Now pick up each stitch in turn and
stretch the thread through it. Do not pierce the canvas with a needle. A thread
should only pass under the stitches. Do you like crocheting stitches
of the initial seam (photo B). Always enter the needle in one direction. If you
began, for example, from right to left, then continue (photo B).
3) It turns out such a neat little shoe (photo D)
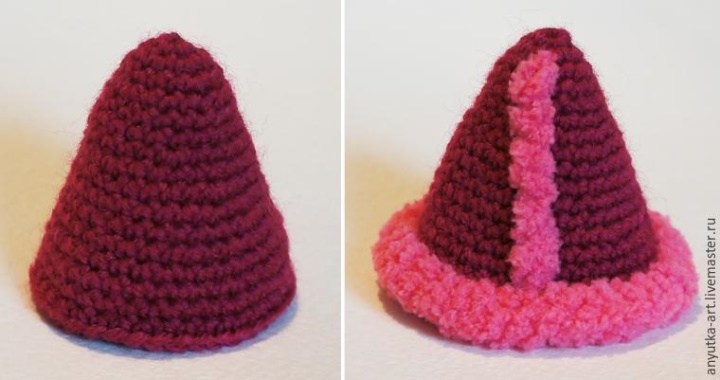
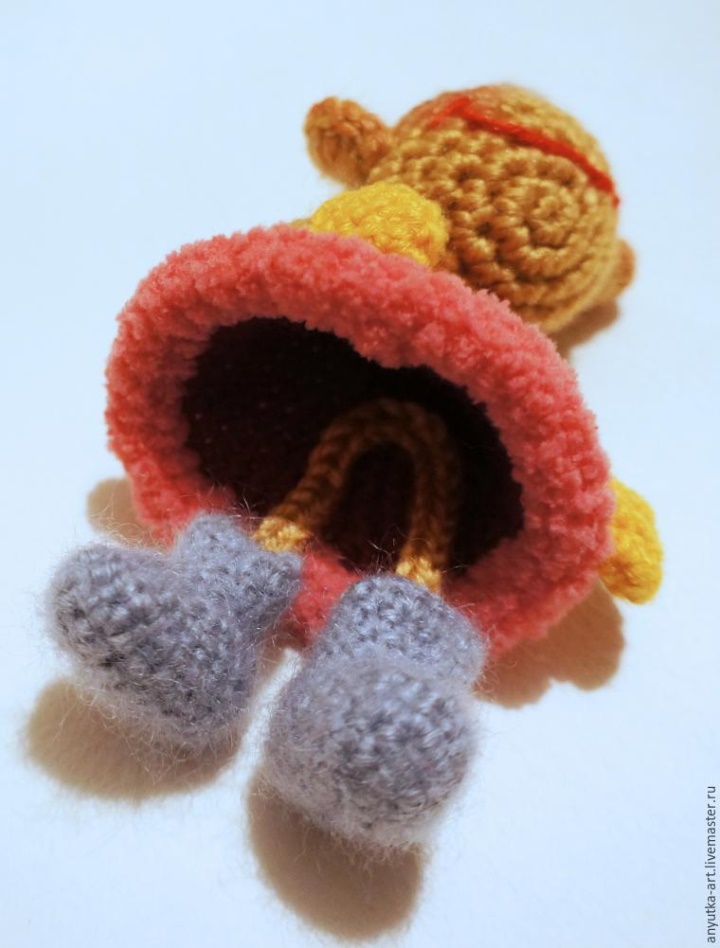
We knit a body
Well, we knit a body, it's loudly said :), we knit a bell-bell.
I knitted from Alize fine yarn (half wool, 390 m / 100 g).
1. We start knitting with 6 stitches without a crochet in an amigurumi ring.
Next, we knit making 2 increments in each row.
Do not forget to shift the increase on the increase in the previous series.
We knit, until the height of the bell is about 6-7 cm. We knit
tightly, so that the bell holds the shape well.
2. After completing knitting, we make a binding of yarns of a different color. Smartly and
Winter will turn out if you tie a textured yarn. I Knitted Yarn Alize
softy (100% micro-polyester) in two strands. The same yarn, but in the same thread,
performed a chain stitch with a hook, along the coat-bell
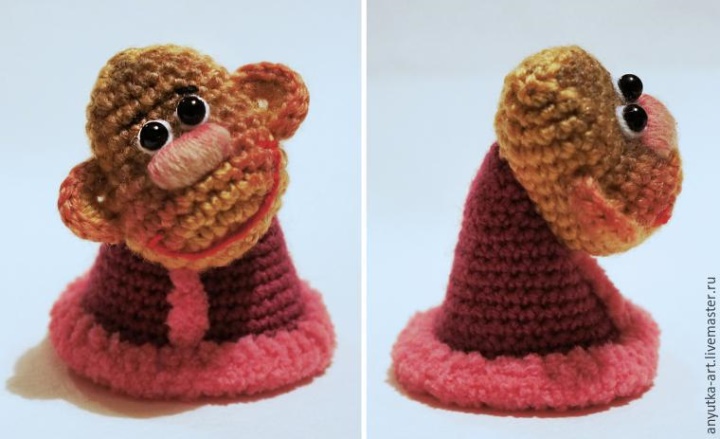
Sewing the head to the body
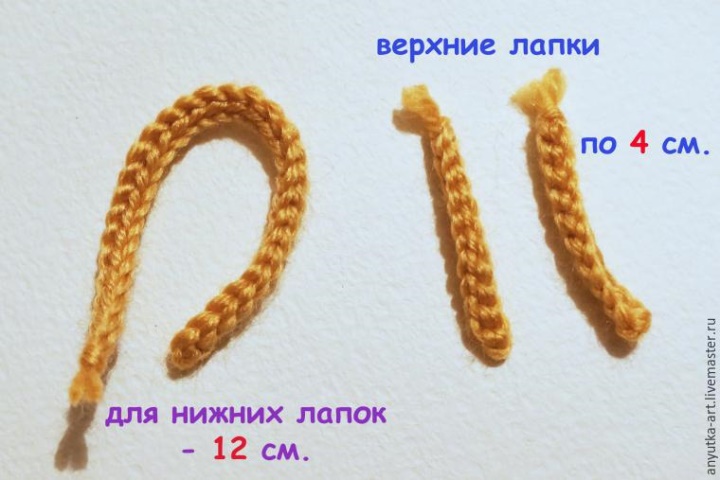
We knit the legs
We knit a chain of air loops of the required length. We mess on it
row of connecting bars.
For the upper legs we knit two blanks. For the lower - one long.
We knit mittens
Mittens I knitted, also, from yarn Alize fine, but yellow.
1. We knit 6 columns without a crochet in an amigurumi ring.
2. In the second row, make 3-4 increments.
3. Then we knit without adding to the required length of mittens.
4. We put on the mittens on the paws and sew.

Knit boots
Valenochka well knit from some fluffy yarn.
I knitted from Alize real 40 Angora in two strands.
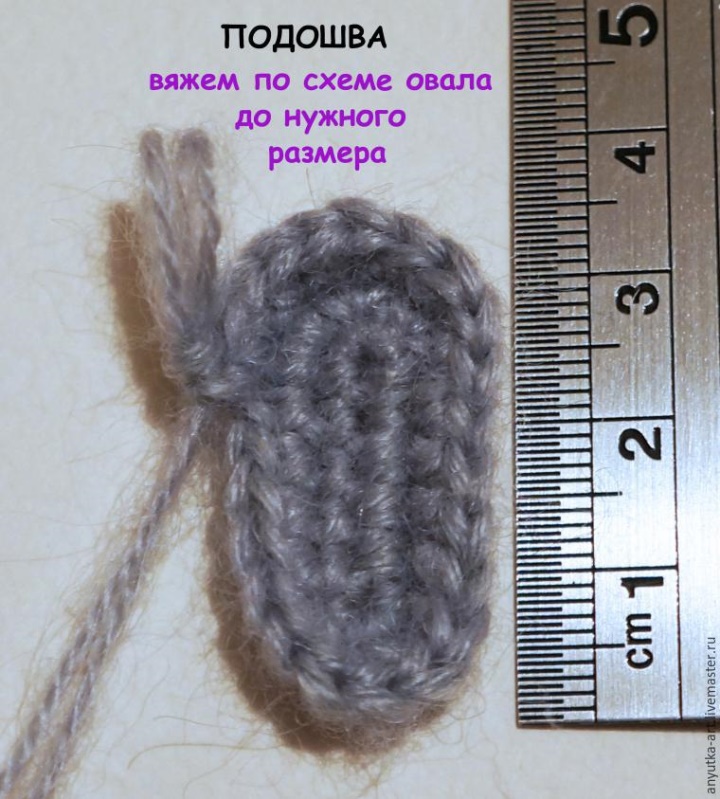
1. The sole is knitted with columns without a crochet according to the scheme of the oval. I did not become
give a diagram here. If you have never knitted an oval, then look
on the Internet - schemes and moooooooo much!
I started knitting with a chain of 6 air loops, plus a lifting loop.
Up to the size necessary to me the sole, it was required to connect one row. For
so that the toe sock was wider than the heel, I began to knit the second row by making
three increases from the side of the sock (see photo)
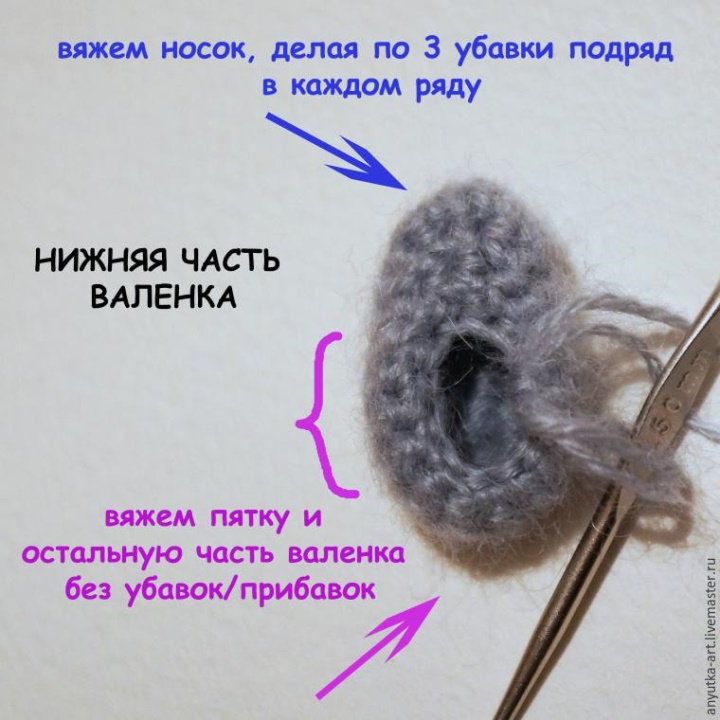
2. Then knit without adding / removing to the end of the row.
3. Next, we knit by doing 3 adjustments in a row. Losses are done in a row and only with
the sides of the sock.
Should get such a bast. The size of the hole "bast", we do
your taste. The main thing is that the paw of the monkey crawls into it.
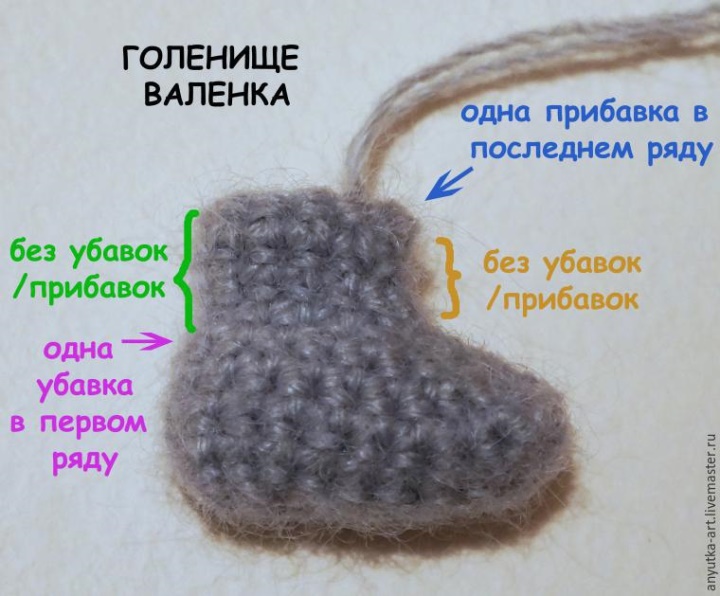
4. We knit the bootleg (it is called a valenka so?). In the first row, with
hand heel, do 1 reduction.
5. Then we knit without any deductions.
6. In the last row, on the side of the sock, make 1-2 increments.
Complete the knitting with a connecting post. "Ponytail" leave
more authentic. They then sew the felt boots to the ape's paw.
In socks boots, put on a small lump of filler.
Sew the upper legs to the body of the monkey.
She is already lustily looking at her future legs in boots.

We put the lower legs into the body-bell and sew.
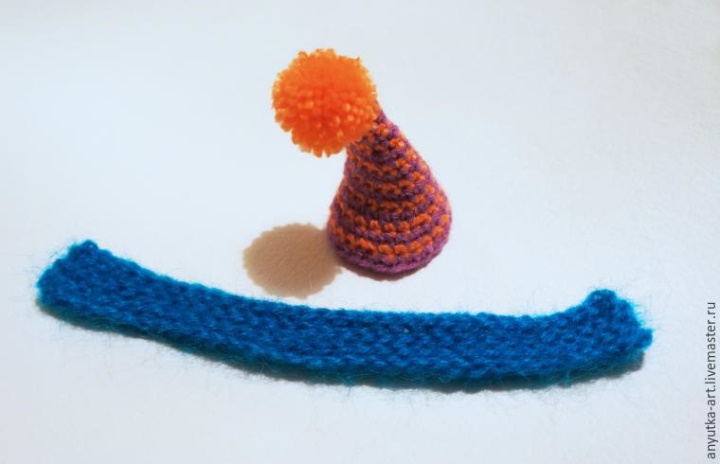
We knit a hat and scarf
For the scarf, tie a string of air loops of the correct length.
Spray several rows with columns without crochet, to the desired width
scarf.
I tied a scarf from Alize real 40 Angora yarn into one thread, Bosnian
knitting.
Bosnian knitting is knitting by connecting posts.
I knitted each row only for the back half loop. It turns out the canvas
similar to knitting.
Since the canvas with Bosnian knitting is very dense,
it is better to take a thick hook. Then the scarf will turn out to be soft. Another one
moment - with knitting by connecting bars, at the beginning of each
row, the lifting loop is also made.
We knit a cap like a bell-bellied body. Only in each row
we do not for 2, but for 1 increase. We knit until the cap becomes
crawl over the head of a monkey
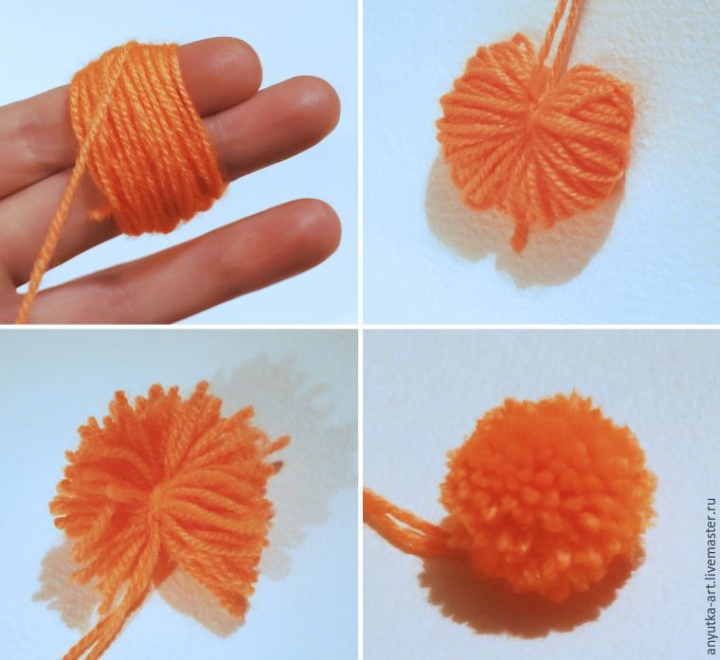
Make pompomchik not be difficult. Then it can be sewn or
tie caps to the top of the head.
We dress our monkey.
Here such a ridiculous thing turned out!
Doing a hairdo
At the previous monkey, on the head a hat. It is sewn and therefore
I did not make a head of hair.
If you want, you can make our monkeys hairstyles.
1. Prepare the pieces of yarn (photo A). It is better to take yarn, which will be easy
to dissolve into separate threads and to comb. The pieces are made more authentic, with
reserve. Then you can cut everything.
2. We introduce a hook under the column on the head of the monkey (photo B).
3. Cut a piece of yarn in half. Patch and pull (photo
AT).
Through the resulting loop stretch the "tail" and tighten (photo D).
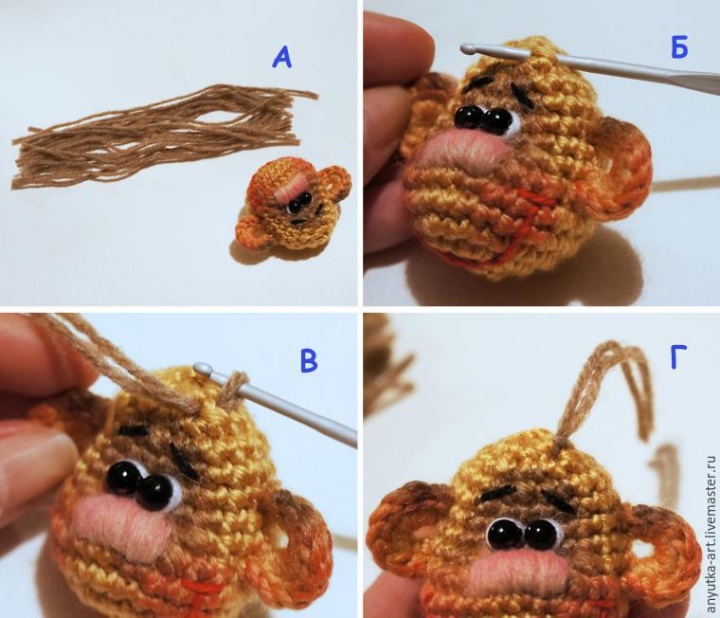
In this way we tie the whole apex of the monkey.
Trimming. We spin the yarn with a needle and brush it with a brush.
Again we equate.
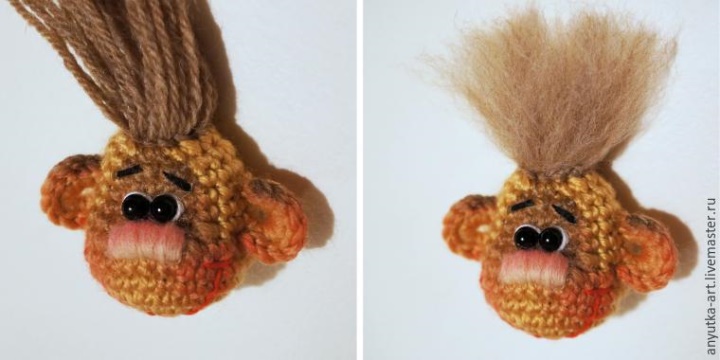
Here is a chub turned out at this monkey-patsanchika :)
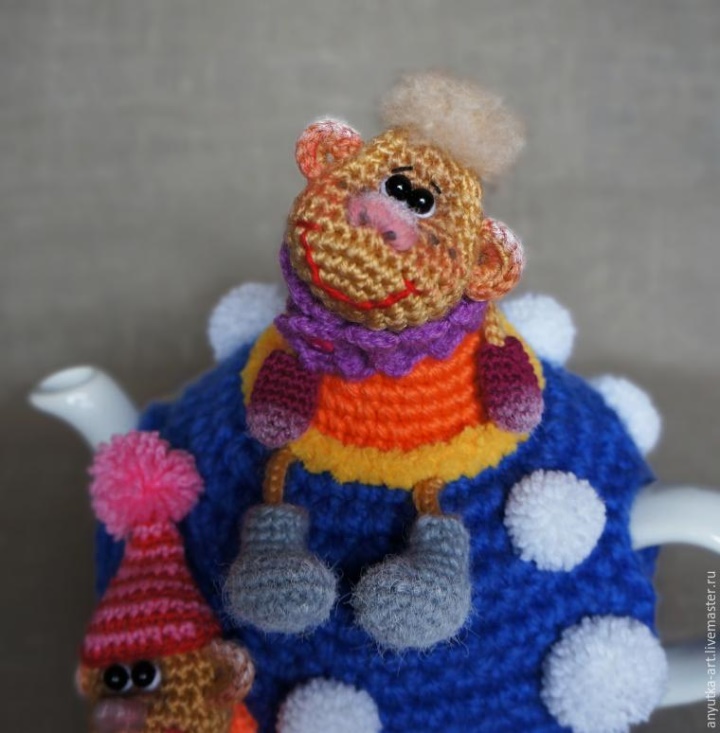
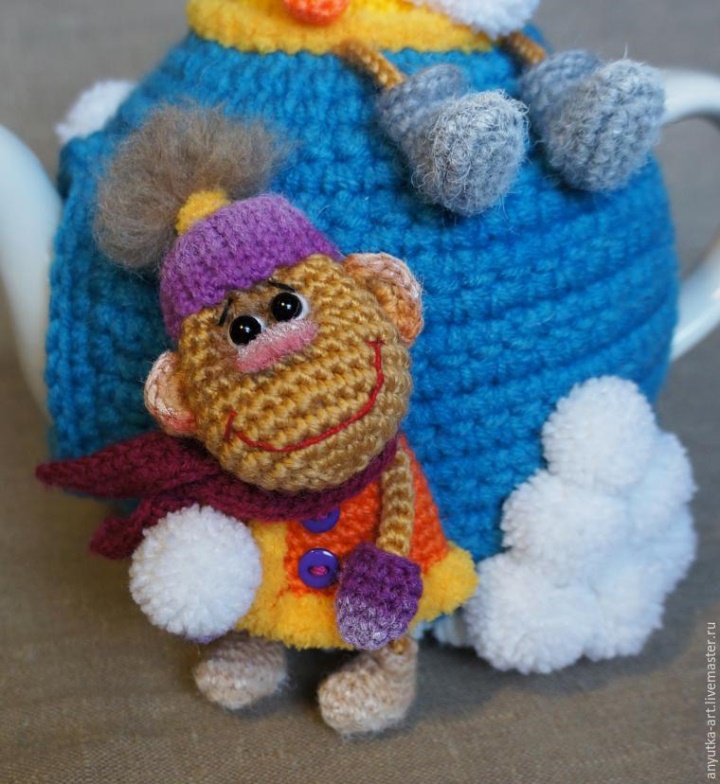
And this modest woman with a tail on the vertex, warmed with a knitted bandage.
Bandage:
1. We knit a chain of air loops along the width of the bandage.
2. We knit the stitches without the crochet, until the bandage becomes the desired length.
We knit only for the back half loop - we will get an elastic band.
3. Sew the ends of the bandage and dress on the head of the monkey.
I powdered my monkeys with a snowball. For this, on a semi-dry brush
has collected undiluted white acrylic paint. Surplus removed, poking
napkin and tinted monkeys. It became quite winter
it's already a monkey from warm countries. She also has a ponytail on the vertex. AND
the dressing is not for warmth, but for beauty.
Here the bandage is two chains of airy loops decorated with beads.
And, by the way, about the tail. Not only that on the vertex, but the fact that the pope.
The ponytail can also be knitted as knit paws and sewed on the relying
his place